By now I am sure some of you have been wondering about how I got some of the city names and building names for my layout. Allentown should be obvious. It is named for John Allen. My main town of Ellison is named for Frank Ellison. Some of the other smaller towns are named after close friends or relatives. A lot of structure names are also named for coworkers and friends. I find it a good way of naming businesses and such.
My layout name, Dry Gulch & Western, came about in a strange way. It involves a very long explanation but the namesake town on my layout is called Dry Gulch. The town’s initials are DG which is GD backwards, again a little homage to the Gorre & Daphetid of John Allen fame. Now on to the last pictures of the photo tour.
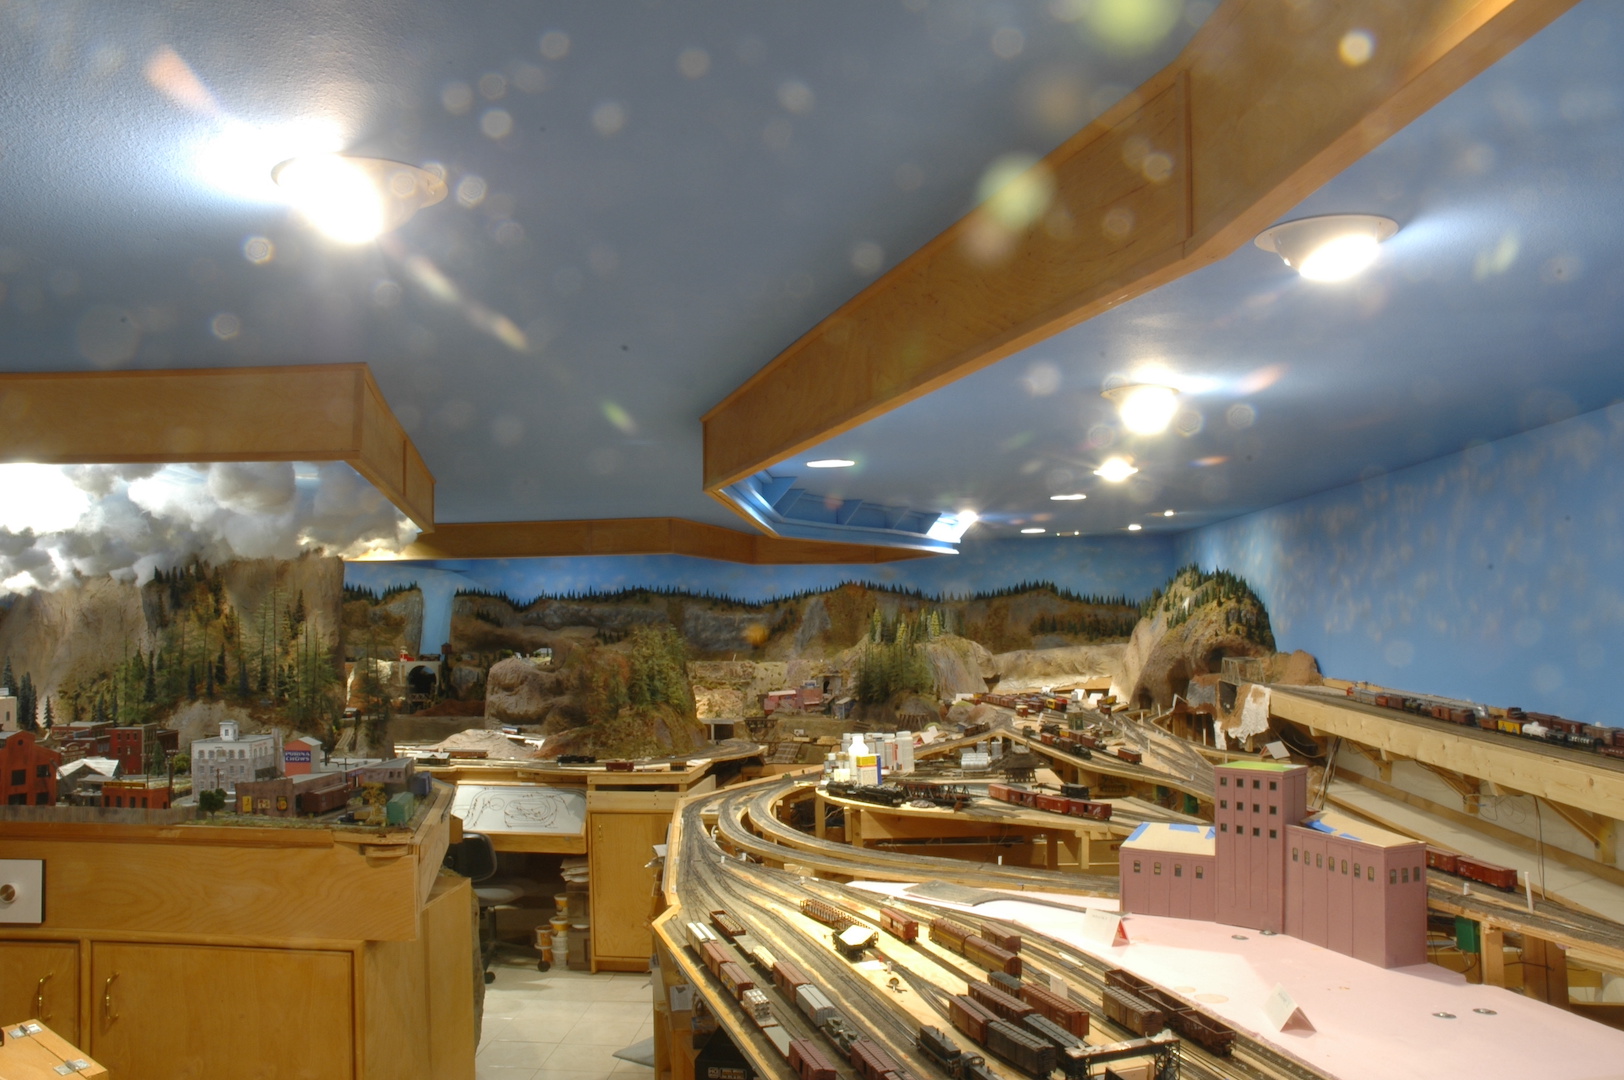
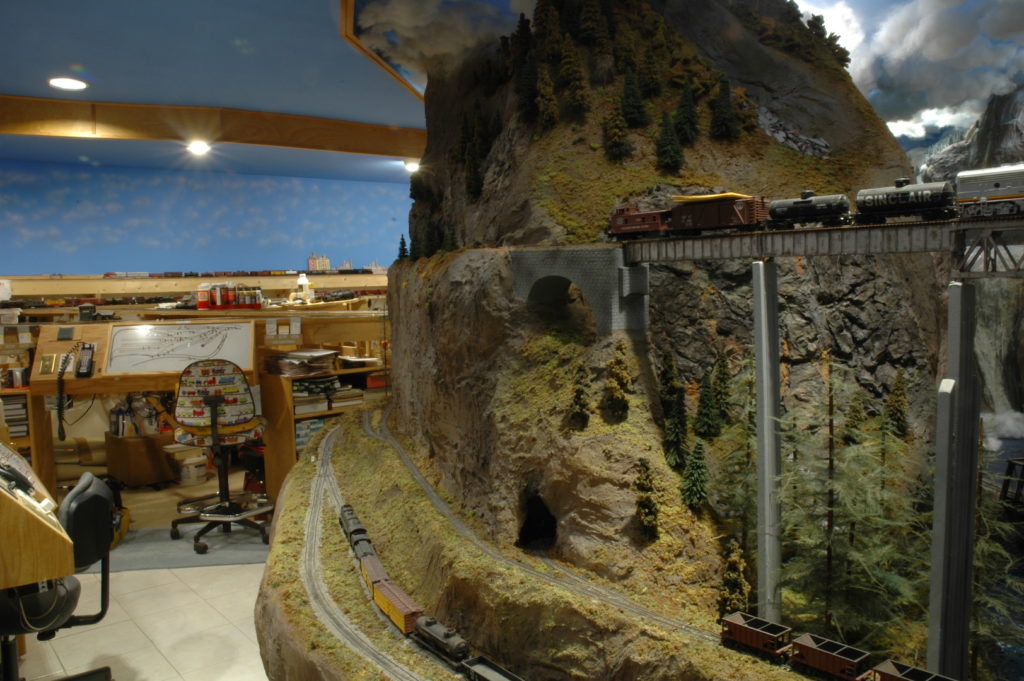
Photo 51 shows the stub end of the wye in Allentown. This photo also gives a good overall view of the layout. If you look between the two large mountains in this photo (center left) there is a valley that goes all the way to far wall. There are actually 5 different mountain areas visible when looking down that valley.
Photo 51
Photo 52 shows how other parts of the layout can be used as a backdrop in this photo. Careful cropping of photos allows this to happen. Allentown is a mix of a lot of different structures. The flour mill was carefully built to hide the wall corner yet allow for freight traffic.
Photo 52
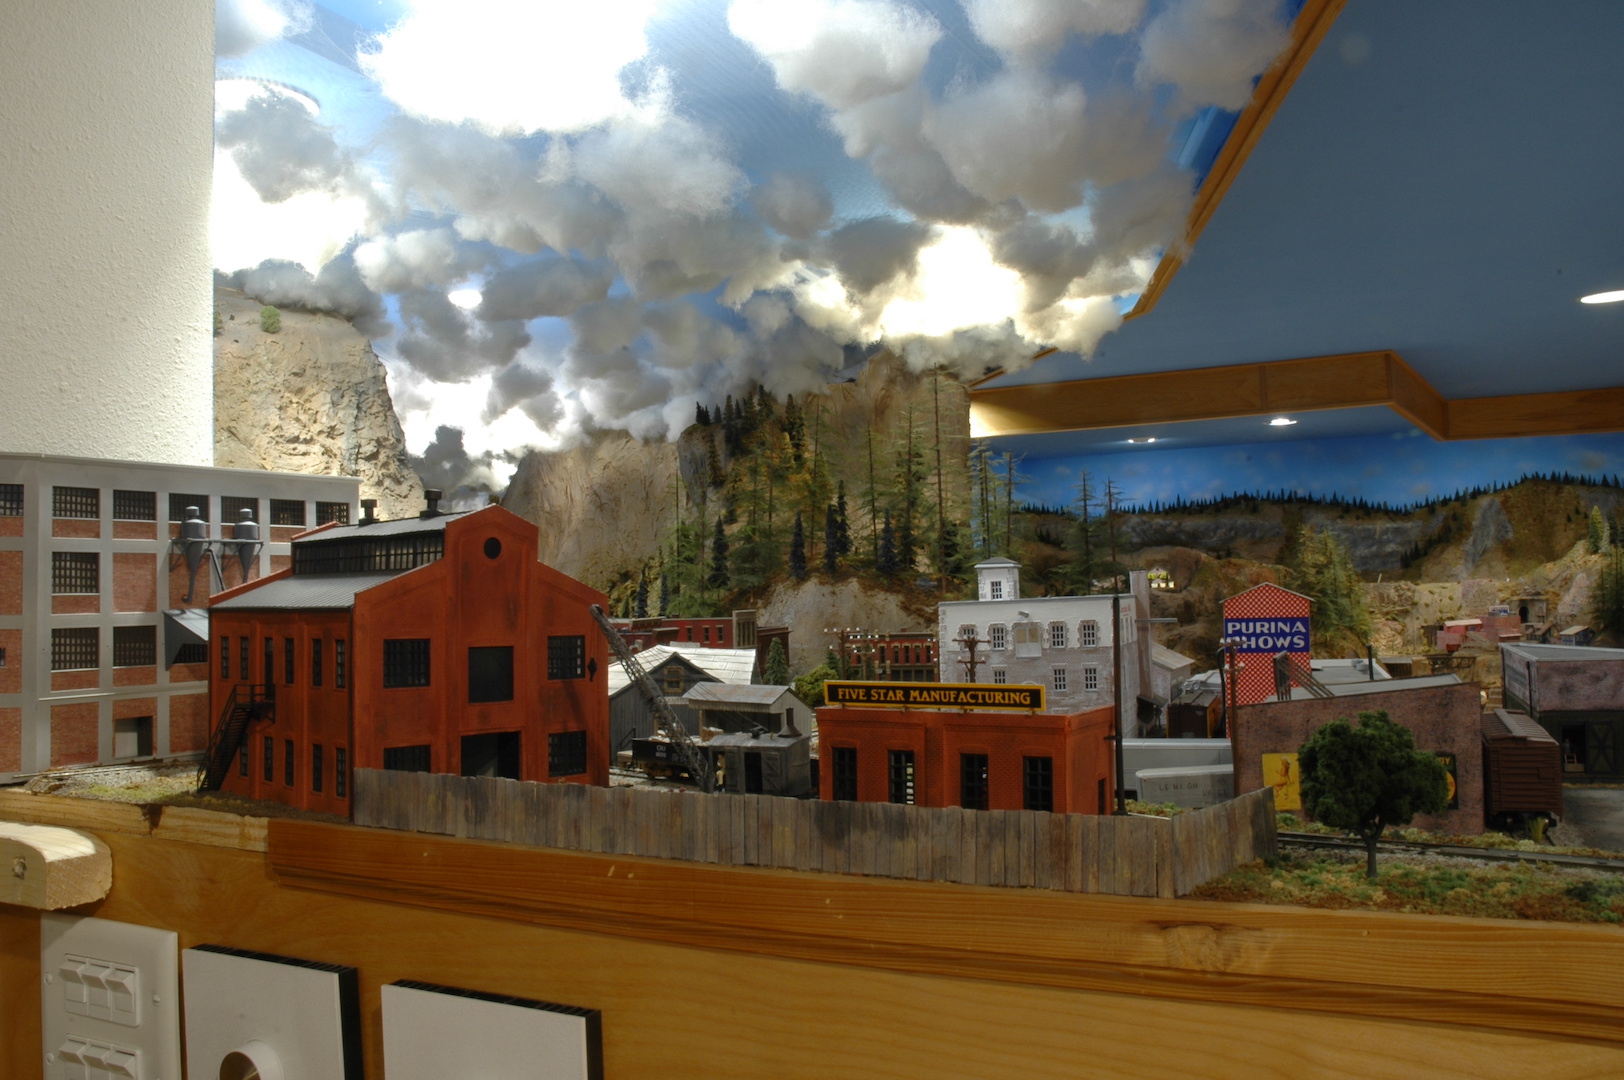
Photo 53 gives a view of the layout rooms other corner along with a close-up view of the industrial section of Allentown. The future city of Ellison will be located in that far corner.
Photo 53
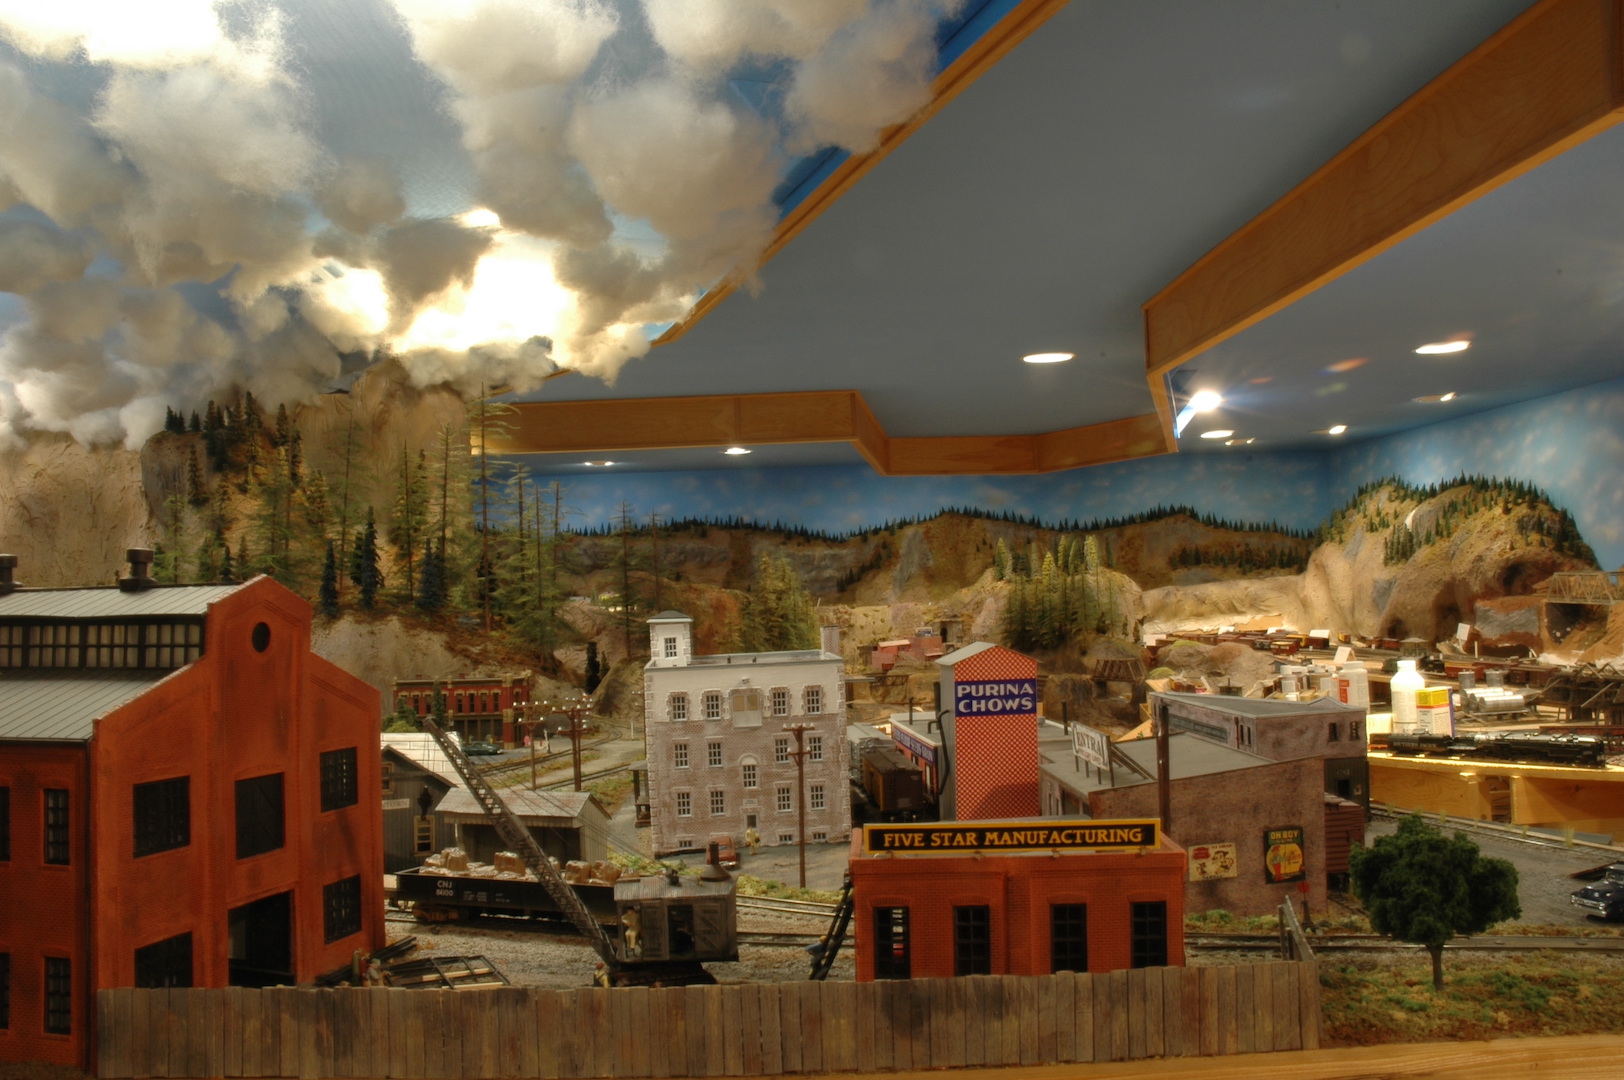
Photo 54 shows a good section of the layout while standing beside South Allentown. Allentown is to the left and Newport is to the right. Dry Gulch is directly behind Allentown and is directly above the large control panel. Gornitzka Crossing is just to the right of Dry Gulch and Ellison is tucked into the room corner. If you look really hard you can see the town of Alpine by the stone arch bridge on the far back wall.
Photo 54
Thus, ends this part of the layout tour of the Dry Gulch & Western RR. I hope everyone has enjoyed the trip around the layout. I also hope that viewing the layout in this photo series has given some impetus to work on you own model railroad project. In a few weeks’ time I’ll show you what I have been working on since these photos were taken. The Covid-19 pandemic has given me the opportunity to devote some time to quite a few model railroad projects. There has been quite a bit more work done on the layout. I have also spent a great deal of time working on various locomotive projects. The energy spent on these locomotives will increase my roster for future layout operations. I hope everyone had a good New Year and the management of the Dry Gulch & Western is looking forward to a great 2021!
A request in the Grab Iron called for restoration of an O gauge layout at the Northwest Railway Museum in Snoqualmie, obviously a golden opportunity for the Hi Rail modular group to take action. The layout had formally been in the now defunct Bellingham Railroad Museum and would be resurrected in Snoqualmie. The Hi Railer’s would take on this task.
Contact with Emily Boersma the Museum volunteer coordinator was made to schedule a visit Friday November 20th for a quick assessment of the task at hand. Removing and relocating model railroad layouts might be done in one piece, unlikely, or with a chainsaw, more than likely. Emily advised that the Museum was looking at reopening on December 14th, pandemic allowing and would like the layout up and running by then. Friday came and the visit revealed a layout in essentially one piece, comprising three tracks and needing something like a modular set up at a show. We were advised that running on one of the tracks was never reliable and needs to be fixed. Yes, we can do this no problem. Hum, yes we hope so?
The first work session was scheduled for Tuesday November 24th where the team set about sorting all the tote boxes under the layout into trains, accessories and electrics. A quick look at the locomotives revealed that the mechanisms were dry as a bone and appear to have never been lubricated. A look under the layout revealed a spider work of wiring that was literally cut out to aid transportation, no color coding and any one’s guess as to which goes where. The easiest solution is to rewire, not something we normally do on a show set up. Lubricating locomotives and stock ensued, new color coded power feeders were added to two of the tracks. Soon we were testing locomotives and track. A good percentage of the locomotives needed something more than lubrication, one, a nice Great Northern electric on test made it part way round the layout before stopping in a cloud of smoke. Not good. Well not as bad as it could be as a light bracket in the locomotive decided at that moment to fail shorting out on the frame thus frying the wire. Cut off the wire and the locomotive runs fine but is without a working headlight.
In discussion with Richard Anderson, the museum director, he wished that by the 14th we have all three tracks in full reliable operation, all accessories working. As he said, he would like to see light and action. There is no evidence of previous automatic operation of signals nor barrier crossings and it would appear such operation would be desirable in the future. It was decided that this feature would be put on the back burner and handled in the New Year after everything else is fixed and operational.
December 1st was the next work session. Having gone through all the locomotives, lubricated all, repaired some and others put away for a more extensive overhaul. We moved on to the accessories to check them out, each showing evidence of extensive use. The lower inside track had been glued in place but about a six foot stretch had come adrift. The loose track was screwed down. The track was cleaned as best we could considering there are two tunnels on the line where the track is inaccessible within. Our first attempt to run a train on this track had the locomotive enter the tunnel at full gallop and derail out of sight and out of reach. Consistent running was finally accomplished by all locomotives on all tracks except for Thomas the tank. The wheel bearings on his passenger cars were so worn, through lack of lubrication, that the wheel flanges were scraping on the underside of the car floor. The drag of these cars causing Thomas to derail on the corners. The Museum did not consider they wished to buy new cars as would be reasonable. We offered to take these cars away to see if we could accomplish a repair as they are less than useless otherwise.
December 4th revealed the Thomas passenger cars with new brass bearings replacing those original Lionel plastic ones. Thomas now runs fine. GREAT!!!! The rest of the day was devoted to powering the lights, accessories and compiling a list of spare parts required.
December 8th and in what we thought would be the final day of work before the 14th taking our stock of new light bulbs and parts for repair of ailing accessories. Work was progressing in fine order even to a bit of beauty treatment to the scenery when Richard dropped by with the disheartening news of an extension of the lock down to January 4th and that the museum would remain closed through then. Not a huge surprise but obviously a hit to the museum with lost revenue during the holiday season. A quick assessment of our ‘plan’ showed that a revision was needed, we cannot justify delaying automation of the accessories until January and in reality that should be accomplished prior to Christmas. The rest of the work session was devoted to testing the signals as well as the barrier crossings for operation. As with most other parts of this layout few worked as is and by the end of the day by a means of cannibalization the three required functional barrier crossings were made out of seven nonfunctional ones. Neither of the signals were functional and both needed new components to make functional. It is doubtful that we can source parts locally considering these signals are at least 50 years old. Where is the Boeing swap meet when you need it?
December 11th, the final day and big push to put this program to bed with four members working on the layout; two servicing reluctant accessories; one under the layout wiring for the barrier crossings; one doing the final scenery touch ups and all tidying up around the layout. One of our members raided his home layout for a couple of color light signals set for automatic block operation that he donated to the project. These were added to the layout in the final minutes of the session. We have now been made official museum volunteers and need to sign in and sign out. A little training session will be required for other museum volunteers in how to operate the layout; put it to bed at the end of the day and awaken it in the mornings.
Overall it was nice meeting and working with Emily and Richard; good to work on a layout again and not quite like a set up at a train show. It was a learning experience especially in automation that we might add to our modular layouts. On the negative side if there was one, the floor of the building was darned cold and hard.
We are almost at the end of my photo layout tour. For those of you that haven’t been following along with this series, the Dry Gulch & Western is a mountain railroad that follows some of John Allen’s famous Gorre & Daphetid layout. My layout is not an exact copy, nor did I want it to be an exact copy. It is more of an “adjusted” track plan. My layout follows the basic idea of John Allen’s by using a double loop with each loop folded over each other. That allows for a really long mainline with a minimal use of space. Most of the same scenery areas are used twice by having the mainline pass through it at different elevations or in tunnels. Doing this allows trains to travel more distance between towns. In the grand scheme of things, the mainline goes around the room a total of four times. I have kept a lot of the key elements that were on John’s layout but have modified them to give them my personal touch.
I still have a lot of scenery to complete and many other details to add. Since I am the only person working on the layout, I try to work on it each day, even if I just have 5-10 minutes available. I also try to work on several different projects at the same time. This helps those projects get done faster. While some paint is drying on one thing, or some glue is setting on another I can switch over to still another project to move it along to completion. I always have 3-4 ongoing projects in various stages of completion. Once a building or other item is completed, I immediately begin another project. If there are small gaps of time available, I can easily grab a freight car and weather it in about 5 minutes.
One thing I have found is that basic scenery on a layout can move very quickly over a large area but towns and cities with their various buildings take way more time to complete. When I get to a town on the layout, I start building the key structure(s) of the town. This can be done even way before the scenery ever reaches the town. I have done this with almost all my cities and towns on the layout. Let’s move on with the tour.
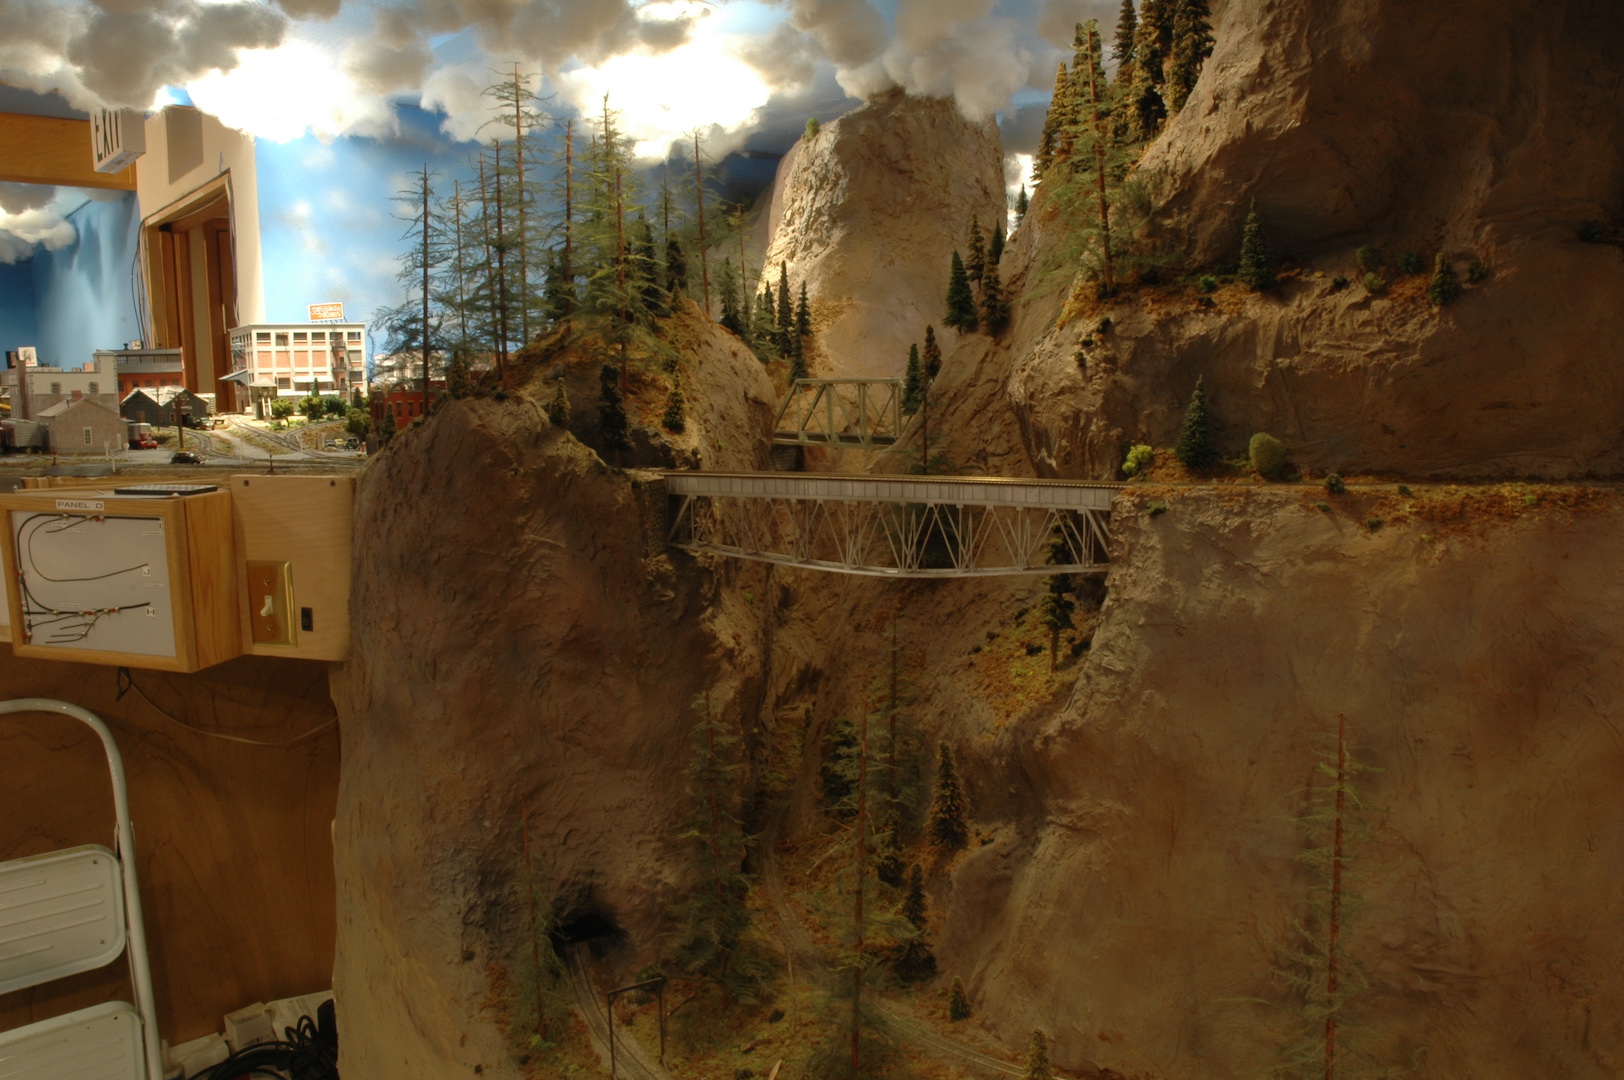
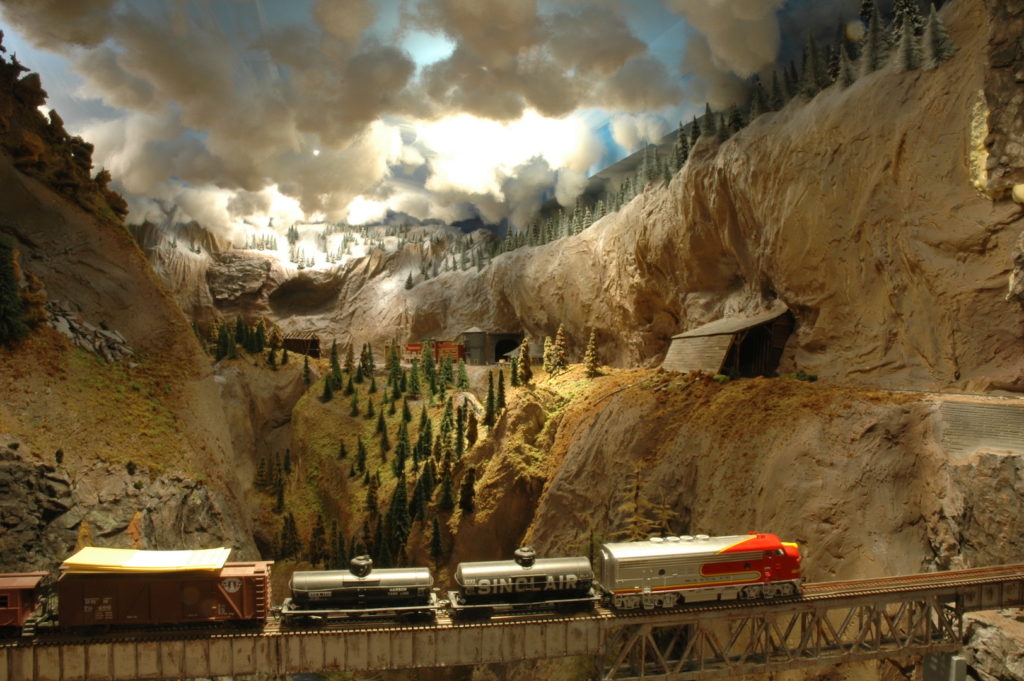
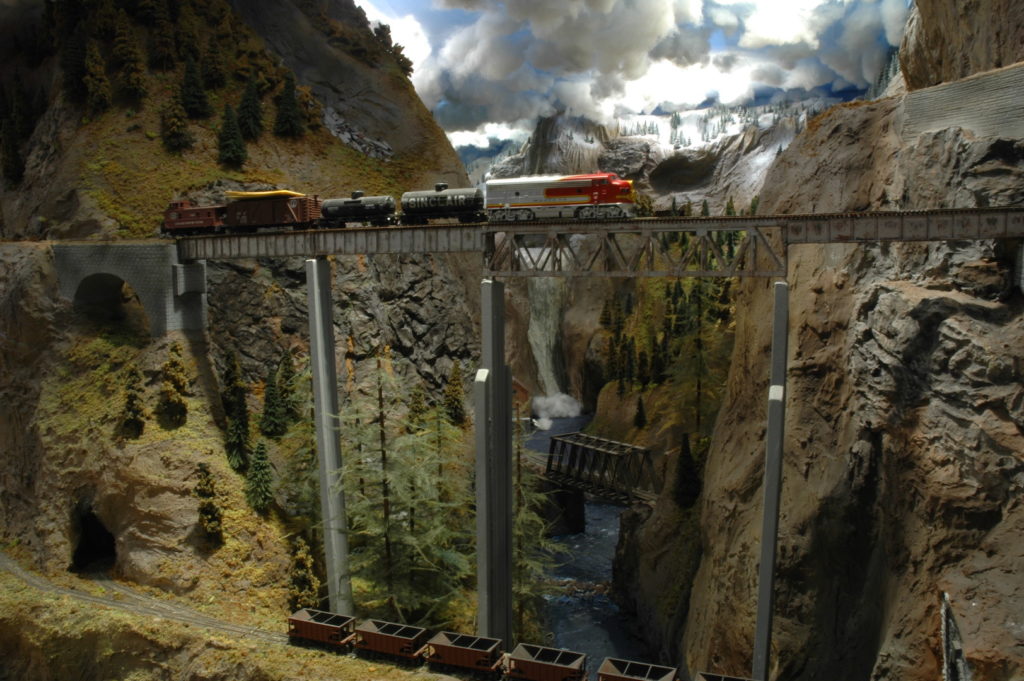
Photo 46 shows one of the key features of the layout. In this photo you see two different bridges spanning a steep canyon. At the base of this canyon is a narrow-gauge line and to the left is a standard gauge mainline. This photo shows my curved bottom chord bridge spanning that deep valley, it carries the mainline into Allentown. Trains that travel on this bridge can go directly into Allentown and then on to Tallyn Pass or can glide across the layout room entryway into South Allentown. The other bridge also carries the same mainline but can be used as a bypass to go directly to Tallyn Pass. This photo shows how one scene is used twice by the same mainline trackage.
Photo 46
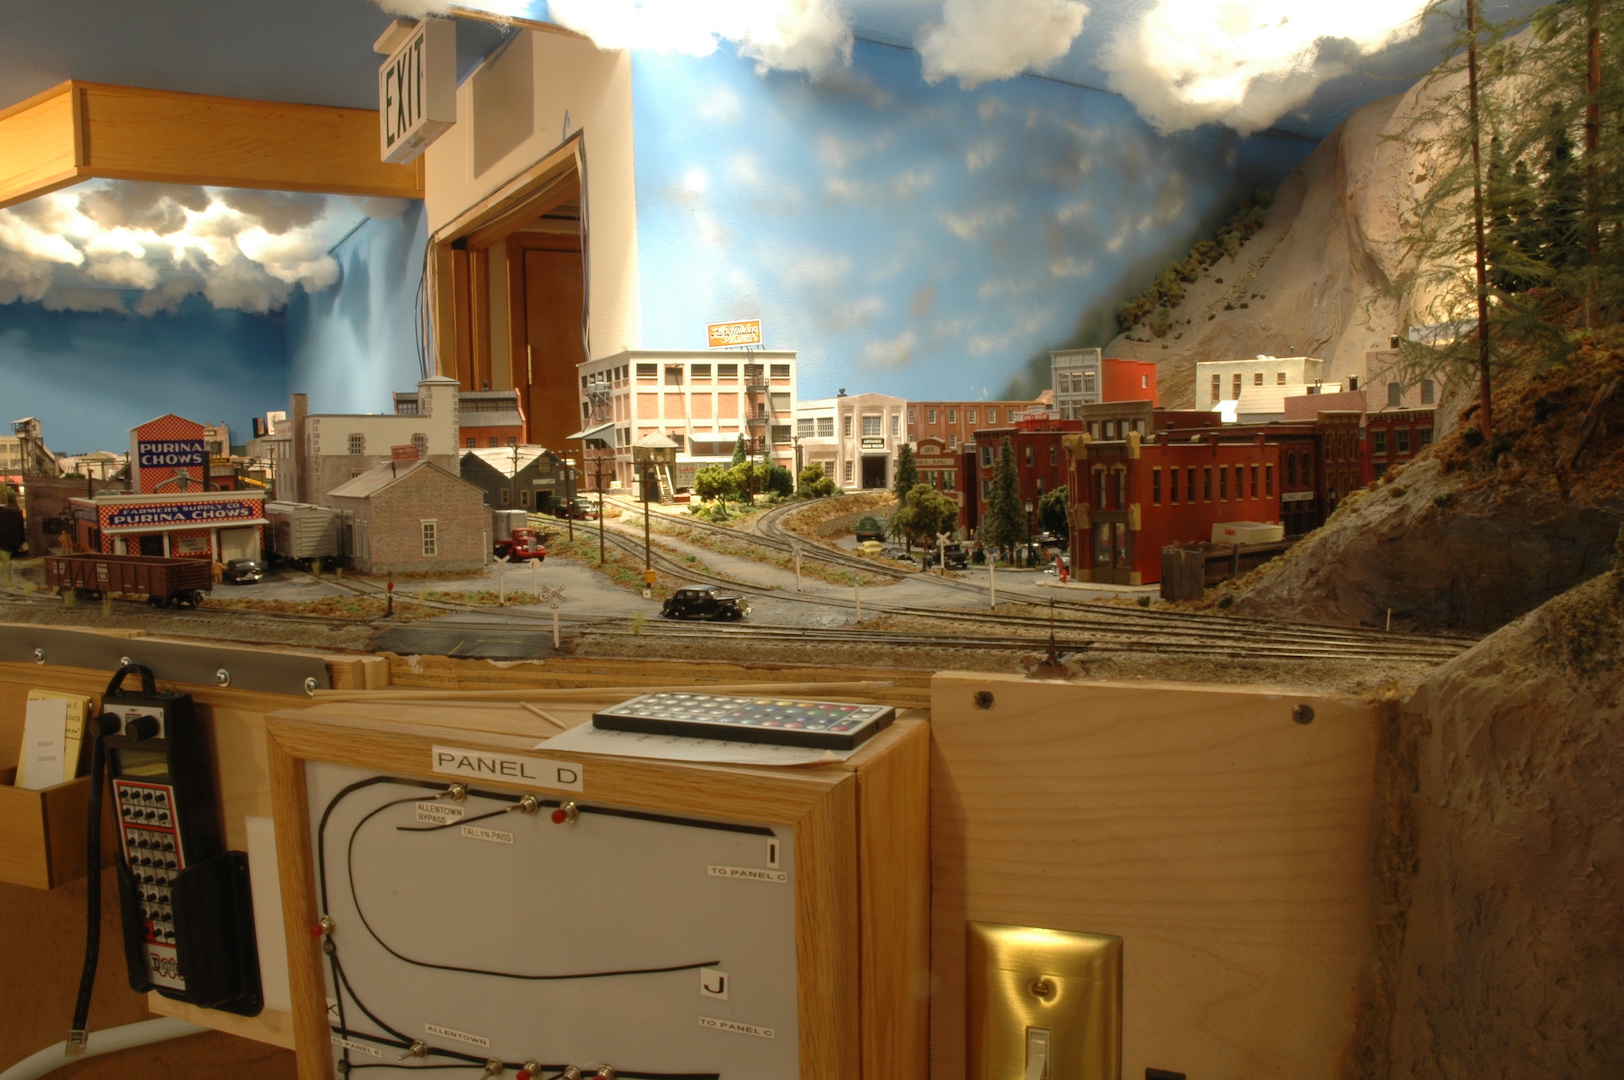
Photo 47 pans further to the left to allow you to view the aisle, Allentown, and even part of South Allentown. Please note the hill to the right with the tall timber trees covering it. That hill acts as a critical view block and divider between wilderness and the city. Also, in this photo on the extreme left you get a view of Newport yard.
Photo 47
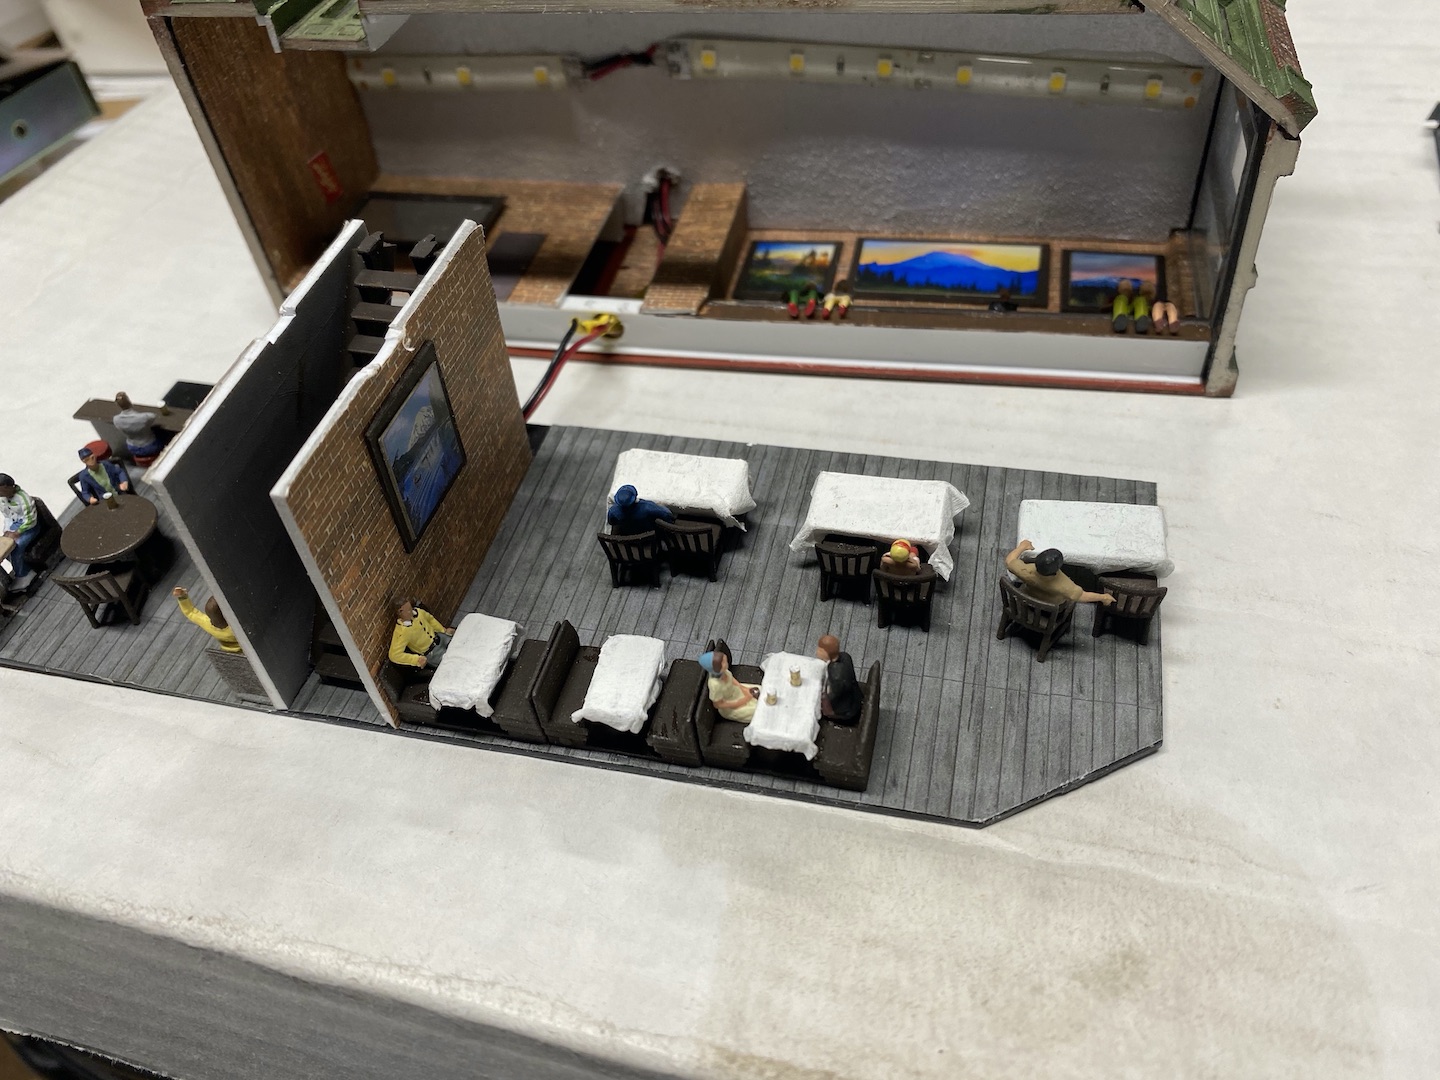
Photo 48 is a closer view of Allentown. Buildings are a mixture of kits, scratch-built, and kit-bashed structures. All of them have interiors and lighting. This was the first town I completed on the layout and is set on a slight slope. Elevation from the front to the back rises about 1-1.5 inches. Yes, the sidings are not level, yet the cars placed on them do not roll away! What type of sorcery happens on this portion of the layout??? Any guesses? This area also features a wye to allow locomotives to be turned if needed.
Photo 48
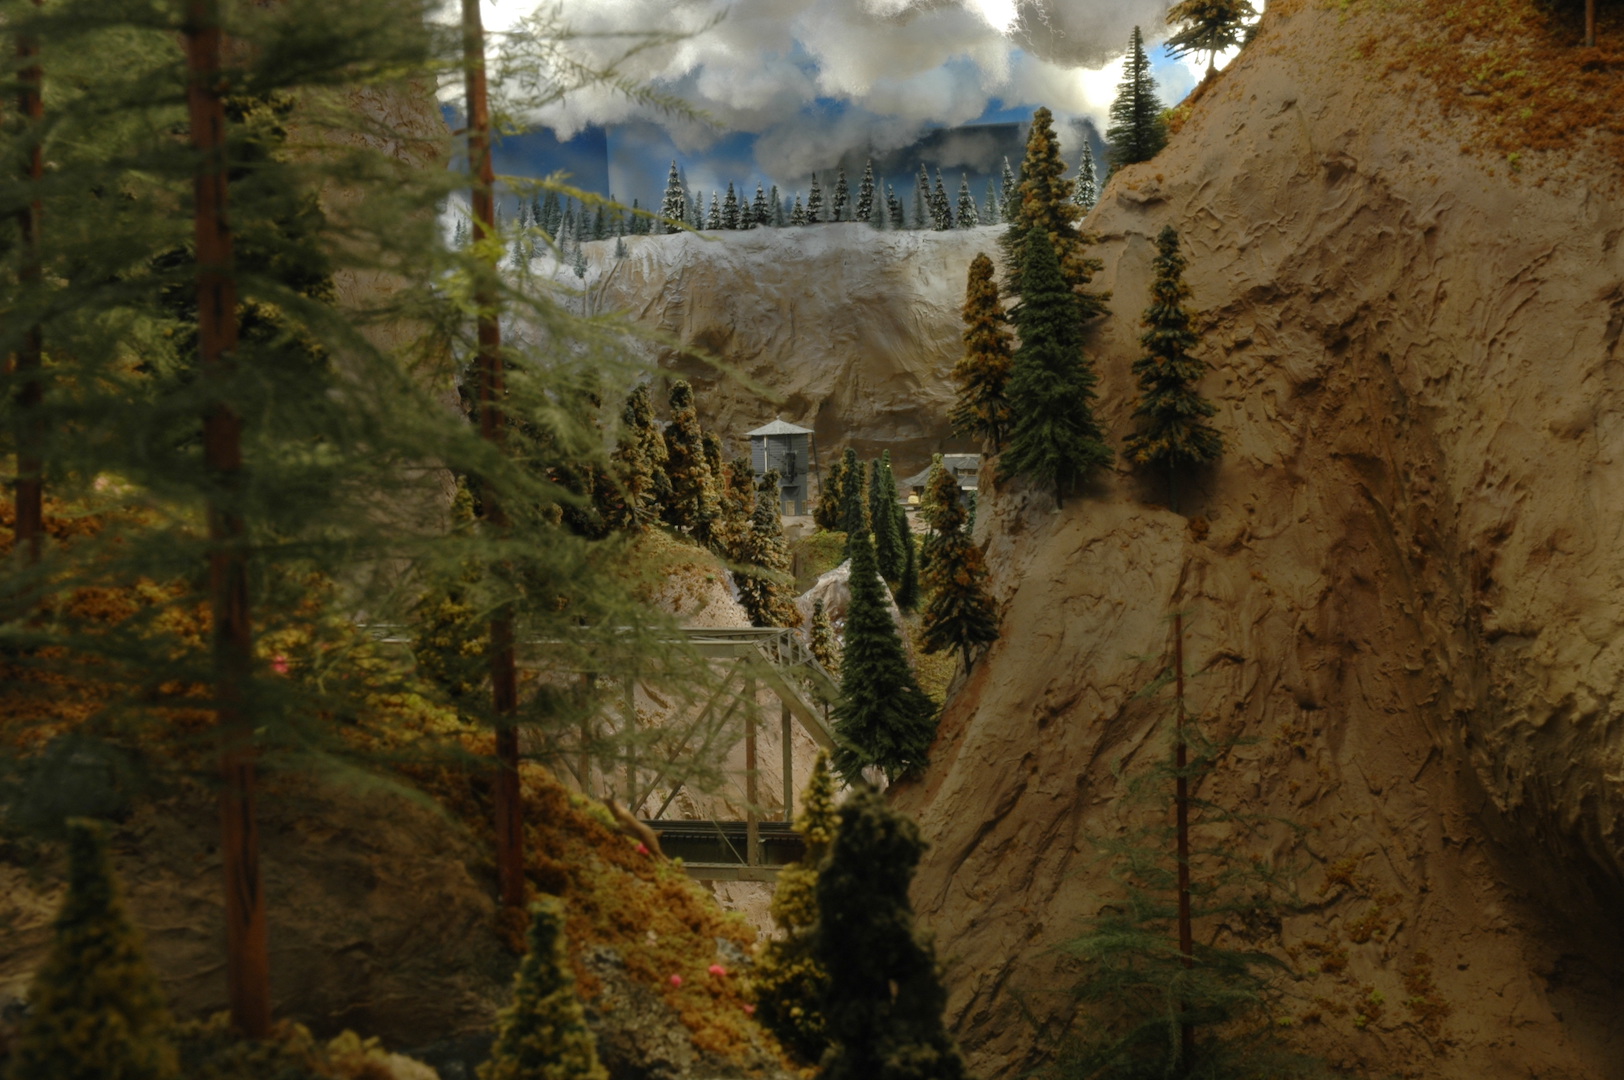
Photo 49 gives you a view looking through the trees down that canyon from photo 46. In this view you would be just about standing on that curved bottom chord bridge. Again, through those trees and in the distance, you can see the water tower at Tallyn Pass. The station is just to the right of the water tower. Tallyn Pass is about 8 actual feet away in this picture and a very long tunnel gets you there from Allentown.
Photo 49
Photo 50 gives a nice view of downtown Allentown. This town does not have a passenger station, only a freight house. It does have a small passenger shed located by the freight house. The giant mountain directly behind the buildings acts as a view block. See how that other small hill with those tall timber trees acts as a view block to the other portion of the layout. Allentown has a lot of operational action in a very small amount of space. The wye has businesses located on it and there are 3 sidings with additional businesses. This and South Allentown are the driving force to get trains over the mountains from Newport and Ellison.
Photo 50
That is it for this installment. Next time we will look a little closer at Allentown. I hope everyone has a merry Christmas and a happy New Year.
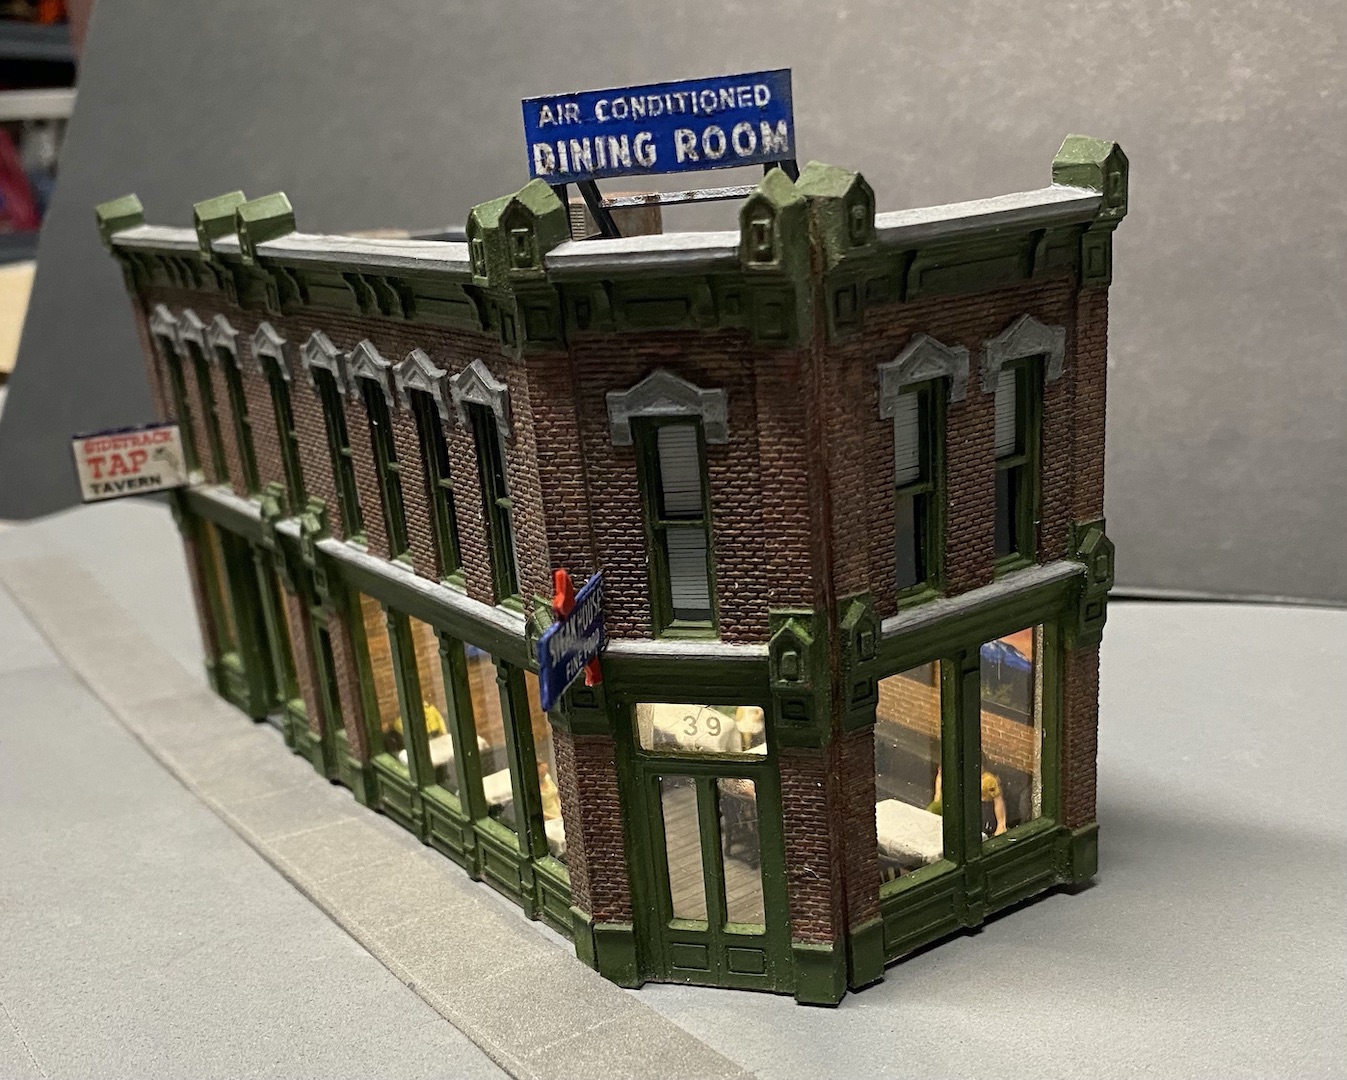
With extra time on my hands due to COVID, I decided to build a classic DPM building while adding my own personal touches. I purchased this kit from an estate collection. After I began the assembly process, I noticed the back wall was missing. I substituted a piece of Walters brick sheet. Once I removed all the flashing and sanded the edges (without brick detail) to square them.
I spray painted the interior of the walls a flat black. Once that dried, I painted the exterior of the walls with a red primer. After drying for couple of days, I used a sponge to add a variety of acrylic brick shades; burnt umber, burnt sienna, brick red, and yellow ochre, in various “spots” over the brick walls. This provides a variety of colors in the walls like real brick! Once this has dried, I applied a grout mixture. This consists of joint compound, some dark gray acrylic paint, and a little water. I used an old flat 1/2” wide paintbrush to apply the grout mixture, then wiped it off with a paper towel. This leaves the mortar in the mortar joints of the brick walls. Since there was still a film on the brick faces I used a damp paper towel to wipe off the walls a second time. Using a fine paint brush and a chosen accent color, I painted the trim, doors, and windows. I use a medium gray and/or a concrete color for the concrete sills and lintels. Once all has dried, I laid the walls flat and coated them with alcohol and India ink. This leaves the walls a bit darker and somewhat weathered looking.
My next step is to install window treatments. You can use commercially available products, paper as shades, or simply paint curtains from the back side. Don’t forget to add addresses with dry transfer lettering.
Now it’s time to begin assembly! I used a solvent cement and an assembly jig. If you’re going to install a floor, roof, and/or base, measure and add bracing before assembly. Once assembled you can measure and cut the roof and floors from styrene or mat board.
If I’m adding an interior, I will install brick sheet, wallpaper sheet, or something similar to the inside walls. I place wall dividers by attaching them to the floor. Speaking of floors, I’ll use paint or a printed paper floor. I use photo copies of paintings as wall decorations. I have scratch built tables, desks, beds, etc. I have also discovered “Shapeways” they produce a variety of 3D printed scale items. I used booths, tables, chairs, and bar stools for this build. The exterior signage is from Barmills. I use 12 volt strip LED’s for lighting the interiors.
Finishing touches include; weathering with Pastel chalks, roof details (vents, air conditioning, chimneys, signs, and access hatches). I encourage you to take some extra time and a little extra work and you can turn an inexpensive kit into an eye catcher!
Thanks for reading! Greg Price Matheson & Western RR
I know every model railroader that has constructed a layout has had issues with their layout. Mine is no exception. Some history of my layout, this time I will explain some of the pitfalls that I have experienced while constructing my layout. As some of you know, my layout was originally designed to be an analog DC system. Yes, I created a huge number of control blocks on the layout. Then, along came DCC during the early construction phase and its operating possibilities intrigued me. I continued with my DC construction but sort of waited to see which DCC system would suit my railroad. At the time there were two main systems available Lenz and Digitrax. They both had their good points and bad points. After a year or so of sitting on the fence I decided on Digitrax since it was based in the USA and had a very good service department.
I purchased a Digitrax system and began to install it. Unfortunately, all the turnouts that I had already mounted on the layout were not DCC compatible. For the next 6 months I painstakingly made all the turnouts DCC compatible while they were in place on the layout. Oh well, live and learn! In my unbridled haste with layout construction (a lot of folks do this) I was very sloppy with my wiring especially in my main control panels. I learned the hard way. Over the next 4-5 months I re-wired all the control panels and got rid of the “rats nest” of wire. Not a fun job, I should have done it right the first time! Oh well, live and learn, again!!
The next problem that I encountered was with my Tortoise switch machines. Several of them developed an internal short. These shorts would send my DCC system into a fit. Digitrax likes to beep at you when something is wrong, and it really beeped at me! After several days of trying to determine where the short was coming from I finally located the bad switch machine. It took a while since I have around 100 switch machines on my layout. I was able to find some flaking on the internal PC board which I fixed and put the machine back into service. Well, a few weeks later I had another short. Yes, I found another bad machine. After the 5th switch machine short I decided to resolve the problem and I made an external switch for all the Tortoise machines. They do not look pretty but they have completely solved the problem. Of course, I spent another several months modifying all of my switch machines. They were modified in place on the layout. Yes, you guessed it, live and learn!
The next major issue I had was actually caused by me. We replaced our living room carpet and kitchen ceramic tile. I saved the carpet and salvaged the tile. I decided to put the tile and carpet in the train room. Well, that was an experience. The problem I encountered was that I had to jack up the layout in sections to get the tile or carpet underneath the layout supports. Yes, you could hear creaking and popping as it was lifted upward. Amazing how much damage can be done when lifting a layout an inch or two one section at a time. Yes, several months had to be devoted to grade re-alignment and track repair. At the time I didn’t have very much scenery in place so that was fortunate. I guess the good thing is I now know what will happen to my track work if an earthquake hits this area.
The last problem really wasn’t a problem but more of a convenience factor for layout operators. I delved into this in my last posting on the Grab Iron. I wanted operators to have an easier time during operating sessions, so I migrated both of my main yards closer to the front of the layout. I rerouted my branch line trackage to make the run more visible to the operator and also increase the runs workload. I created some more sidings on the layout to give operators more things to do. The shipping basin trackage at Newport was enlarged to allow for freight car storage by the car ferry. This construction process was done over a year long period, but I think it has created a much better layout.
So, I consider a layout a work in progress even if some of the track or scenery is already in place. There is nothing wrong with making changes that will enhance the appearance or increase the operational capabilities of the layout. Now on with more of the tour.
Photo 41 gives a better view of the small town called Tallyn Pass. It is high in the snow-covered mountain country. Note the two snow sheds. One is a level fall snow shed to the left of the town while the other is a glance snow shed protecting the mainline to the right.
Photo 41
Photo 42 shows you how deep the valley is and how high my bridges can get. The waterfall in the center of the photo is about 8-9 feet away from the camera. To have access to this area there is a large access hatch and the river can be used as a walkway.
Photo 42
Photo 43 shows the view as the camera is turned towards the aisle. This view shows my large mountain that hides two large support posts. I use this mountain as a strategic view block for the turnback curves on the mainline and a way of hiding the town of Allentown from this wilderness scene.
Photo 43
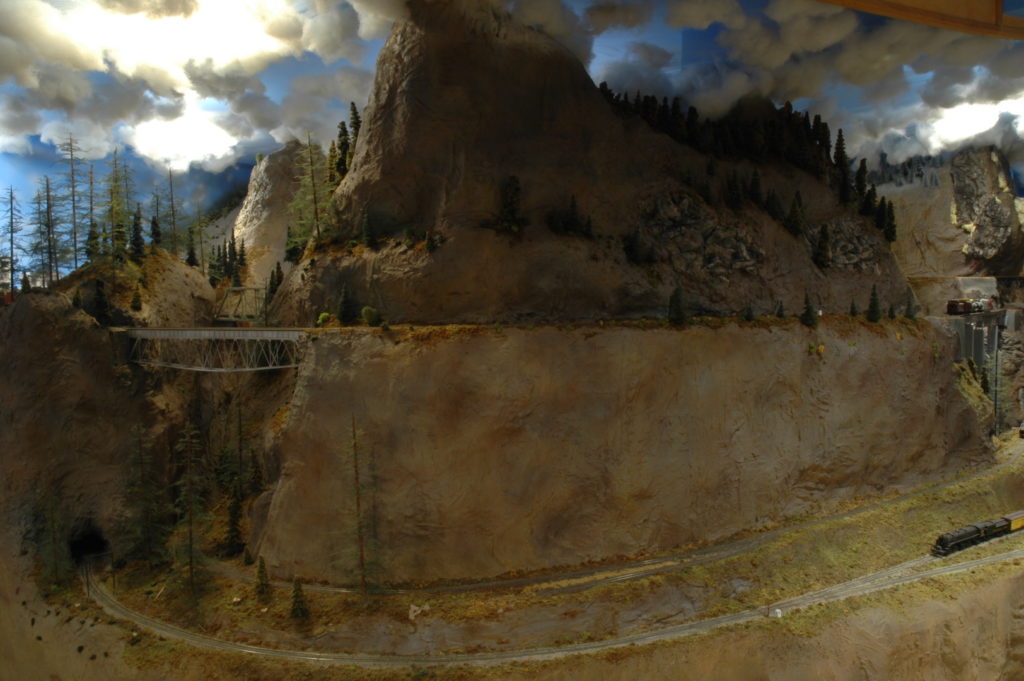
Photo 44 gives you an overall view of the mountain. The C&O 2-6-6-2 parked at the base of the mountain on the extreme right gives you an idea of the size. Yes, I can easily stand up inside of this mountain. Almost all of the track can be maintained from the aisle or from inside of the mountain. There is one carefully placed access located by the green bridge just behind the silver curved bottom chord bridge. Yes, the silver bridge was modeled after one that was on John Allen’s Gorre & Daphetid RR. The green bridge behind it is from a Central Valley kit. The kit is a 4-panel bridge but this bridge on the layout is a 3-panel. Yes, it was difficult to make this bridge from that kit. The other feature of that green bridge is that it is “free floating”. It must be since it is the only link between two sections of the layout framework. It allows for expansion and contraction of those two sections.
Photo 44
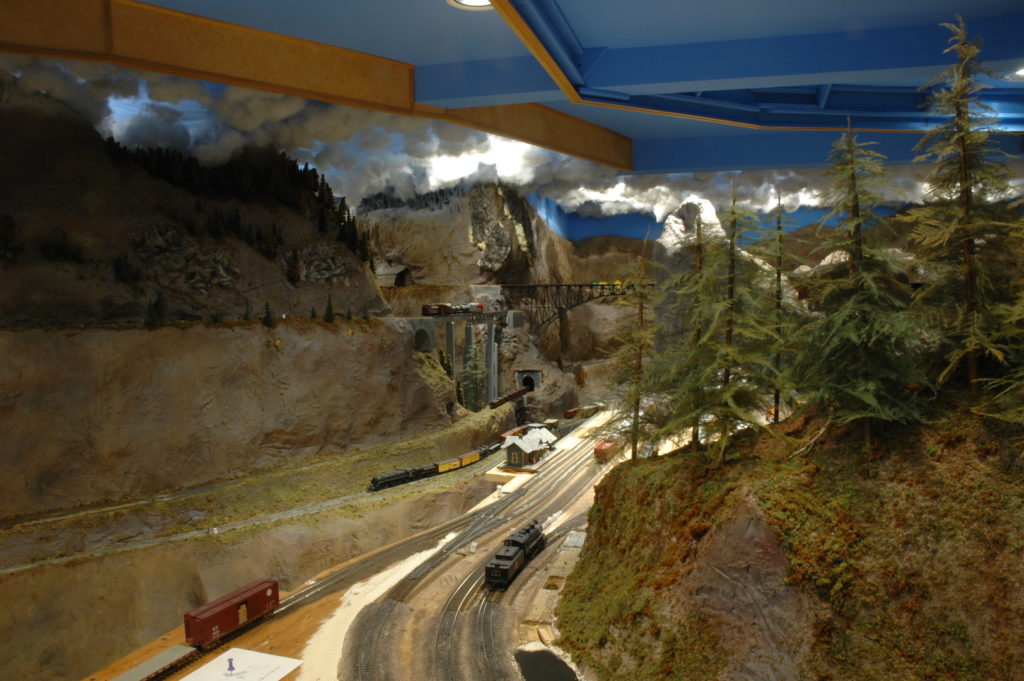
Photo 45 gives a view of the layout and mountain while standing in front of Gornitzka Crossing on the opposite side of the main aisle. Dry Gulch station is almost in the middle of this photo. Notice how the aisle that leads down my main valley to all the large bridges in this picture has disappeared. This allows for some great scenery shots with lots of depth. This photo also gives you an idea of just how long my mainline is and how much elevation my trains need to climb. For a train to traverse the entire mainline it takes about 45 minutes to an hour at freight speed.
Photo 45
That is it for this installment, next time we will travel even closer to Allentown. I hope everyone in the 4D and beyond had a safe and blessed Thanksgiving.