
BRIDGE-BUILDING BASS-ACKWARDS

Article and Photos by Rich Thom

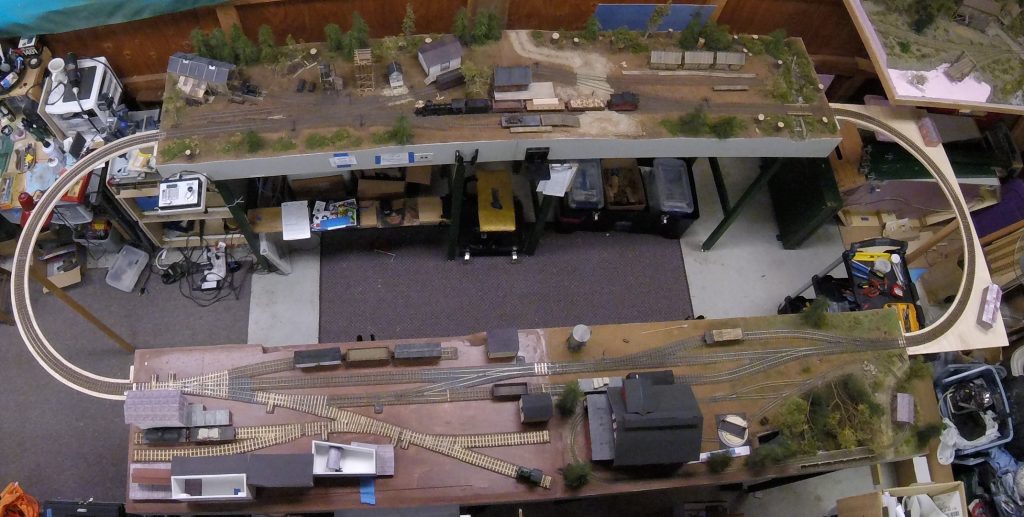
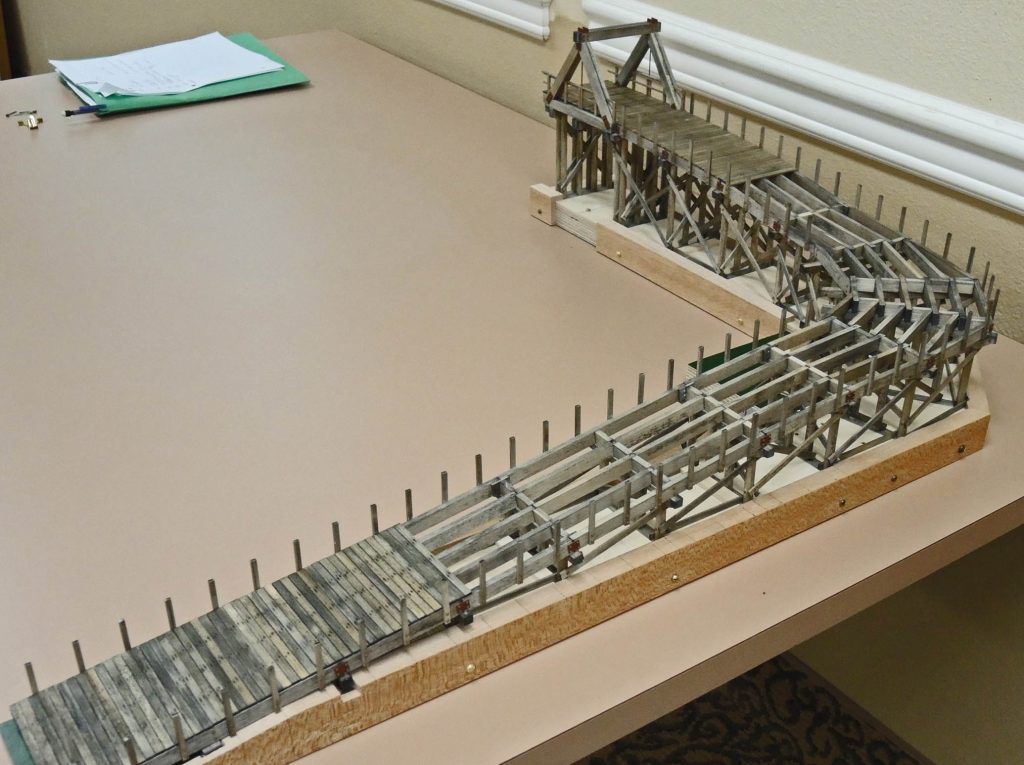
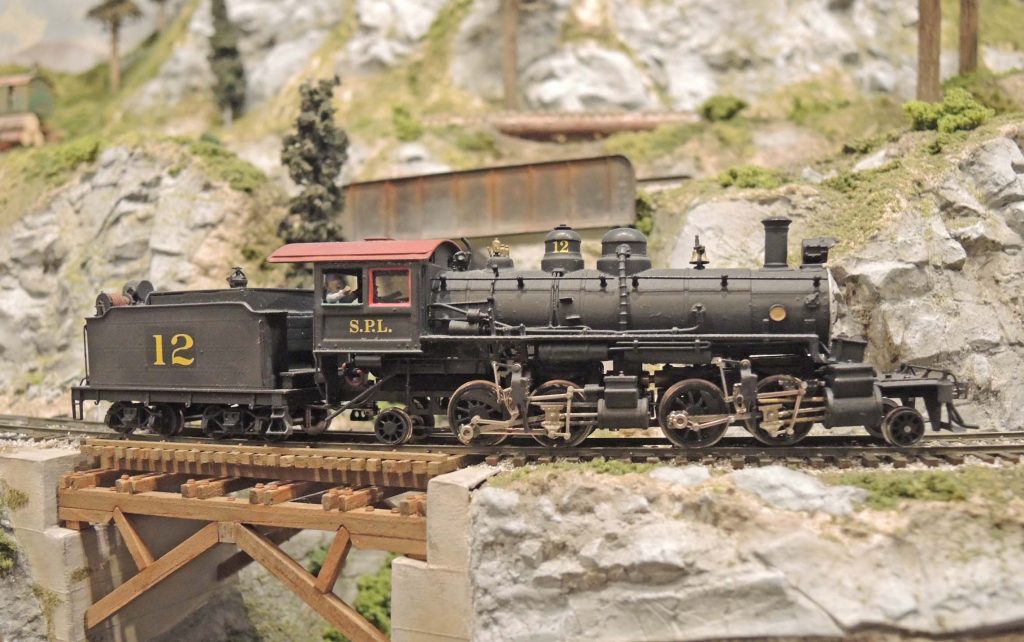
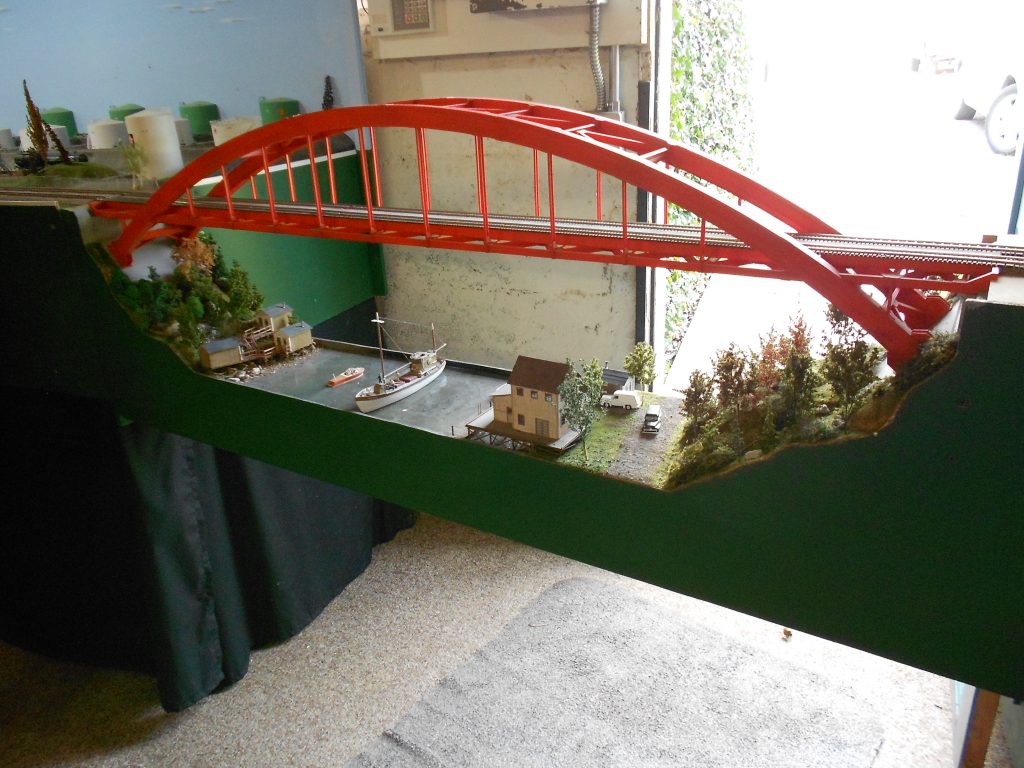
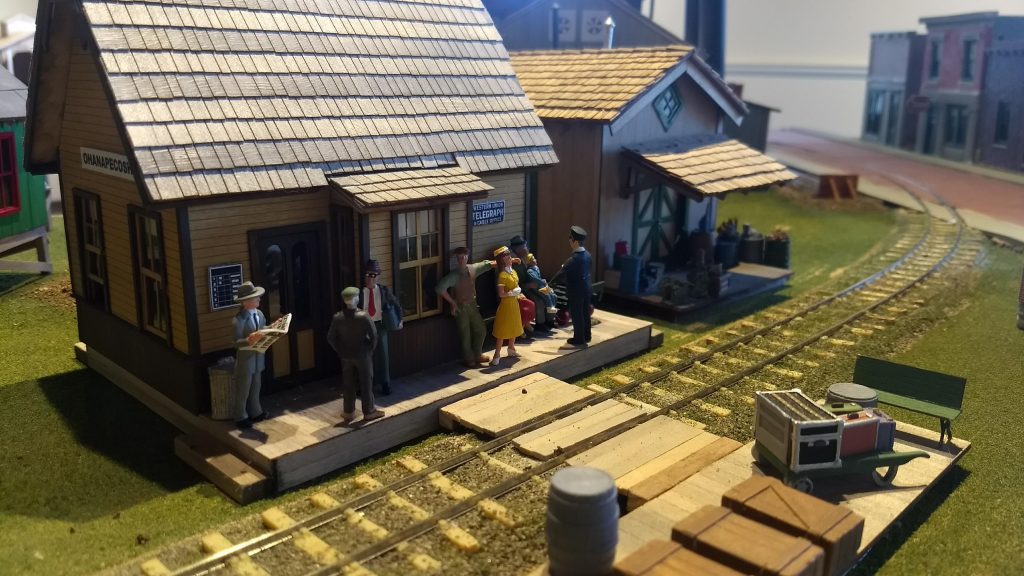
Readers who have crewed on my HO-scale Coldwater Creek & Cascade RR during the past eight years have been greeted when entering the layout room by the scene in Figure 1—a granite defile spanned not by proper bridges but two pieces of ½” plywood subroadbed.  When I started my layout in 2008 (having been away from the hobby since 1962) I sought the advice of local experts about the construction sequence for a layout designed for operations, which was entirely new to me.  All advised laying track and beginning op sessions as soon as possible, leaving scenery and time-intensive structures such as bridges until later, so that the operation scheme and track plan were debugged first.  It was good advice, but I didn’t quite follow it.  Unhappy with my bare plywood empire I charged ahead and completed the scenery next, leaving the plywood spans in place where bridges would be, well, “someday.”  That left the conundrum shown in Fig 1: scenery 90-percent finished—but no bridges.  I had two choices here.  I could cut away the temporary spans, removing the track, cork roadbed and subroadbed entirely, then build the bridges the usual way, from the ground up.  However, I had seen an article in Railroad Model Craftsman (“Building Trestle at North Crags” by John Olson, Dec 1978) in which the author described cutting the subroadbed away, but keeping the rails in place, then building the bridge and abutments underneath them.  More or less bass-ackwards!  The advantage, especially for a bridge or trestle on a curve, is the preservation of smooth curvature as well as precise level across the span.  That seemed appealing so I have built most of my bridges in this manner.

Fig 1 – Project Start

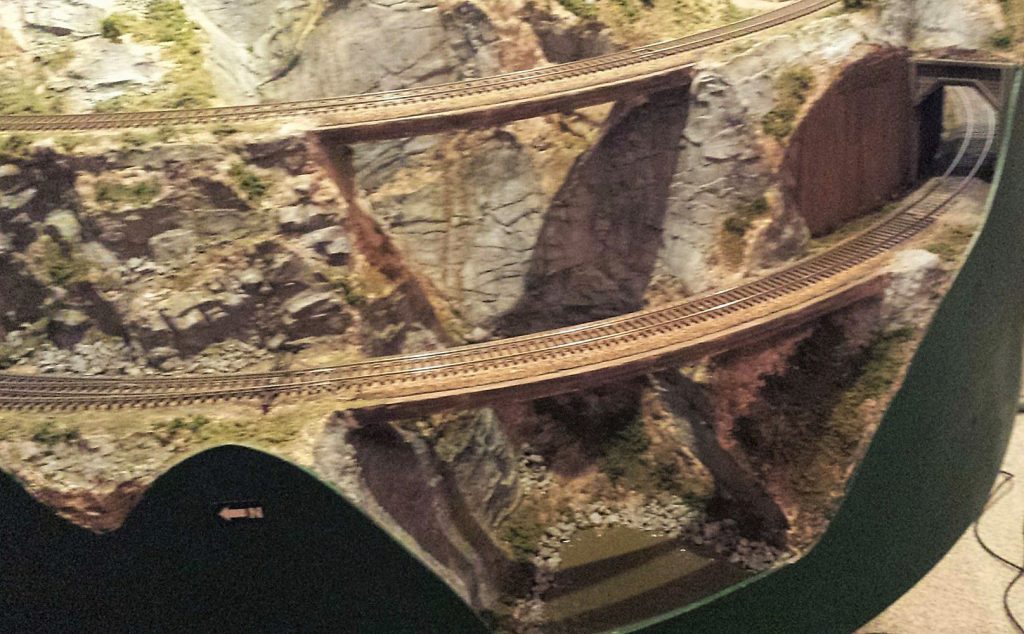
I’ll use the example of my Silver Falls Bridge, the upper span in Fig 1, to describe the construction sequence.  The 1:87 pile driver crew came out to the site to have a look at the sheer granite walls on each side and, after a few unkind words about the railroad’s surveyor, announced that no piles could be driven there.  Some sort of single span was needed rather than a pile trestle.  My modeled year is 1928 so I could have prototypically selected a steel girder span—I have them elsewhere on the layout and it would have been far easier—but since this was a foreground model I chose a timber deck truss bridge, with its fussy tension rods and nbw’s.  I used a Kalmbach publication plan, shortened by one panel to fit my 50-foot span.

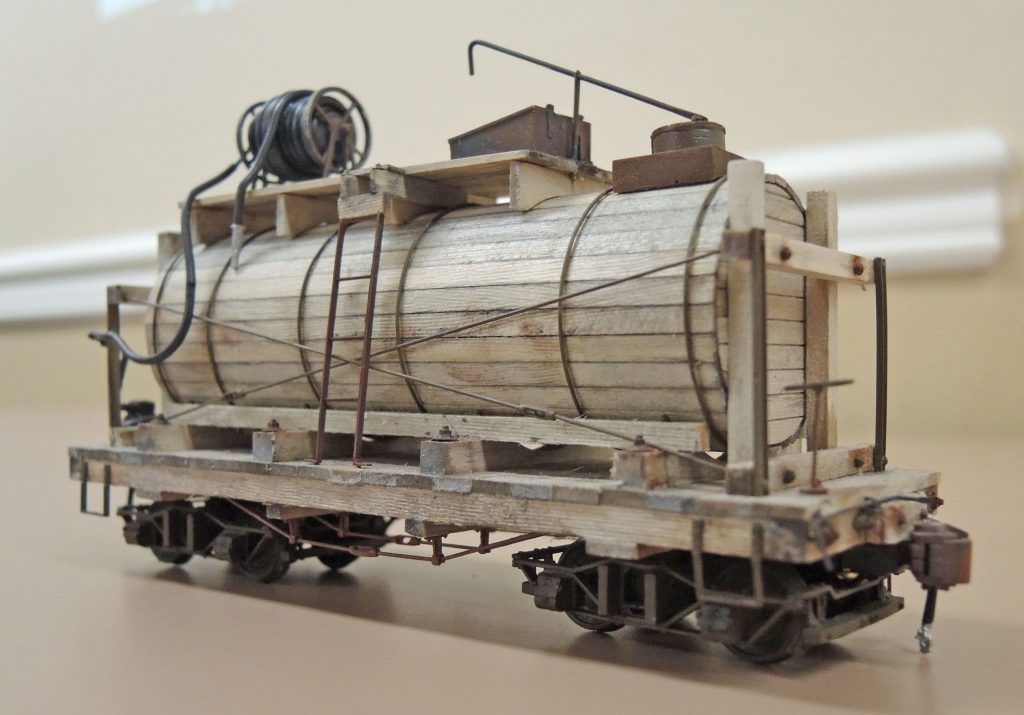
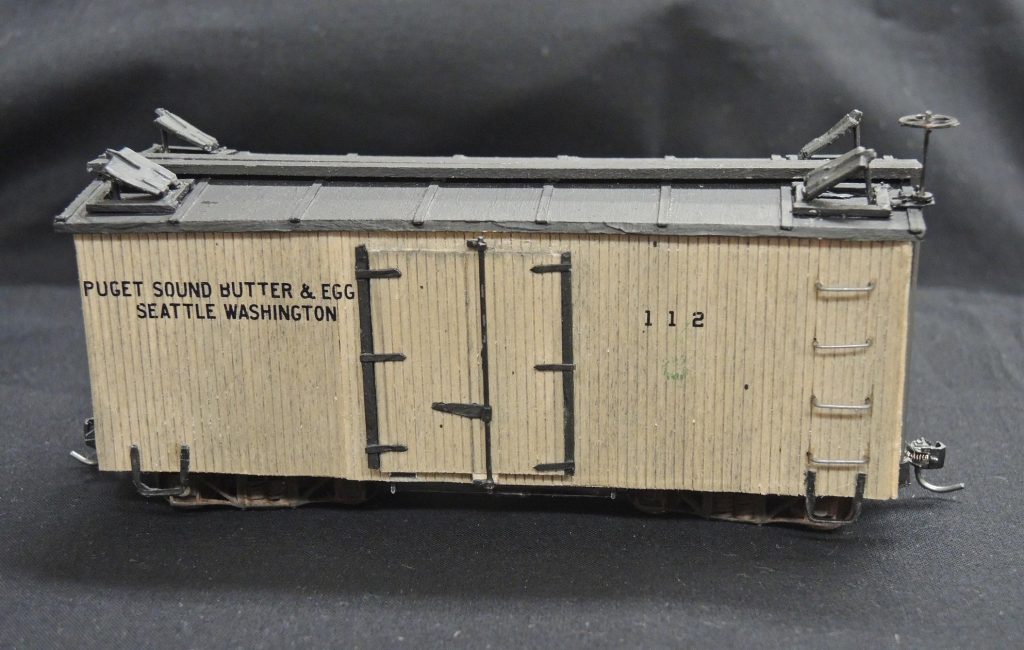
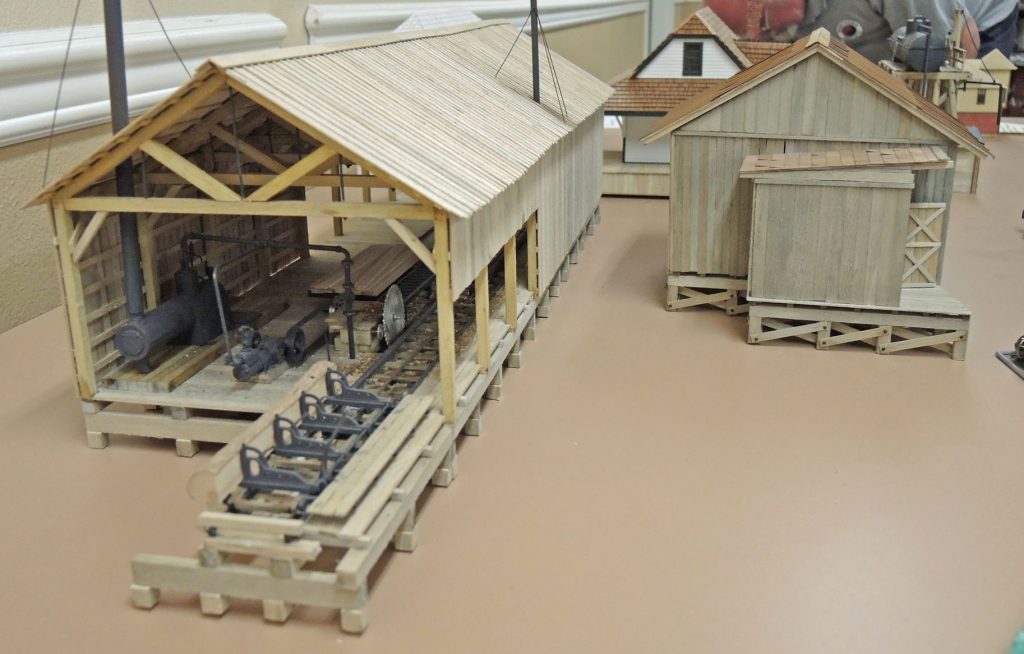
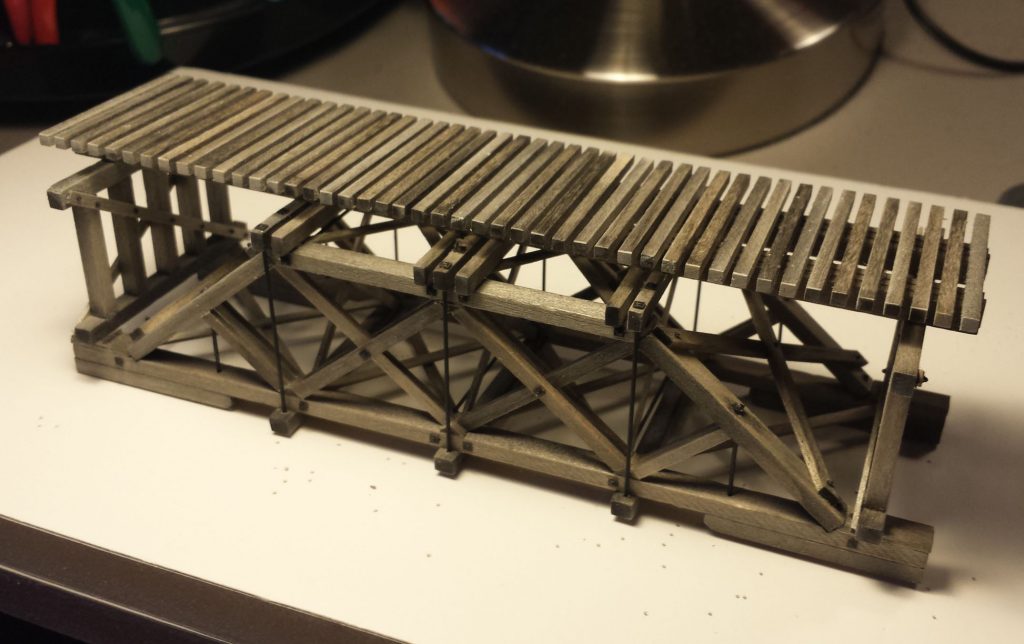
Building the deck truss bridge used standard methods at the workbench (Fig 2).  Stripwood and bridge ties are from Mt. Albert Scale Lumber (now distributed by Fast Tracks), pre-stained with Micromark Bridge and Tie Stain.  Having tried several glues, I use Aleene’s Tacky Glue, either standard or fast-grab variants depending on whether the workpiece is held tightly in a jig, or needs the fast-grab action.  Nbw’s are from Tichy Train Group.  Tension rods are 0.028” brass wire or 2.4” in HO, just slightly oversize but easier to see.

Fig 2 – Silver Falls Span Built at the Bench

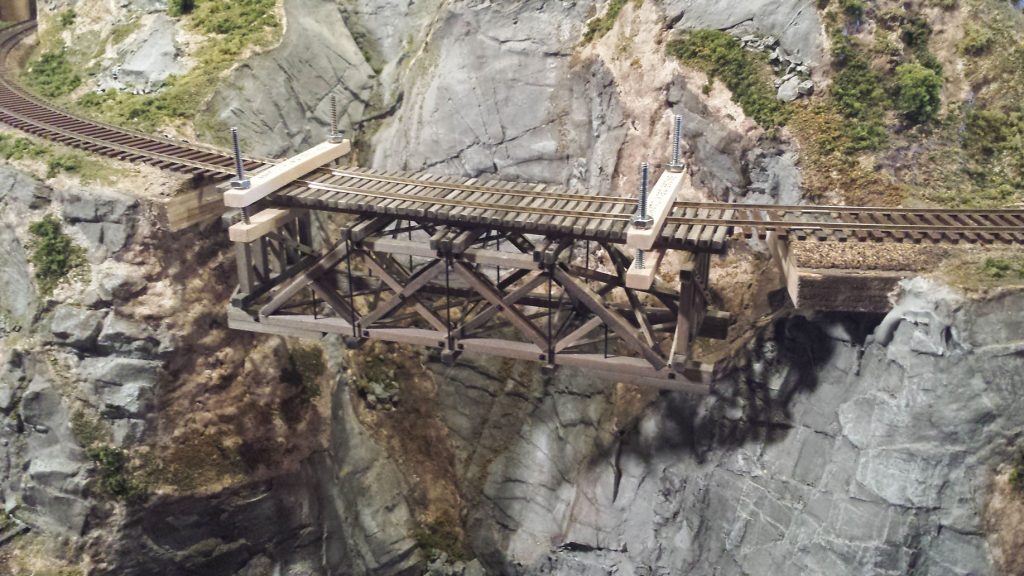
Now for the fun part!  First the plywood subroadbed and cork roadbed were cut away (Fig 3) using a Zona 5” saber saw blade.  The granite rock faces by the way are Cripplebush rubber rocks, which though more time-consuming to paint than plaster or resin alternatives, I am very pleased with.  I presented a Skagit Valley & Whidbey NMRA clinic on their use in 2016.  Next the flextrack plastic ties were removed.  The blue painter’s tape marks ties that are to remain in place; these will be set in ballast on the concrete abutments. 

Fig 3 – Subroadbed and Cork Cut Away and Flextrack Ties Removed

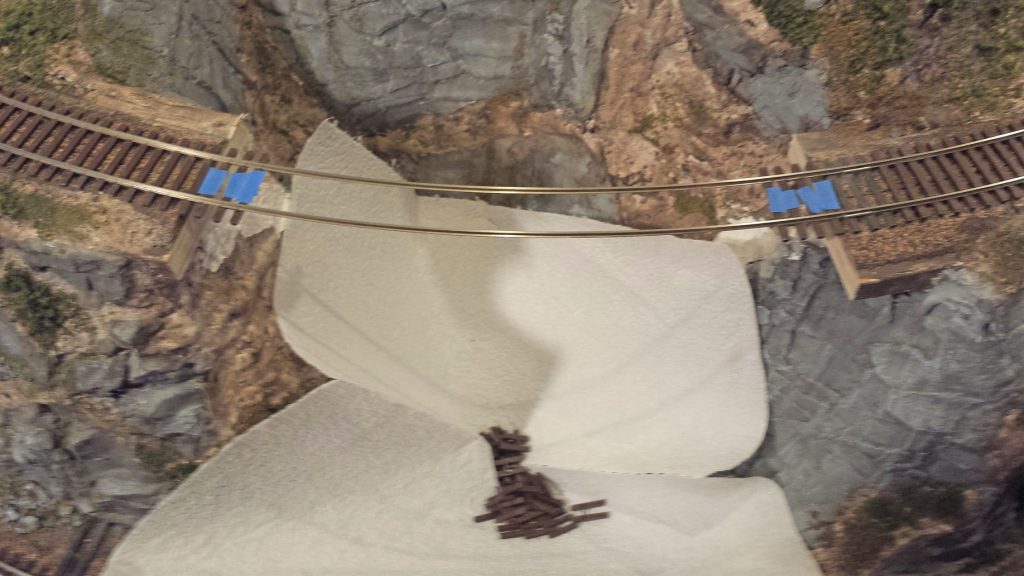
The next step, Fig 4, was to carefully clamp the pre-fabricated span to the rails.  None of the clamps in my toolbox was quite right for the job, so I jury-rigged the pair seen here.  Alignment is important; to get it right I drew pencil lines on the bridge ties for locating the rails. 

Fig 4 – Span Clamped to Rails

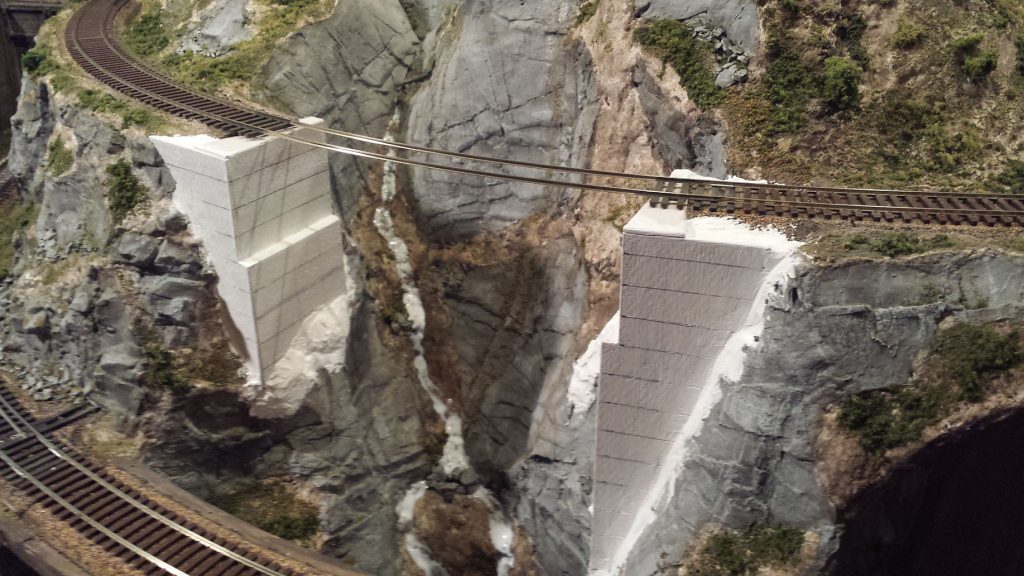
The next step was to build the abutments below the suspended bridge span.  I used basswood and artist’s mat board to simulate concrete abutments, sealing the mat board well so that it didn’t warp with subsequent applications of acrylic paint.  This is the most tedious step in the sequence, requiring a number of height measurements from tie level to the pre-existing terrain.  In Fig 5, the abutments are completed and ready for painting.  They were blended into the existing rock terrain with Sculptamold, which was then carved with striations to match the features of the rubber rocks.  All was then given a coat of white acrylic gesso.  I used gesso liberally in my scenery coloring as an undercoat, to even everything out over varying materials and increase reflectance and brightness, a trick I learned from my artist son.  The white stream below the span is a coat of gloss mod podge which will dry clear; this was unrelated to the bridge work and just done at the same time.

Fig 5 – Abutments Ready for Painting

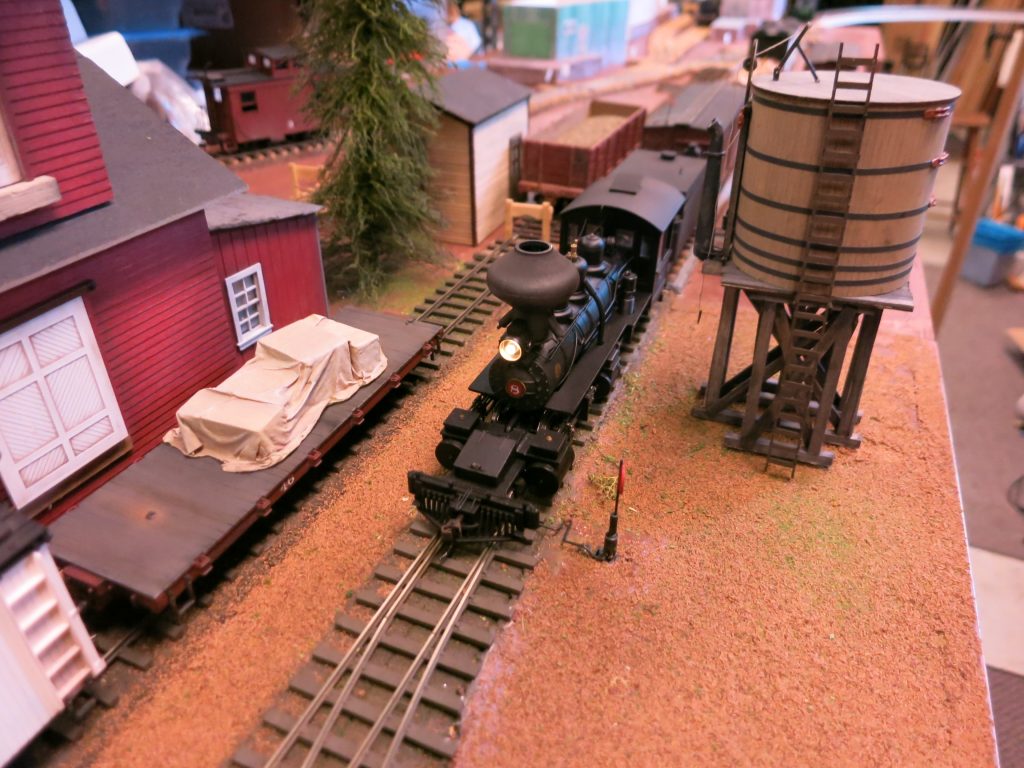
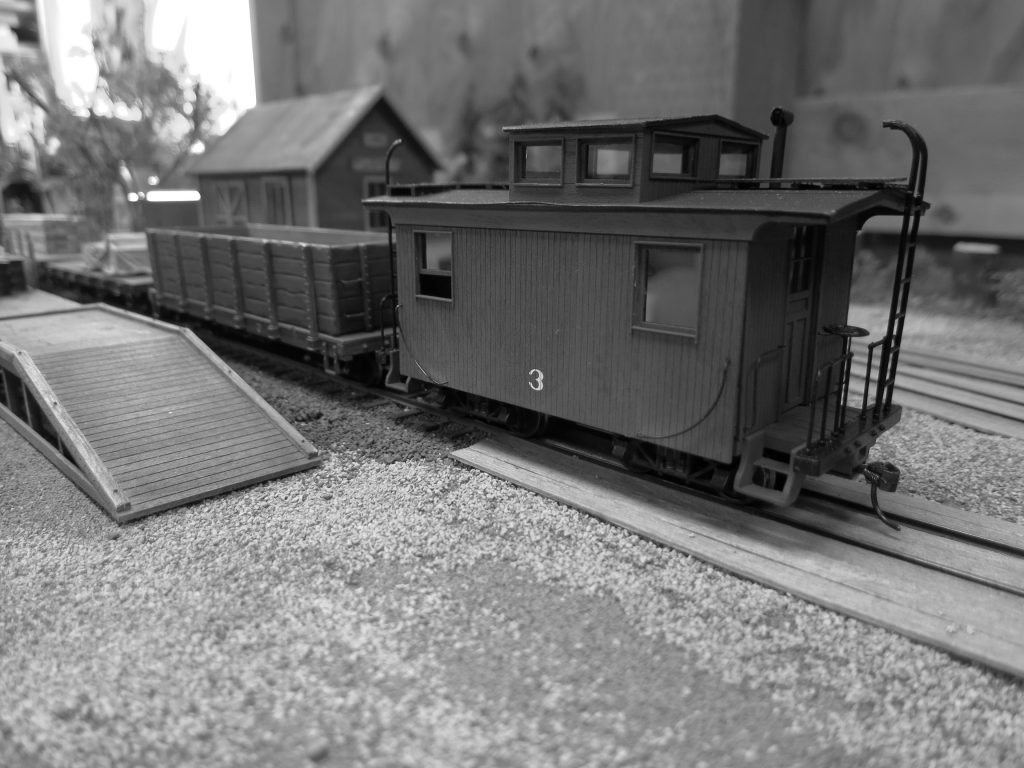
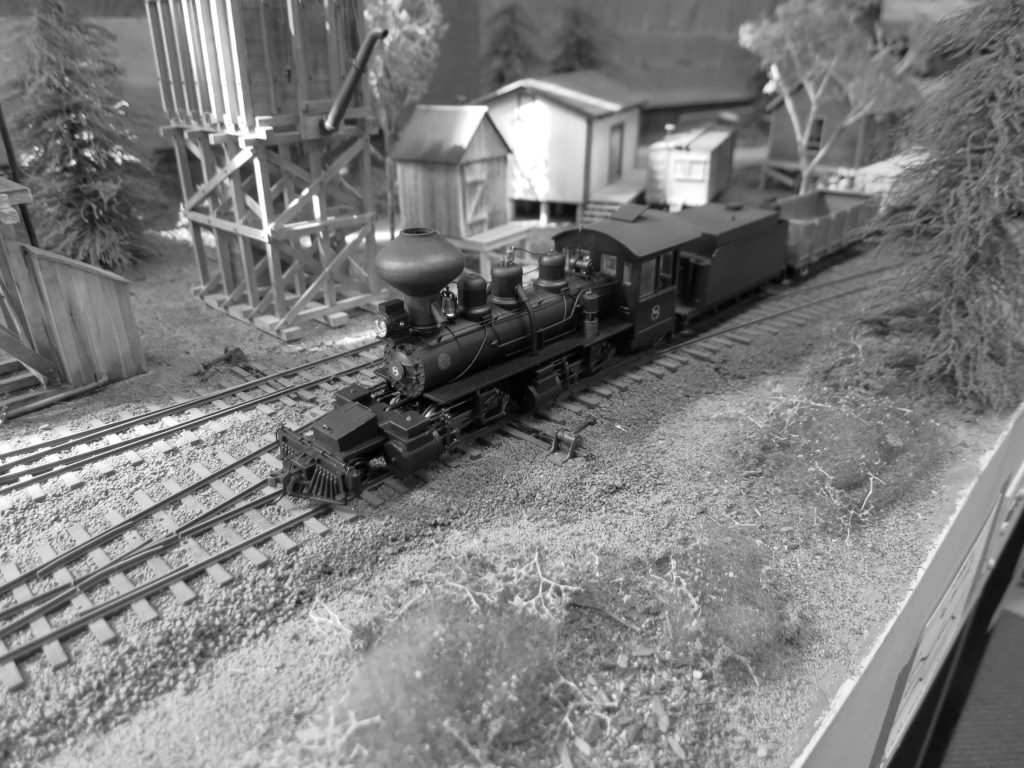
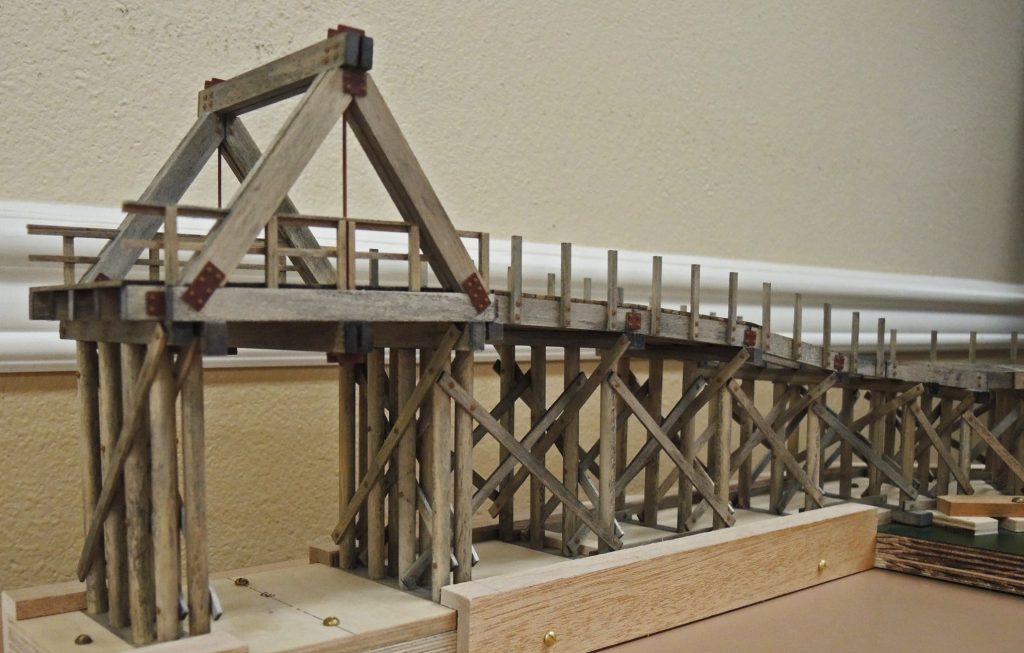
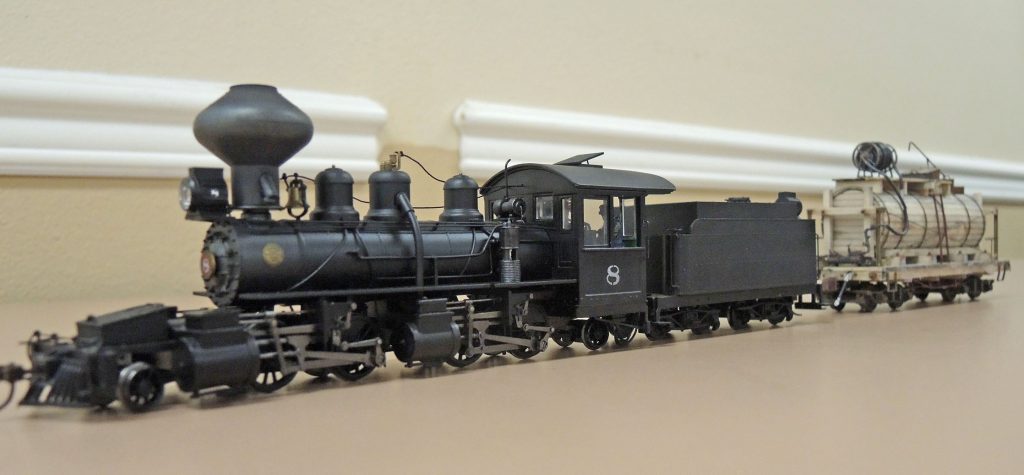
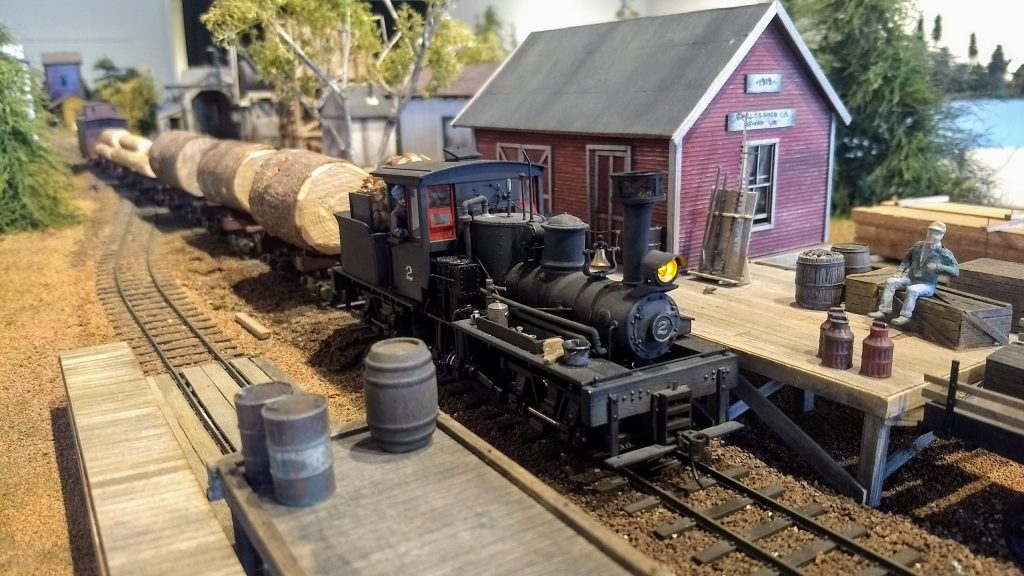
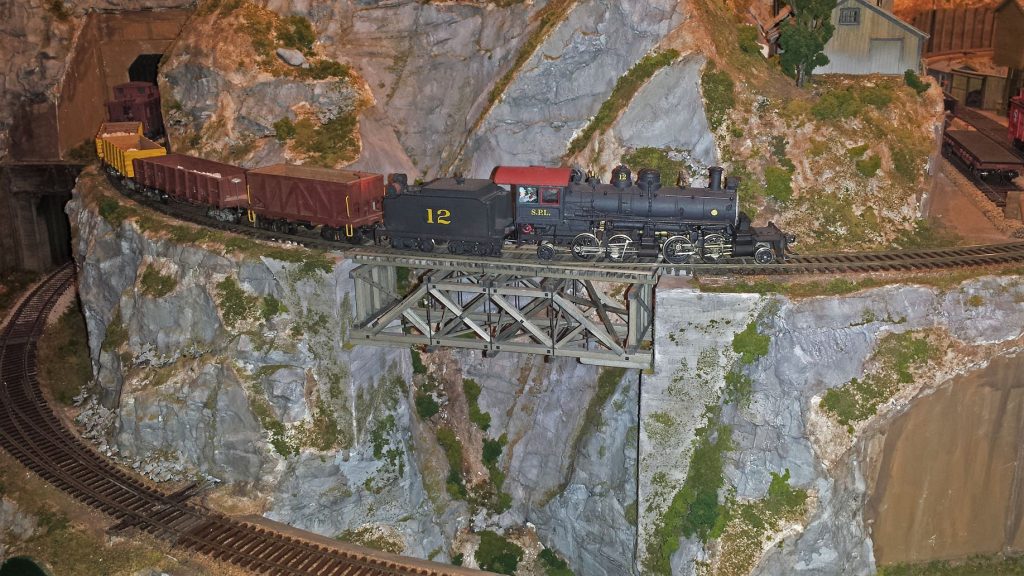
The bridge span was repositioned into place and rails spiked to the bridge ties.  Guard timbers and their nbw’s were added as a final step.  The completed Silver Falls Bridge is shown in Fig 6, with the CC&CRR’s heaviest loco—a 2-4-4-2—giving the bridge an axle-load test; it passed.  I sized timbers and other features for an E-55 rating, or slightly lower.  The abutments were weathered with India ink washes and Bragdon powders, and some simulated foliage and moss added.

Fig 6 – Bridge Installation Complete

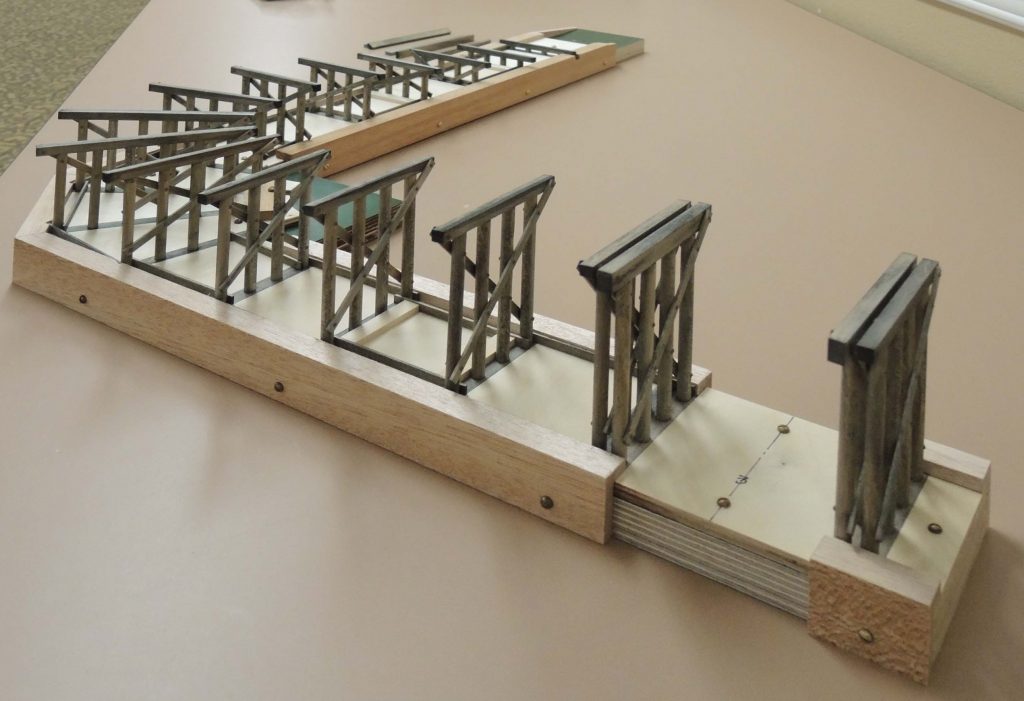
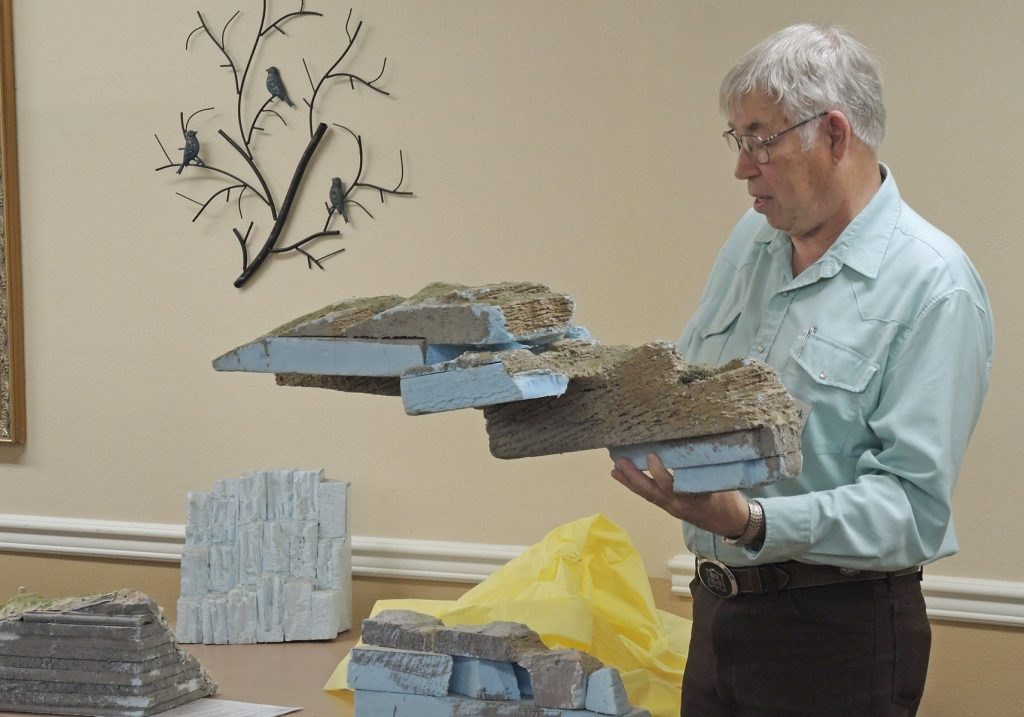
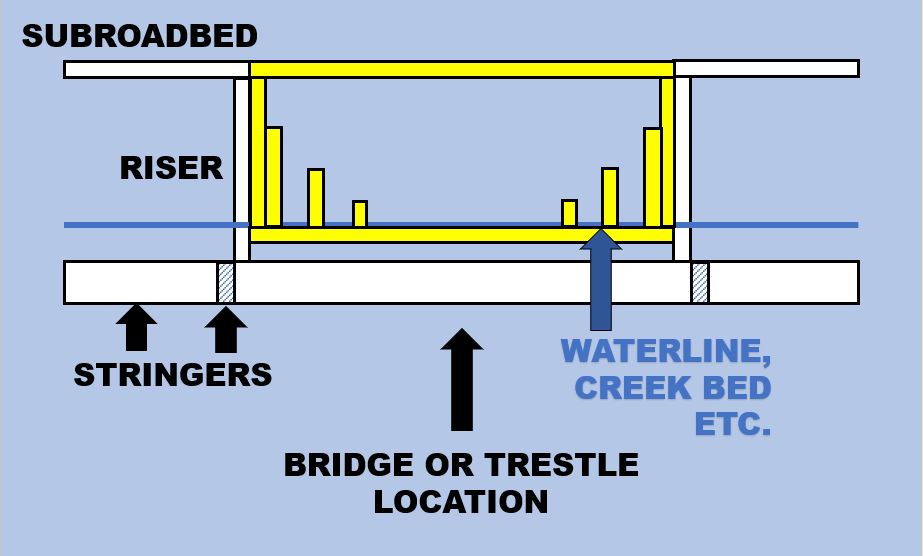
I’m not recommending that you build your bridges this way, but having boxed myself in by largely completing my scenery before tackling the bridges, it worked satisfactorily for me.  There are several better ways, only one of which is illustrated in Fig 7.  The idea here is, when you build your basic layout framework—stringers, risers, subroadbed—instead of keeping the subroadbed continuous across your future bridge locations as I did, construct a removable “bridge frame,” highlighted in yellow in the figure.  It’s built of 1 x 3’s or 1 x 4’s or whatever your chosen lumber size is, and includes abutment and pier supports as shown.  Lay your track and begin op sessions and run for years this way if you want to—but don’t complete the scenery around the bridge frame.  When you’re ready to build your bridge or trestle, remove the frame, the top piece of subroadbed, and build the bridge on the frame at the bench.  Reinstall the bridge frame with its completed bridge and fill in the scenery around it.  Maybe on my next layout! 

Fig 7 – One Better Way

###

Narrow Gauge on the “Isolation Circle Central” Route.

During this interesting time of following the “Stay Home, Stay Healthy” directive from the state, I am finding things a bit more challenging to avoid “honey-dos” since I’m in the house all the time.  Sure this may be a great time to work on house projects but what fun is that. 

So in order to get away from the world and especially chores for a while, I imagined a setup for my modules that could be used for testing and motivation to work on the real important home projects – model railroad stuff!

I am part of the Pacific Northwest On30 Modular Group and have six modules in my shop.  Most of the time however the modules are stored in their transportation configuration and are only set up if I need to fix track or plant a structure.  They share the shop with other vehicles and projects that usually get more attention and I normally don’t have a lot of time to work on them let alone set them up and run stuff on them.

Well the last few weeks have been a different story.  Being in quarantine and working all day from my kitchen table “office” on the phone and on the computer, I am pretty much toast at the end of the work day and need to get out of the house.  The only place I can go is the yard or the shop.  While out organizing some stuff in the shop while I was bored, I found some birch plywood that could be possibly be used make a couple 22 inch radius curves.  I thought, hey I’ve got four straight five foot modules that I could connect together and have an oval for continuous running.  And so was born the idea for the “Isolation Circle Central”.

Normally a storage area, this is now the domain of the “Isolation Circle Central”.

A few evenings of chopping wood and laying track resulted in a seemingly basic circle to run trains around on my finished and work-in-progress modules.  There is no way my ol’ lady is going to negotiate that duckunder – so the “social distancing” part of the setup was an extreme success.

Nemah Valley No 8, a 2-4-4-2 passing the water tank at Willapa Cranberry Farms module.

The layout is powered by a Digitrax Zephyr with a Digitrax PR3 to interface with a computer and run JMRI WiThrottles.  This way I can run two (or six) locos at once on the cellphone Engine Driver app.  I also modified one of my modules to provide a programming track for use with the PR3.  Normally we program locos “off layout” on a test track but since I’m using the PR3 for the computer anyway, may as well upgrade capability and use the direct programming feature also.  It is certainly much more convenient to program and test on the same track. 

JMRI “Engine Driver” app is used as a WiFi throttle with up to six locos that can be controlled at a time. One or two is plenty for normal use.
This engine house track has been modified to also serve as a programming track using a Digitrax PR3 interface.
The Digitrax PR3 can be seen temporarily screwed to the module support leg structure. Hidden switch provides selection between “Run” and “Program”.

For our PNWOn30 Group we use JMRI Operations Pro to provide switchlists for our operations under TT&TO rules.  My modules are already built up as locations with the appropriate spurs in the JMRI program for operations.  All I had to do was create a modified route to only include my four modules and select cars from my inventory to be used for operations.

Dedicated computer for JMRI is clamped to a plank that is also clamped to the module legs.

So, with little effort I had JMRI setup to run switchlists specifically for my setup.  I designated one of the corners as a staging yard and run a route from staging to staging traversing all the modules and performing set outs and pick ups according to the JMRI generated switchlists.  Between each module “location” I do a complete lap around the layout to get some distance before the next module stop.  All told the “Circle Job” takes a little over an hour to complete.  That’s the time for at least one cup of a refreshing beverage and certainly supports the “Stay Home, Stay Healthy” directive. 

Remember when black and white photos were all the rage. This is a Mount Blue kit On30 caboose.
The No. 8 heading through the Bay Lumber Company – Camp 4 modules. Setting up the modules and running trains allows for practicing some photography that I normally never have time to do at train shows.

Have fun and Be Safe.

####

Skagit Valley and Whidbey March 12th Clinic Cancelled

By Rich Blake

In communication with our gracious venue host – Summerhill Assisted Living Facility – we have cancelled our March 12th clinic due to risk to residents and visitors during this time of the COVID-19 Coronavirus outbreak. In accordance with the Washington State Department of Health guidelines related to the outbreak emergency, Summerhill will be enforcing a “no-visitor” policy until further notice. SV&W respects and understands this decision.

We are still planning to have our regular clinic on the 8th of April at the Summerhill venue provided we have better news in a few weeks on this epidemic. In mean-time we are advising all model railroaders to be safe and observe good preventative measures.

Rich

Skagit Valley and Whidbey Clinic February Meeting – The World’s Last Woodburners

Article and Photos by Rich Thom

Twenty-three gathered at Summer Hill in Oak Harbor for February’s SV&W NMRA Clinic, welcomed by Clinic Chair Rich Blake.  After reviewing the calendar, Rich to everyone’s delight showed some photos of Al Frasch’s new N-scale layout that he’s nearly completed in his new home near Tucson, AZ.  Al, a former long-time member, newsletter editor, and tireless booster of our clinic as well as model railroad operations in the area, built his new layout in less than two years.  Not unexpected from this energetic modeler—good work, Al!

For Show-and-Tell, Alan Murray brought in his O-scale road overpass (Fig 1).     

Fig 1 – Alan Murray’s Road Overpass (WIP)

This is a work-in-progress and Alan will describe the overpass construction in detail at our March meeting.  He brought it this evening to show the details of the bents and stringers that will (by next month!) be hidden by roadway decking.  The overpass has a home: it will feature in one town on Jon Bentz’s in progress On30 layout in Freeland, joining many other scratch structures already in place.  Your reporter visited Jon’s layout recently and it will be a welcome addition to our clinic area’s operations-focused layouts.  Beta-testing will start this Spring; no pressure, Jon! 

Fig 2 – Another View of Alan’s Overpass

The main subject matter at the meeting was “The World’s Last Woodburners” presented by your Grab Iron reporter.  That’s a rather sweeping title, because woodburning steam locos were scattered around the world here and there, on preserved railroads, in museums and so forth, but only in a very few places did entire fleets of motive power in everyday, workaday use still burn wood.  Your reporter visited two such places in the late 1980’s and early 1990’s.  The first was the Philippines.  

Fig 3 – Victorias Millyard, Philippines

The Philippine woodburners were found on the island of Negros, one of the country’s 7,000-plus islands.  Here were the majority of the Philippines’ Sugar Centrals, 45 of which were founded by American companies, most between 1912 and 1927.  Victorias Milling Company (Fig 3) was the largest of them all, at its peak grinding over 16,000 tons of cane each day during the milling season.  All of the motive power—in this case 0-8-0’s—burned wood.  Combined, the sugar railroads had over 1,000 miles of track fanning out like a spider web from the coast into the cane fields, on several gauges.  Victorias had the most unusual: 600mm, which at 1 foot 11 and 5/8 inches was essentially 2 foot gauge—but not quite!

Fig 4 – Hawaiian-Philippines Baldwin 0-6-0
Read More

Skagit Valley and Whidbey Clinic January 2020 Meeting – “Skookum” Night

Article and Photos by Rich Thom Except as Noted

Clinic Chair Rich Blake welcomed 21 to our first meeting of 2020.  Rich was also the evening’s presenter giving, first, a comprehensive review of the 39th National Narrow Gauge Convention held last September in Sacramento.  The four-day event featured 54 clinics; 7 modular groups; several special museum and shop tours; and 34 layouts open to convention attendees.  Rich’s photos of contest models, dioramas, modular layouts, and the 9 layouts he visited all displayed very high levels of modeling skills.

Rich’s California visit culminated in a very unique event indeed: a special railfan steam-up on the Niles Canyon Railway (www.ncry.org) commemorating the 150th anniversary of the transcontinental railroad’s completion, featuring the newly-restored articulated logging locomotive the “Skookum,” a rare 2-4-4-2.  Niles Canyon’s Clover Valley #4, a 2-6-6-2T also recently overhauled, was steamed up and double-headed with Skookum (Figures 1 and 2).   

Fig 1 – Clover Valley #4 (left) & Columbia River Belt Line #7 “Skookum” (Photo: Rich Blake)
Fig 2 – Skookum #7 (Photo: Rich Blake)

Many steam locos returned to service have dull histories, spending decades rusting away in city parks or museum backshops, but Skookum’s is especially colorful.  Baldwin built the 2-4-4-2 Mallet (compound) for Tennessee’s Little River Railroad (https://littleriverrailroad.org/skookum) as their #126 in 1909, but it was too heavy for their rails and they returned it to the builder.  Baldwin’s salesmen aggressively pursued northwest logging and short lines to unload their white elephant and in 1910 sold it to the Columbia River Belt Line Railway in Oregon, where the loco worked for ten years.  (The Skookum is currently lettered for this first northwest owner.)  After 1920 it worked on a number of Washington state lumber companies, the longest stint (1933-1955) with the Deep River Logging Co. as their No. 7.  There, in 1955, it rolled off a trestle into a muddy streambed and was abandoned until pulled out five years later by rail enthusiasts. It was disassembled piece by piece and hauled out of the woods to Snoqualmie where it sat for 30 years.  It was moved again at some point to Mount Rainier Scenic Railway’s grounds where it sat in a rusty pile for many more years. A succession of dedicated steam preservationists led by Chris Baldo of the Willits Roots of Motive Power team rescued the loco and Skookum was eventually restored by the Oregon Coast Railway shops in Garibaldi OR to running condition in March 2019.  “Skookum” is a Native American word meaning “powerful, brave, sturdy” and this old Baldwin product surely lived up to its name.  The first of its kind, Skookum encouraged Baldwin to market more articulated Mallets in the northwest, selling many.

Fig 3 – Dave Clarke’s 2-4-4-2

HO-scale reproductions of Little River Railroad #126 were imported by Gem Models, around 682 of them altogether, over the course of four runs in 1962, 1963, 1964 and 1982.  Fig 3 shows one of the 1982 run, produced by Jonan.  This run featured can motors and supposedly more detailing than the earlier versions.  This beautiful example was painted and lettered by Dave Clarke, our clinic’s master of brass model rebuilds, after installing a sound decoder, speaker, and lights.  

Fig 4 – Tom Hawkins’ 2-4-4-2

Fig 4 is another 1982 Gem 2-4-4-2 that Dave Clarke upgraded with DCC and sound, painted and lettered for Tom Hawkins’ HO-scale Port Thomas and Southern Railroad (styled after the Olympic Peninsula’s Port Townsend and Southern).  Tom reports that it’s a beautiful runner. 

Fig 5 – Rich Thom’s 2-4-4-2

Your reporter plumb forgot to bring his “Skookum” to the meeting, but here it is anyway (Fig 5), photographed on his Coldwater Creek & Cascade Railroad.  Rich’s model is from the first 1962 run that Gem imported, made by Akane Model Railroad Co. of Tokyo, and was found in a consignment sale in Sacramento.  Gary Jordan, brass hat of the Gilpin Tram multi-gauge layout in Mukilteo, did the upgrade, replacing the open-frame motor with a can motor and installing a Tsunami decoder and 1-inch speaker.  It’s the best-running loco on Rich’s layout, with stunning sound.

Fig 6 – Jon Bentz’ On30 Fire Car

In other Show and Tell, Jon Bentz brought in a very nicely-done On30 Fire Car (Fig 6), a kitbash of a Morgan Hill kit (www.morganhillmodels.com).  Good news: Jon’s new layout is nearing beta-testing for operations.  We’re pleased since we are down to only two layouts hosting regular op sessions on Whidbey Island and it will be exciting to have a third to encourage ops enthusiasts to ride the ferry to our pleasant isle.  No pressure, Jon!

Fig 7 – Rich Blake’s Bachmann 2-4-4-2 Coupled to Jon’s Fire Car

Finally, since “Skookum” was a theme for this meeting, Rich Blake brought his On30 Bachmann 2-4-4-2 to couple up with Jon’s Fire Car (Fig 7).  It bears little resemblance to Skookum but at least it’s a 2-4-4-2 compound!  This loco is slightly weathered with a few added details and features a Tsunami 2 decoder with unique “articulated” chuff sounds. Does anyone know Bachmann’s prototype for their popular 2-4-4-2?

###

Skagit Valley and Whidbey Clinic November Meeting Show and Tell and DCC Night

Article and Photos by Rich Thom

Clinic Chair Rich Blake welcomed 26 to the November meeting, first reviewing the upcoming calendar.  Dec 11th will feature our annual Wassail, a tradition dating back at least a dozen years, with all invited to bring a (finger-food) potluck dish to share.  The pre-clinic dinner at Alfy’s in Oak Harbor is annulled for this meeting only, and the starting time for the Wassail is 6:30 pm.  For the January get-together (Jan 8th), modelers are invited to bring their latest models for detailed discussion of how they created them, and having their models judged (if they wish) for NMRA Achievement Awards.

Fig 1 – Jon Bentz Describes Progress on his Railroad

Several clinic members have layouts in progress including Jon Bentz (Fig 1), who described the status of his Rio Como Railroad.  Filling the better part of a 14’ x 39’ room, the On30 pike re-uses many of Jon’s scratch buildings on all-new benchwork.  A car float operation is featured.  Helping Jon with the construction among others is Cliff Aaker and Alan Murray; Alan, for example, is building the overpass (Fig 2)—a work in progress—for a spot on Jon’s layout.

Fig 2 – Alan Murray’s Overpass (In Progress)
Fig 3 – Ted Becker’s Banta Kit

Ted Becker brought in a model for display (Fig 3), a Banta Modelworks HO-scale “Crick Hollow Hardware and Miners Supply.”  Ted has thoroughly re-purposed the structure and varied the details.

Read More

The Anacortes and Fidalgo Model Railroad Club Open House This Weekend

The Anacortes and Fidalgo Model Railroad Club will host what may be their last open house this weekend November 2nd and 3rd  from 10am to 4pm each day.  The layout is located in the basement at 419 Q Ave. in the beautiful seaside historic town of Anacortes west of Mount Vernon off HWY 20.

Look for this sign off Q street in Anacortes, the layout is in the basement around the backside of the house in the photo.

The club has been at this location since 1994 starting with a 500 square foot area and about 10 members.   Over the last 25 years the club has enjoyed a long and interesting pursuit of building and operating a detailed layout depicting many of the historic railroad features in and around Anacortes, Fidalgo Island and the Skagit Valley.

Scratchbuilt and operating model of the Swinomish Channel swing bridge which is still in use today by the BNSF serving the March Point refinery. You can see the distinctive prototype bridge along HWY 20 on the way to Anacortes.
Waterfront scene depicting the busy Anacortes port terminus of the Great Northern Railroad.

A lot of hard work and dedication has gone into the layout and it shows in the many finely constructed structures and scenery details.  The layout now occupies the full 1000 square feet available however the club must unfortunately move out within the next year.

Entryway to the basement layout features a re-creation of the La Conner arch span bridge that connects Fidalgo Island to the mainland on what is now Reservation Road.

Hopefully the club can find a new location to host their layout and equipment in the near future. Many members of the club are local PNR 4d NMRA members and regular attendees of both the Mount Vernon and the Skagit Valley and Whidbey NMRA Clinics.

A recent GoSkagit article about the layout is here

History of Anacortes and the local railroads is here

Map location of the club layout is here

Skagit Valley and Whidbey Clinic October Meeting Foam Scenery and Other Topics

Article and Photos by Rich Thom

Cliff Aaker, subbing for clinic chair Rich Blake, welcomed 24 to the SV&W NMRA Clinic’s October meeting.  Cliff welcomed first-time attendees Roy and Penny Andrukat, Oak Harbor residents modeling in n-scale; we hope they become regulars.  Sad news about the Anacortes and Fidalgo Model Railroad Club, whose members are long-time clinic contributors: the lease on their space has been terminated by the building’s owner, a familiar story to many clubs.  The club’s annual Fall Open House on Nov 2nd and 3rd will likely be their last.  We hope modelers from all over the area will consider paying a visit to the club’s HO-scale 24’ x 45’ layout, featuring Many scratchbuilt bridges and other structures.  Hours each day are 10 am to 4 pm; the address is 419 Q Avenue (intersection of 5th and Q), Anacortes.

The evening’s clinician was MMR Mark Malmkar, who reprised highlights of several clinics he presented over the years back in Nebraska, from which Mark and wife Chris relocated to Whidbey Island.  Mark first covered diverse topics including: layout design for 4’ x 8’ tabletops; locomotive wheel arrangements; benchwork types; wiring basics; passenger car eras and car types; and dining car window arrangements.  Mark is an expert on passenger cars, Pullman Company history and its monopoly on sleeping car services, and the complex Pullman routes and innumerable car variations, and always has good examples and anecdotes to share.  We were even pulled back into that era by Mark’s use of flip-charts—if anyone can remember those!  (In his defense, he has also given clinics using Powerpoint.)        

Fig 1 – Mark Malmkar Shows Sample Foam Scenery Sections

Next, Mark focused on his extensive use of insulating foam scenery (Fig 1).  Mark has managed a somewhat rare feat: He packed up and moved his entire Nebraska model railroad to Washington, and is in the process of re-assembling it, with some shifts and rotations of sections here and there to fit the new space.  One feature which made this easier—or even possible at all—was his extensive use of foam scenery rather than plaster hardshell.  Its light weight and ease of creating large, easily-removable scenery sections and smaller liftouts is well-known.  Mark described the tools and adhesives he used to laminate 1” – 1 and ½” – and 2” sheets into landforms, the rasps and carving tools used to sculpt it, and materials to overcoat it to form the final scenic form.  Fig 2 shows one of several liftouts Mark brought in to show, this one with a tunnel.  Thanks to Mark for an interesting and entertaining presentation.      

Fig 2 – A Foam Liftout Including a Tunnel

Rich

Skagit Valley and Whidbey Clinic September 2019 Meeting – An Evening about Scratchbuilding

Article and Photos by Rich Thom

Clinic Chair Rich Blake welcomed 26 to the first SV&W NMRA Clinic of the season.  This clinic was devoted to scratchbuilding; so without further ado, let’s get to it.

Fig 1. Cliff Aaker describes his scratchbuilding methods.

Area modelers were invited to bring in their scratchbuilding efforts, both completed and in progress, and most are on the table next to Cliff Aaker (Fig 1), who led off the evening with his presentation “Methods and Tools for Scratchbuilding Scale Models.”  Cliff discussed his general approach, in which he either copies a commercial model—to improve upon it by adding details and “personality” for his own railroad—or more typically working from prototype photos.  From photos he works out roof pitch and other dimensions using window, door and other features–for example, a standard door height of 6’10”.  Often he builds a paper or art board mockup for a project if it’s complicated or must fit a precise space; his first such was building a road bridge for the Anacortes & Fidalgo Model Railroad Club, whose members are long-time clinic contributors.

Fig 2. One of Cliff’s scratchbuilt reefers (On30 scale).

Like most everyone, Cliff uses a mix of purchased and scratch detail parts.  For his On30 reefer in Fig 2, brake wheels, roof hatches, turnbuckles—and of course couplers–are commercial parts.  Other details, door hardware, latches, stirrups, and grab irons are scratch.  Cliff passed around his grab iron bending and drilling jigs; the stirrups are fashioned from bent staples. 

Fig 3. A boxcar by Cliff (On30 scale).

Cliff’s box cars (Fig 3 shows one example) are built over a solid wood core, or plug.  This automatically keeps all car sides and ends square and provides the needed weight.  All car sheathing is Kappler Lumber scribed wood.  Roofs are either wood planks or ribbed metal.  Metal ribs are simulated with paper strips cut with a rotary cutter. The styrene door channels were glued to the carbody with “old” thick styrene glue, which Cliff found to adhere well to wood. 

Fig 4. A flatcar by Cliff (On30 scale).

Flatcars (Fig 4) are difficult to weight properly without unsightly lead weights glued to the underbody, or weighted loads.  Cliff solves this by using 1/16” lead sheet sandwiched under the decking.  The stake pockets are commercial parts, the stirrups scratch. 

Fig 5. Scratchbuilt skeleton car by Cliff (On30 scale).

The metal parts on the skeleton log car in Fig 5 were fabricated using concrete patch and latex rubber molds.  (Cliff described multiple uses of two types of concrete patch at our March 2019 clinic.)  The trucks on this car, available from Precision Vintage Classics (www.pvc-sn3.com), use 3D-printed sideframes.  The cars in Figures 2 and 3 also use PVC trucks.

Fig 6. Cliff Aaker’s scratchbuilt copper smelter building in O-scale. (9 volt battery for lighting effects)

Cliff brought two of his scratchbuilt O-scale buildings to discuss some of the construction methods used.  The copper smelter (partial view in Fig 6) was based on drawings of a smelter in Bodie, CA published in Narrow Gauge & Short Line Gazette.  Quickcrete Concrete Crack Seal was used to make the furnace and chimney.  The roofing is ordinary household aluminum foil cut with a rotary cutter and scissors, then shaped with a tool from Brunel Hobbies, their “Corrugated Iron Maker” (www.brunelhobbies.com.au).  Cliff uses all three readily available thicknesses of aluminum foil in his models.

Fig 7. Scratchbuilt depot by Cliff.

The freelanced depot (Fig 7) was designed with a deliberately high-peaked roof, 12/12 pitch, to provide maximum elevation for an IR sensor which, in conjunction with a servo, battery and Arduino, operates a train order signal (not shown) using a TV remote.  During assembly, walls were kept square using a fixture constructed of Lego pieces.  The beautifully-executed roof is built with individual Western Red Cedar roofing shakes.  Thin wood sheets of cedar were cut into strips with a rotary cutter, chopped, and applied one-by-one with double-sided tape.  Fine work, Cliff, and a great clinic!

Fig 8. Alan Murray’s O-scale scratchbuilt oil tank.

Other scratchbuilders in the group had the opportunity to describe their show-and-tell items.  Alan Murray brought two of his fine O-scale structures, including the oil tank in Fig 8.  Alan has discussed his techniques in several of our previous clinics, which include sawing all of his scale boards from sheet—no purchased (expensive) stripwood for him!  Note the N-B-W castings, essential for any model to qualify for an NMRA Achievement Program award.

Fig 9. Alan Murray’s Olympia station interior view.

Alan showed slides detailing the history of the train station in Olympia, and his remarkable reproduction of it in O-Scale.  The single photo of it here (Fig 9) can’t possibly do it justice.  It sits not on land, but a pier, and the pier (not shown) is just as well-crafted as the station.  Alan has featured his Olympia station module construction in previous clinics.

Fig 10. Iver Johnson’s HO-scale scratchbuilt watertank car.
Fig 11. Curt Johnson’s HO-scale tool shed.
Fig 12. Jack Tingstad’s Tennessee Pass depot in HO-scale.
Fig 13. Jon Bentz’ O-scale sawmill and freight house both scratchbuilt.

Iver Johnson showed off his water tank for a logging line, Fig 10.  Curt Johnson got the idea for his scratch shed, Fig 11, from a Walther’s Catalog.  Jack Tingstad built the replica of the Tennessee Pass Station, Fig 12, from plans he was able to obtain after he was unsuccessful in finding one of the original kits which had gone out of production.  Jon Bentz brought two of his O-scale structures, both freelance, a sawmill and a work-in-progress freight house (Fig 13).

Thanks to all for bringing in some fine models and describing some of their techniques.

###

7th Annual Clamshell Days with the Pacific Northwest On30 Modular Group

On July 13th and 14th 2019, the Pacific Northwest On30 Modular Group, participated in the “Clamshell Days” event at the Pacific Columbia Heritage Museum in Ilwaco on the Long Beach peninsula. 

Bay Lumber No 2 rumbling past the Camp 4 freight house with a load of logs.

  This was our 7th year participating in this event and it is one of our favorites as the museum provides a great gallery space for our layout.  Since this is one of the less known “trainshows” there is considerably less spectator traffic than the big shows around Puget Sound.  This allows us to focus more on operations and having fun with our layout and equipment.

Eric Sitiko as conductor and Alan Murray as engineer operating on the east end of the layout.
Cliff Aaker and Byron Osborn working the Willapa Cranberry module.
Paul Vaughn running the layout as Dispatcher. The separate room for the dispatcher was a nice location.

  We ran two days of TTTO operations and are now sporting a new station stop semaphore built by Cliff Aaker that is controlled by an Arduino CPU board and a servo.  The dispatcher also acting as station operator can now use a TV remote control to operate the semaphore to indicate stop for orders at the station.  It really adds a prototypical element to our operations.

The 23 Extra West stopped at Wye Tank to collect a set of train orders. Note the tower and semaphore indicating “stop” signal. This active signalling feature is raised and lowered with a TV remote control by the dispatcher. The tower was designed and built by Cliff Aaker and uses an Arduino micro computer to control the servo logic and infrared sensor.

  The group also had the good fortune through Paul Vaughn’s efforts of gathering a large donation of structures from George Chambers of Issaquah.  He graciously donated the items due to a downsize in living arrangements with the only caveat that the structures be displayed for all to enjoy.  We have several spots for these finely detailed structures and they really add a lot of visual interest and operational opportunities.  Thanks George!!!  

Nice Barber Shop and Power Plant structure donated to the group by George Chambers.
Small station with figures along with other small items donated by George Chambers.

Everybody had fun and enjoyed a nice relaxing weekend.  This event runs every year on the 2nd weekend in July so start planning now and maybe we will see you next year.