Click here to read the eleventh article on Chuck Ricketts Fantasy Island Railroad.
You are browsing archives for
Category: Articles
How to’s, presentations, and informational articles
David Yadock’s Dry Gulch & Western Update 4
Article & Photos By David Yadock
Dry Gulch & Western, Update 4
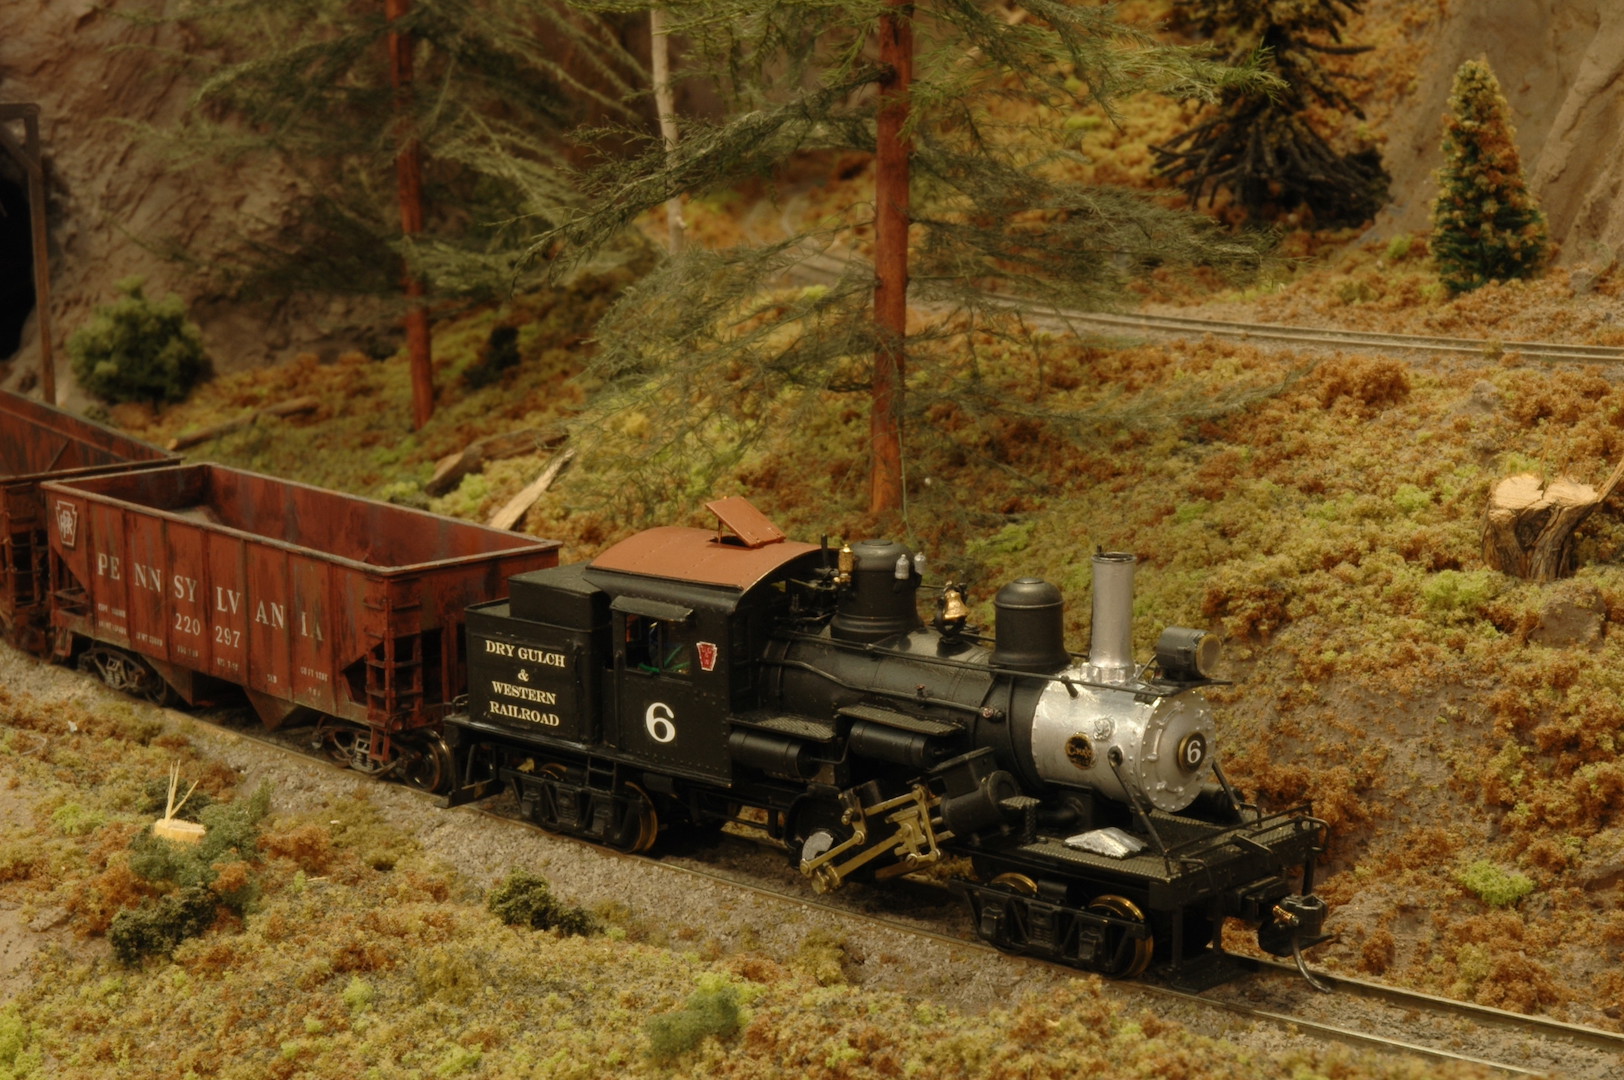
It has been a while since the last update on the Dry Gulch & Western. I’m sure you have been wondering what new things have been happening on the layout. I decided to continue this series with the completion of the Wapwallopen area. We last left off with the track completed but scenery needed to be added. Finally, the scenery and structures are in! As previously mentioned, I created this new town to add interest and some switching to my branch line leading out of Dry Gulch. So, let’s take a look at the new scenery.
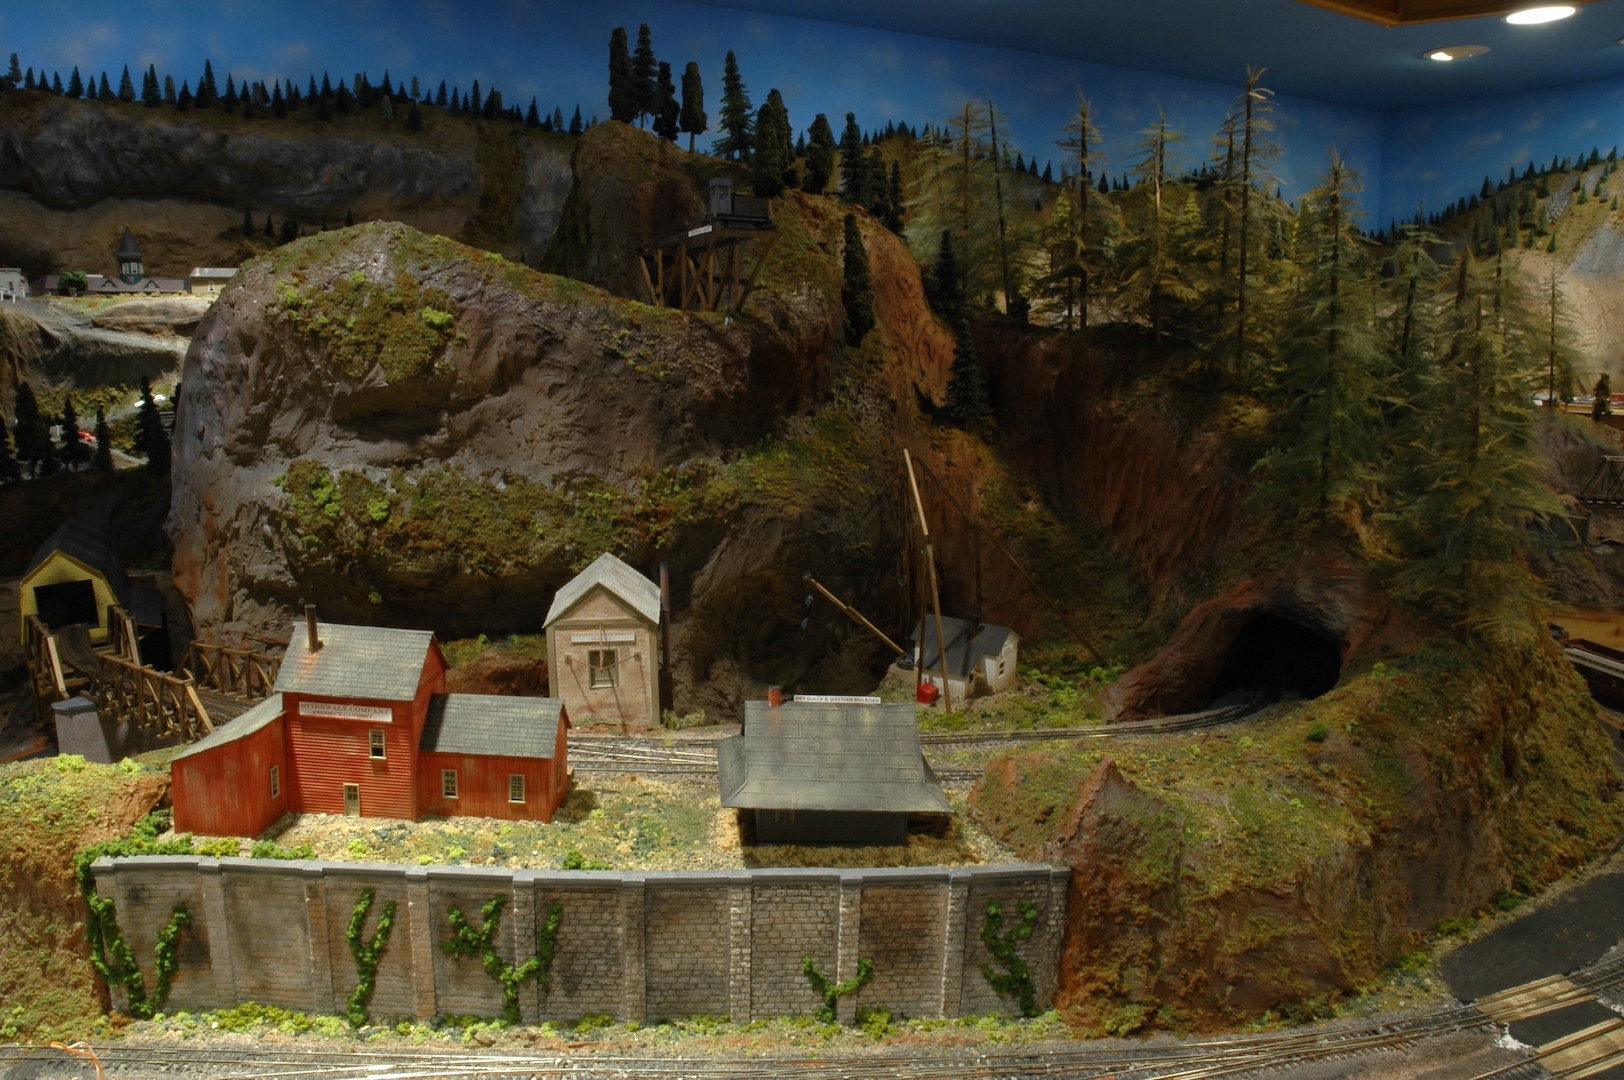
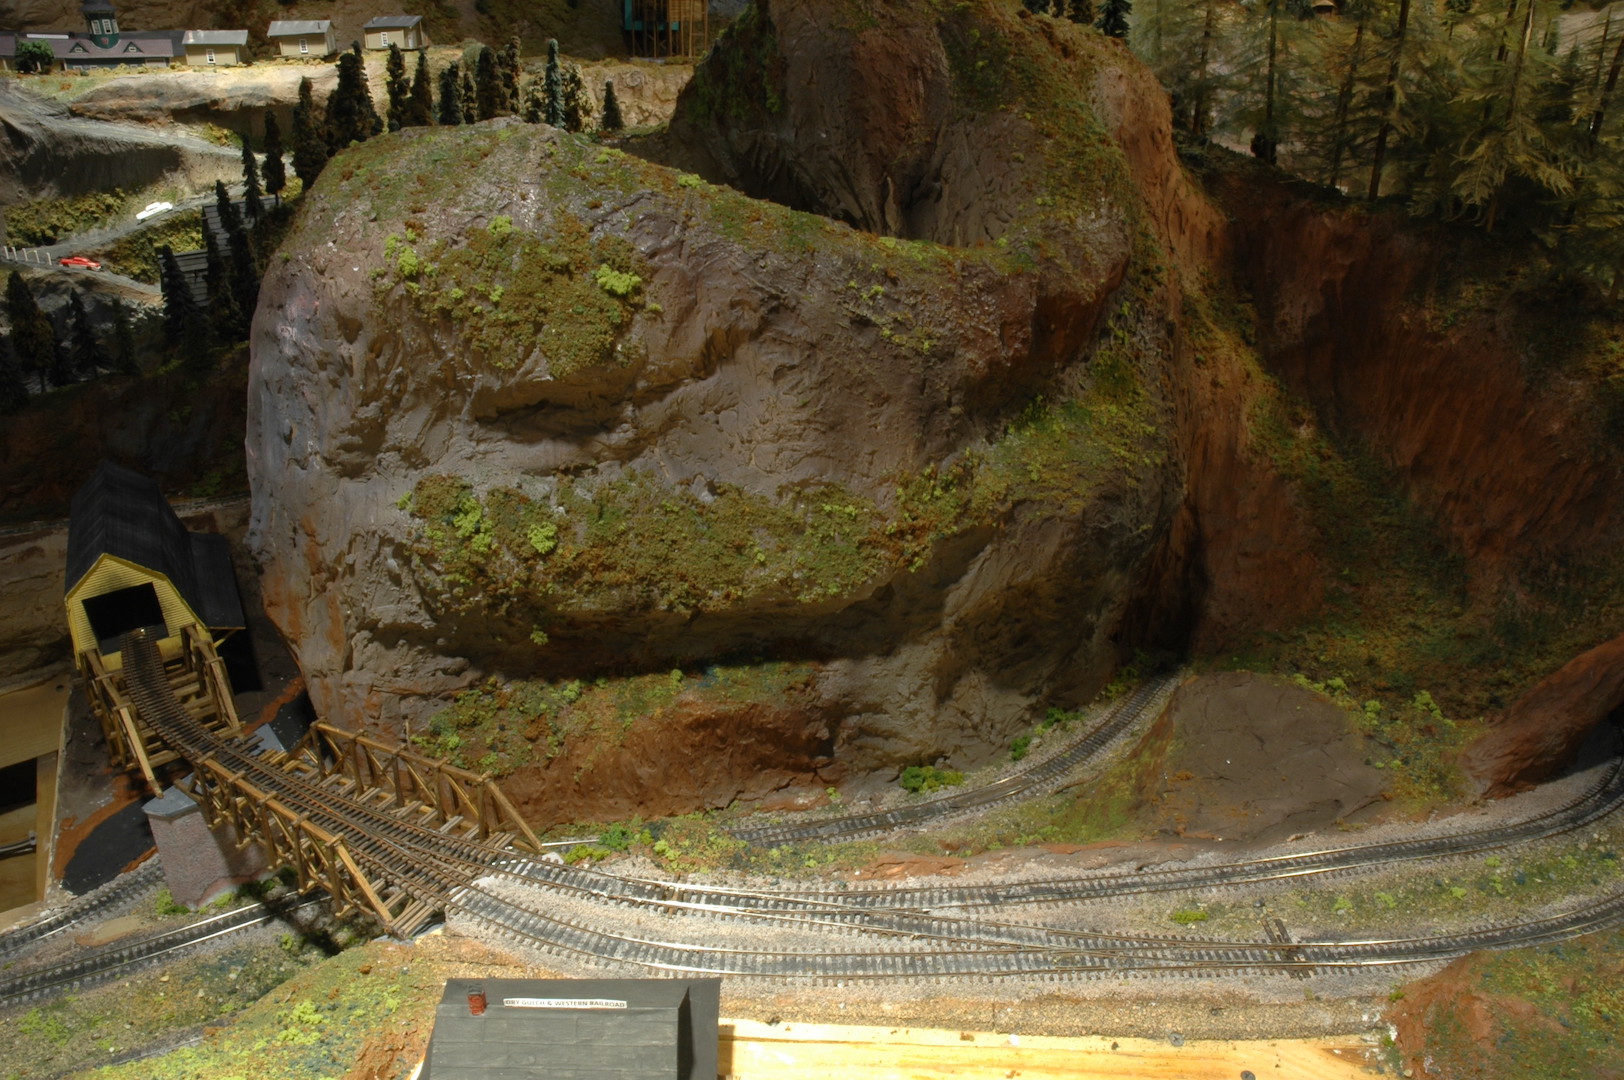
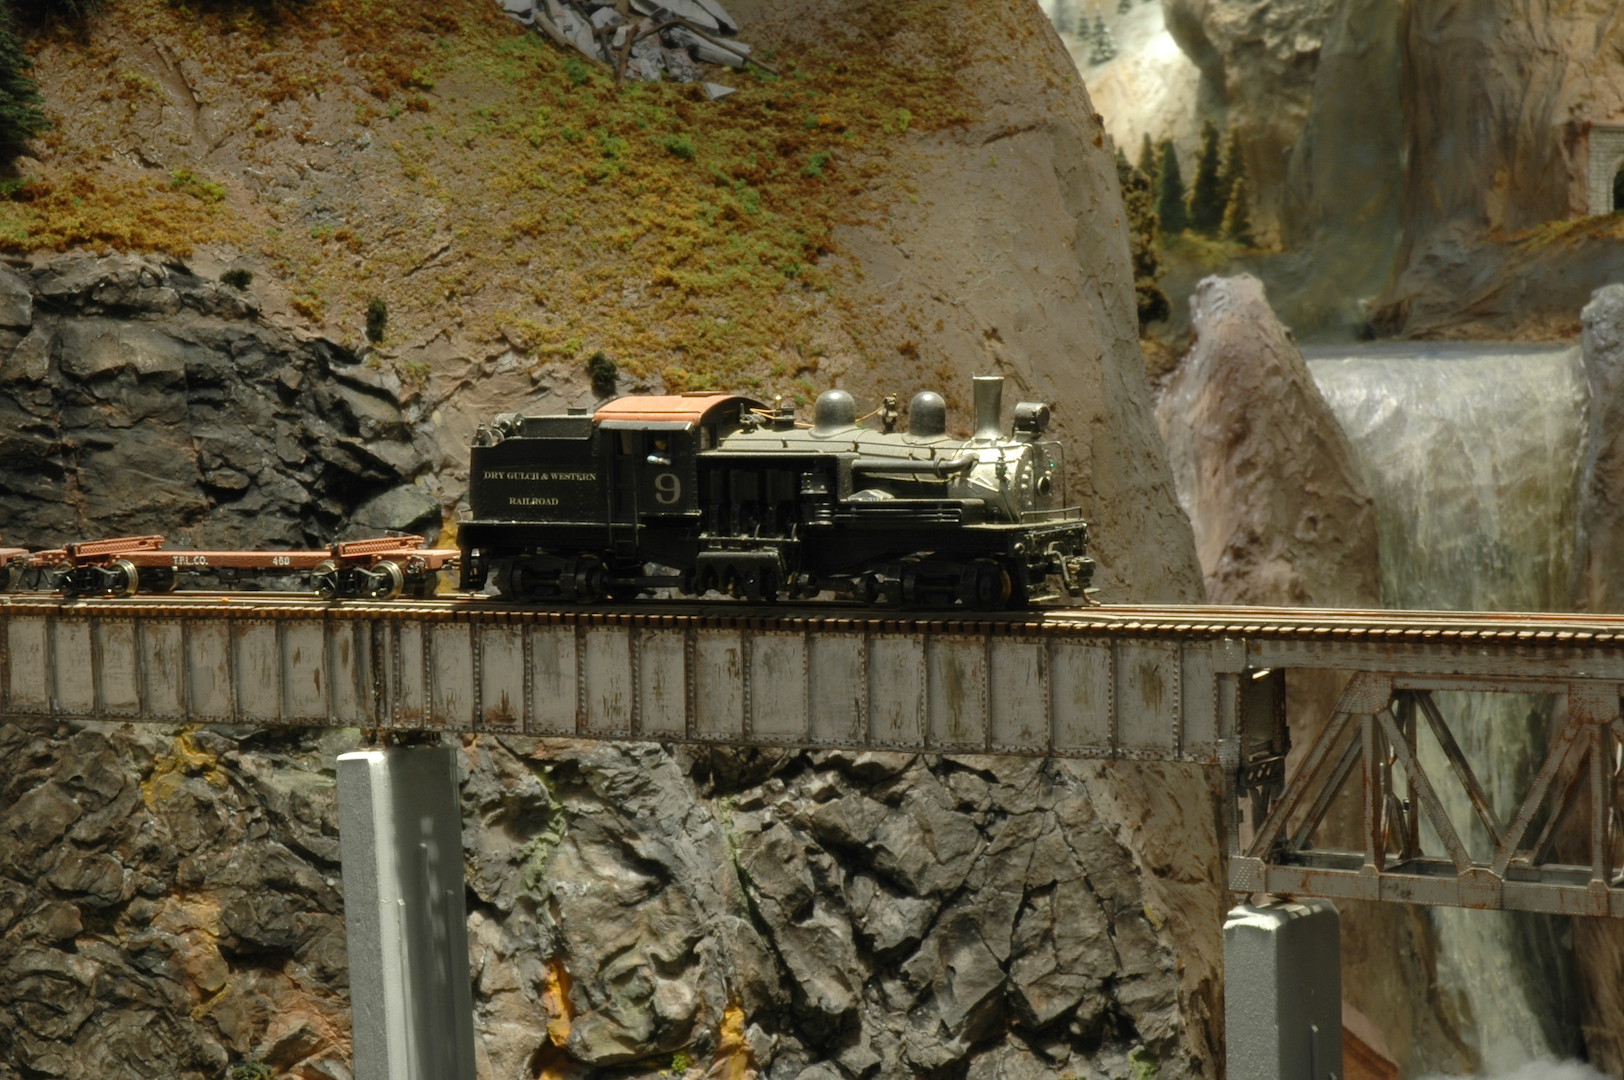
Photo 17 gives the overview of the area. The vine laden stone wall acts as a scenery dividing point between the two towns of Dry Gulch and Wapwallopen. From the extreme left to right you can see the yellow painted coal pocket structure and the straining beam bridges that allow access to the coal pocket. They also support one of the two turnouts for the run around track. The red structure is a small cannery that will provide some revenue freight traffic. The brick structure across the tracks is a deceptive building since it is 3 stories tall and has access to a siding from the branch line as well as another siding from the town of Dry Gulch. The switching crew at Dry Gulch will need to pay attention to where cars are placed next to this building! The small Wapwallopen station with is large expanse of roof is a kit I purchased from Ed Liesse. Ed knows I like Pennsylvania Railroad items, and this is a fine model of a PRR whistle-stop station. Last, is the stiff leg derrick that loads granite slabs onto specially built flat cars. The slabs are lowered from a trolley crane from the granite quarry at the top of the mountain. The entire process is done on the siding from Dry Gulch.
Photos 18 and 19 show both wooden cranes for the granite operation. The stiff-leg derrick was constructed from a Sheepscot kit that I purchased from JJ Johnston. It features functioning spotlights on the spindly legs as well as interior lighting in the small building. The trolley crane in Photo 19 was completely built from scratch and fitted to the area. JJ, I now know why you didn’t build the Sheepscot kit! Instructions? Who needs detailed instructions?

Photo 18 
Photo 19

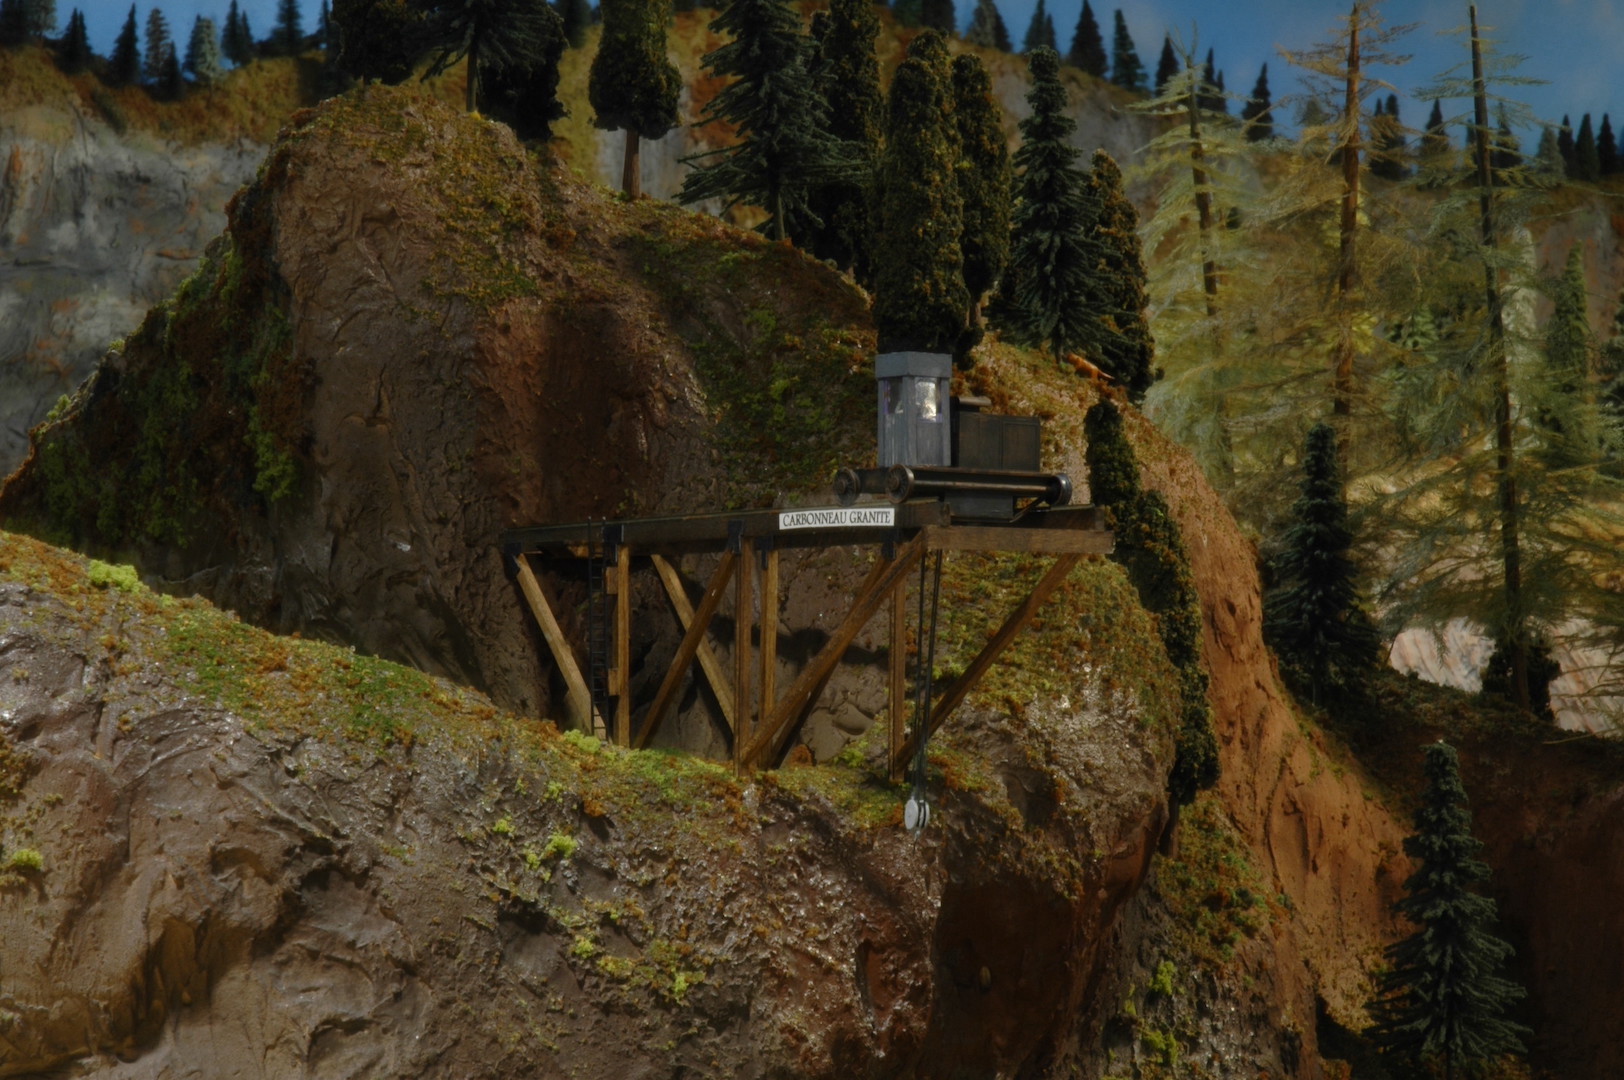
Photo 20 shows a backside view of Wapwallopen and the straining beam bridges. This shot was taken from the access hole located in Dry Gulch. The two tracks leading under the straining beam bridge on the right provide the siding for the granite operation as well as the brick structure. The single-track siding under the second straining beam bridge allows for rail access to a fuel facility and its associated storage tanks.
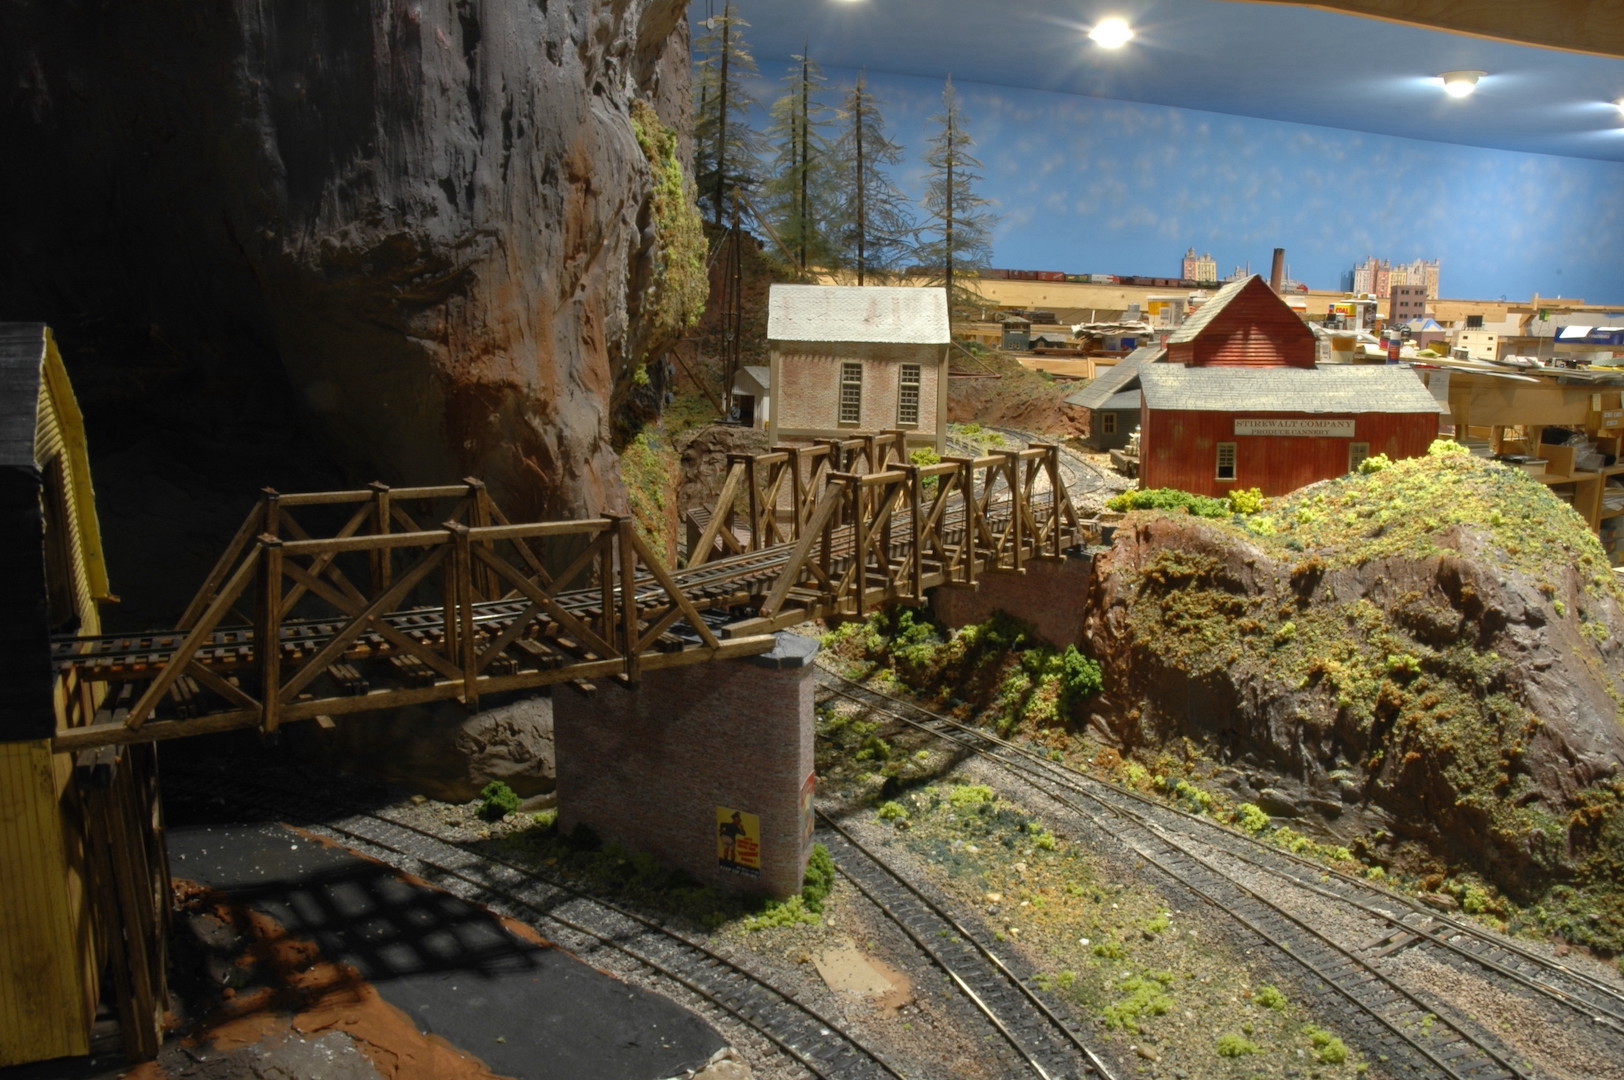
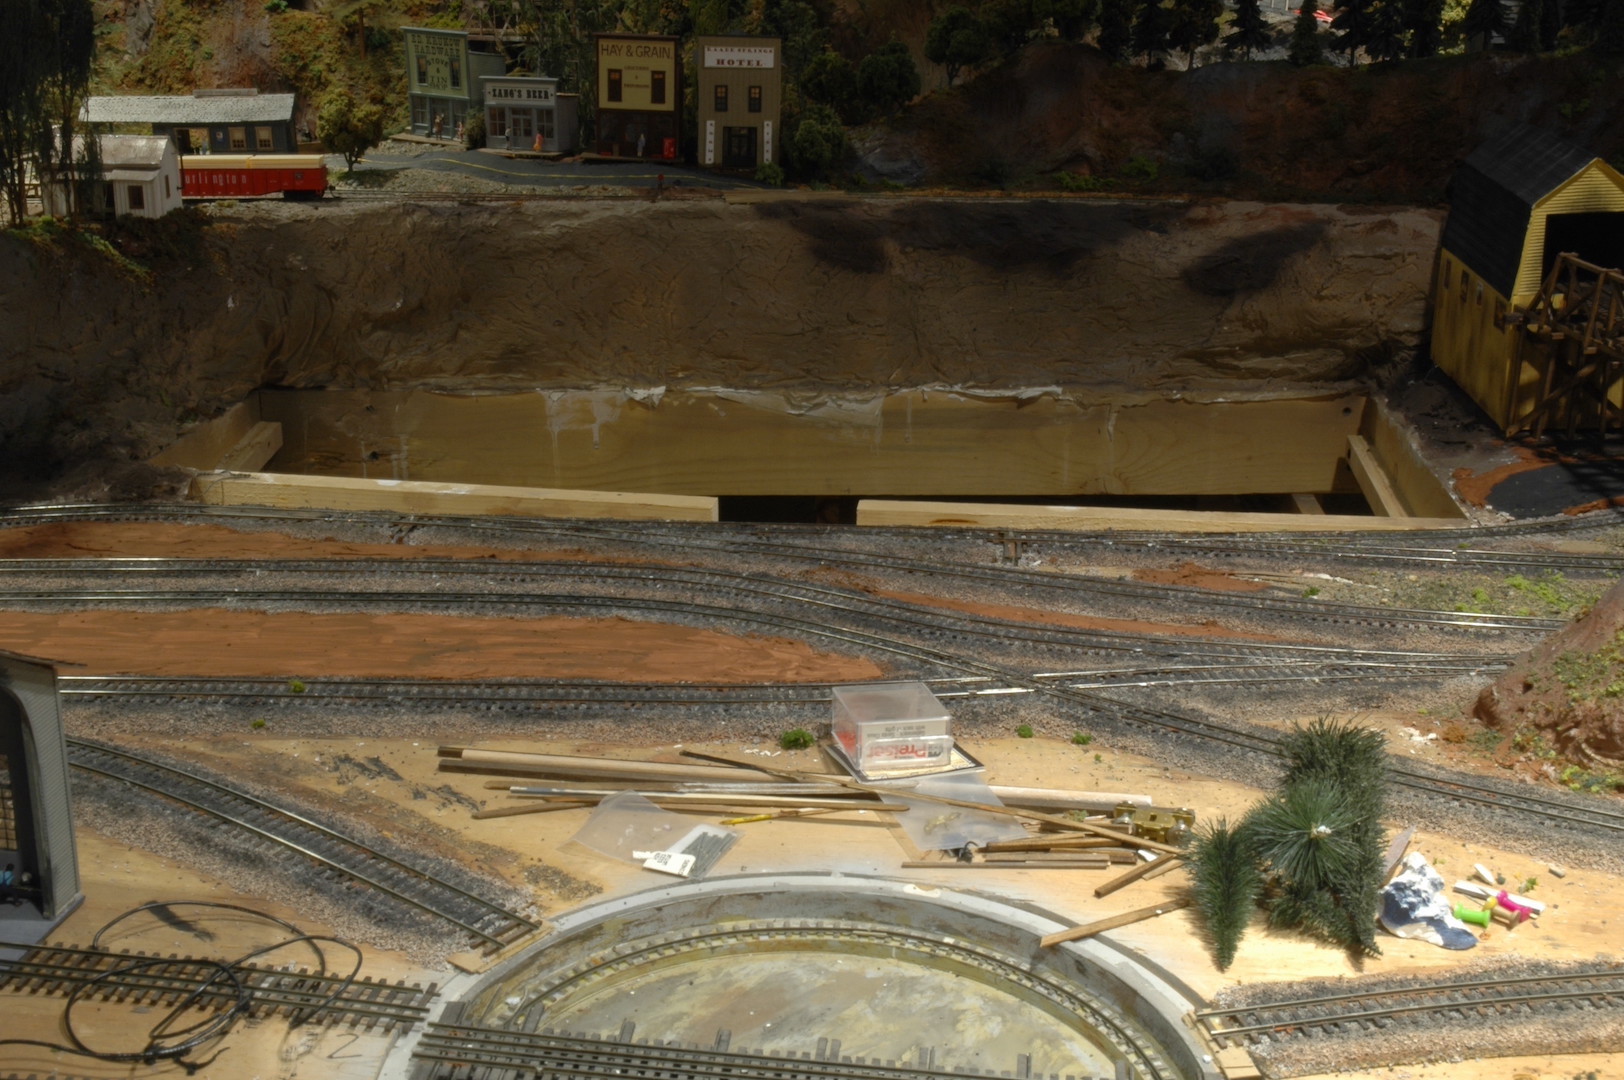
Photo 21 shows the access hole that the previous photo was taken. The cover for this access hole is currently under construction off of the layout. It will feature several structures and scenery. It will be a sliding lift-up type of access hatch with the ability to lock in the upright position allowing me to do track maintenance. Directly behind the hatch area is the completed town of Raade Springs. This town has rail service provided by the branch line out of Dry Gulch. In the foreground is the Dry Gulch turntable and to the extreme left is the corner of the Dry Gulch engine house.
That completes this update on the Dry Gulch & Western Railroad. Over the next few updates, we will take a peek at the towns of Alpine, Potter Flats, and Raade Springs. All of these areas were completed over the past year along with the adjoining scenery.
David
Hopper Car Farm Grain Storage
By George Chambers
My wife Sally and I were on a trip a couple of weeks ago in northern Idaho. A few miles west of Bonners Ferry while driving through some farm country I spotted a use for an old grain hopper car. A Union Pacific hopper car was mounted up on some cement concrete pillars for cattle feed storage. Those modeling today’s railroads could use one on a farm scene.

The next photo was from near where we were staying in Hope, Idaho. The BNSF track was near by, so I caught the rear end of a coal train heading westbound on the former Northern Pacific Railway track. This is a few miles east of Sandpoint. Lots of freight trains going though this area.

George
Bremerton Northern June 2021 Flimsy
Click here to read the June 2021 issue of The Flimsy Board from the Bremerton Northern Model Railroad club.
David Yadock’s Dry Gulch & Western Update 3
Article & Photos By David Yadock
Dry Gulch & Western, Update 3
As mentioned at the beginning of my photo layout series in the Grab Iron, the photos presented in this series are more records of progress rather than glamour shots. Since the outbreak of Covid-19 and the “stay at home” orders I have been working on many Dry Gulch & Western projects when not at my day job. I have mainly concentrated my efforts at completing scenery in the central portion of the layout, an area that is roughly 10 feet by 14 feet. This section of the layout had some track issues that needed modification. One major problem was the branch line running out of Dry Gulch. The original plan was to have a separate line proceed to the tiny mining town of Raade Springs. The major problem was that most of the line was buried into very long tunnels. Hidden track is never a good way of doing things and changes had to be made!
It took a long time to come to the realization that the track needed to be changed and that is why scenery in this area languished. What should I do? Remove the tunnels? Daylight the tunnels? Change the branch line? There were many choices, but I chose to re-align the track. It created some challenges along the way. First, I removed all the track in the very long tunnel. This tunnel went from one side of the Dry Gulch peninsula to the other (about 10 feet). Next up, I created a crossover track that connected the mainline that goes to Dry Gulch with a portion of the old original branch line track. Only a hole in the mountain needed to be created to carry the track from the crossover. Luckily both tracks were at almost the same elevation and hidden from view by that mountain. This crossover track is on the mainline located between my town of Gornitzka Crossing and Dry Gulch. Since the crossover is hidden, the branch line track now appears to be its own stand-alone track. This track comes out of a wooden tunnel portal on its way to Raade Springs. Operationally, this works much better since only a small portion of the branch line track is hidden in a tunnel. Another bonus is that I am able to use one small section of track for two purposes (branch line and mainline). The other feature is that I now have a spot for a new town on the layout. It will have its own station and will feature a couple of small industries. This new town is physically separated from Dry Gulch because of its elevation yet it’s buildings will blend in with the town of Dry Gulch. This new town will increase the operational capabilities of the layout without too much additional scenery or space. This use of space is something to consider with layouts that have size constraints.
The new town is called Wapwallopen (named after a small hamlet in Pennsylvania). It has two sidings and a run-around track. I admit the improved branch line was a major change on the layout that required quite a bit of work. The control panel needed modifications. There were 4 turnouts added to the layout along with new sections of track. Two straining beam wooden bridges were constructed to carry the track to a newly constructed coal pocket. Several structures still need to be completed in this area. All the track has now been ballasted and tested. This new branch line will allow trains to originate out of Dry Gulch, something that was previously not done. Once all the scenery is completed even more trains will be able to use Dry Gulch as their starting point. This will create a multitude of operational possibilities.
For your viewing ease I will be placing “before” and “after” photos of the newly completed areas. This will allow you to compare the old with the new scenery/additions without having to go back and view the older Grab Iron entries I have made.
Photo 11 shows the area where the new town of Wapwallopen will be situated. In this “before” photo a new town will be located approximately where the Borden’s Fine Cheeses reefer is parked. That flat area was built out and extended to allow for a run-around track and two additional turnouts. Some room was created for additional structures.
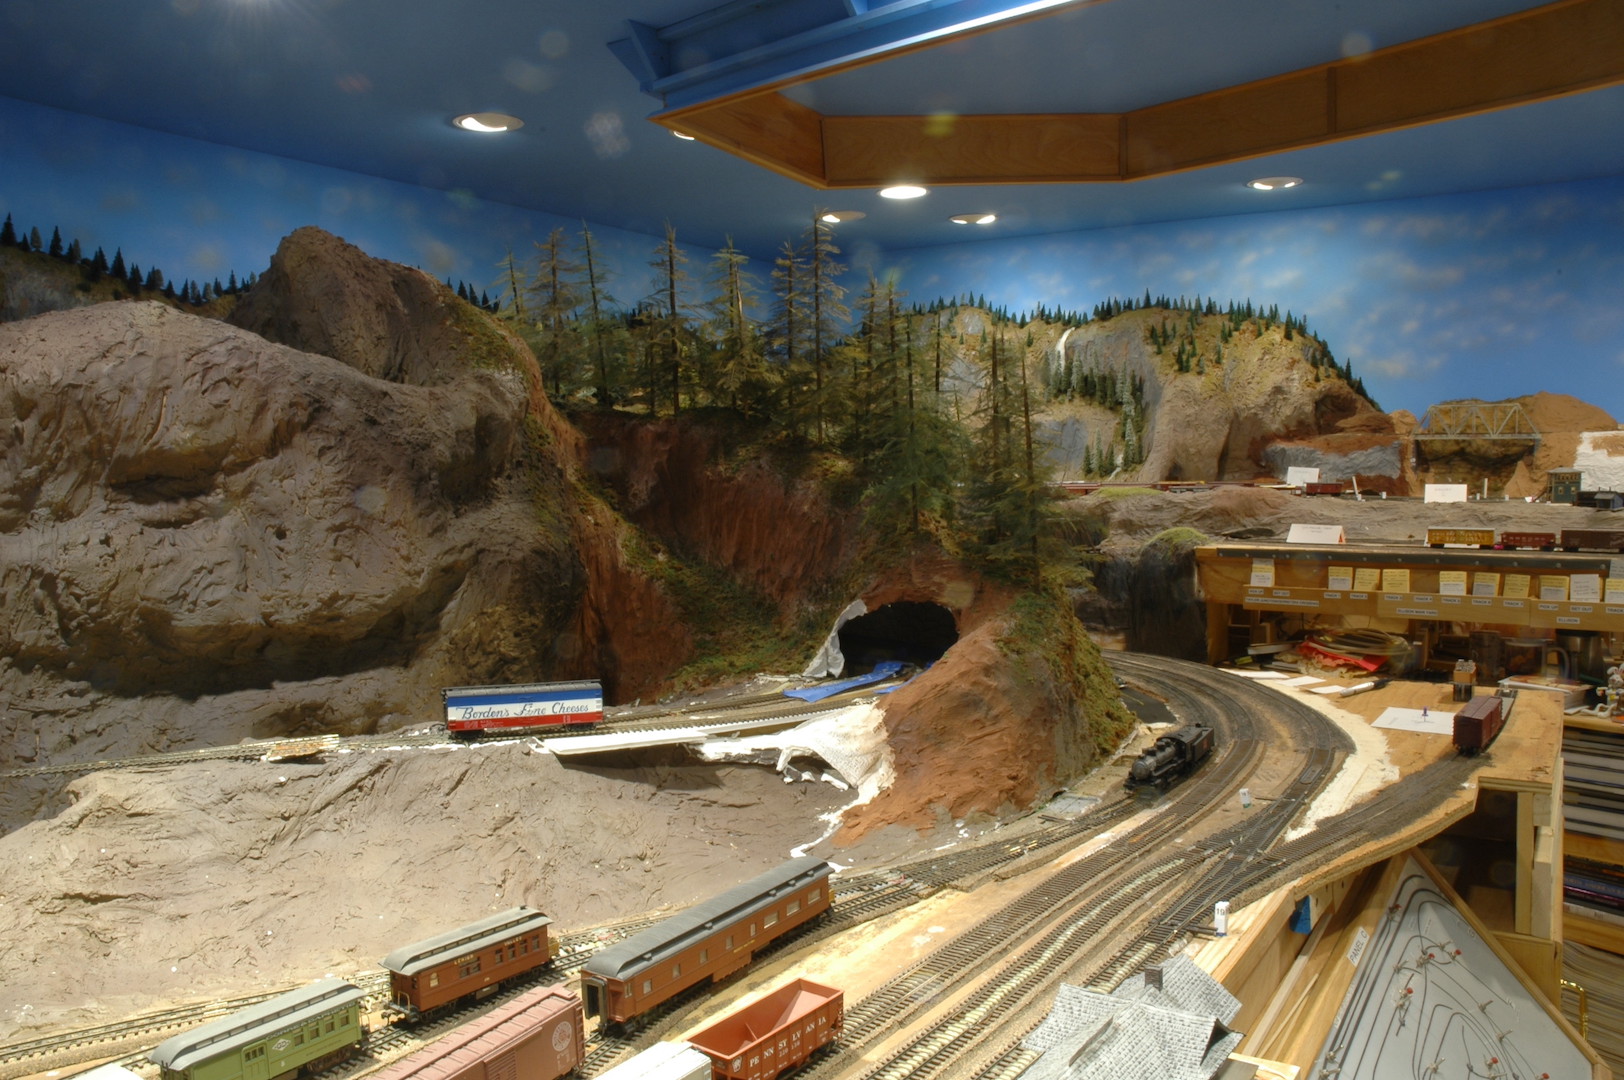
Photo 12 (another before photo) gives the overall view of the area prior to the changes. This photo shows the limited working space in this area. In a few square feet two bridges were installed, a run-around track, and several structures added to create a town. The mountain that is behind and to the left of the red, white, and blue reefer in this photo hides the crossover connecting the mainline with the branch line.
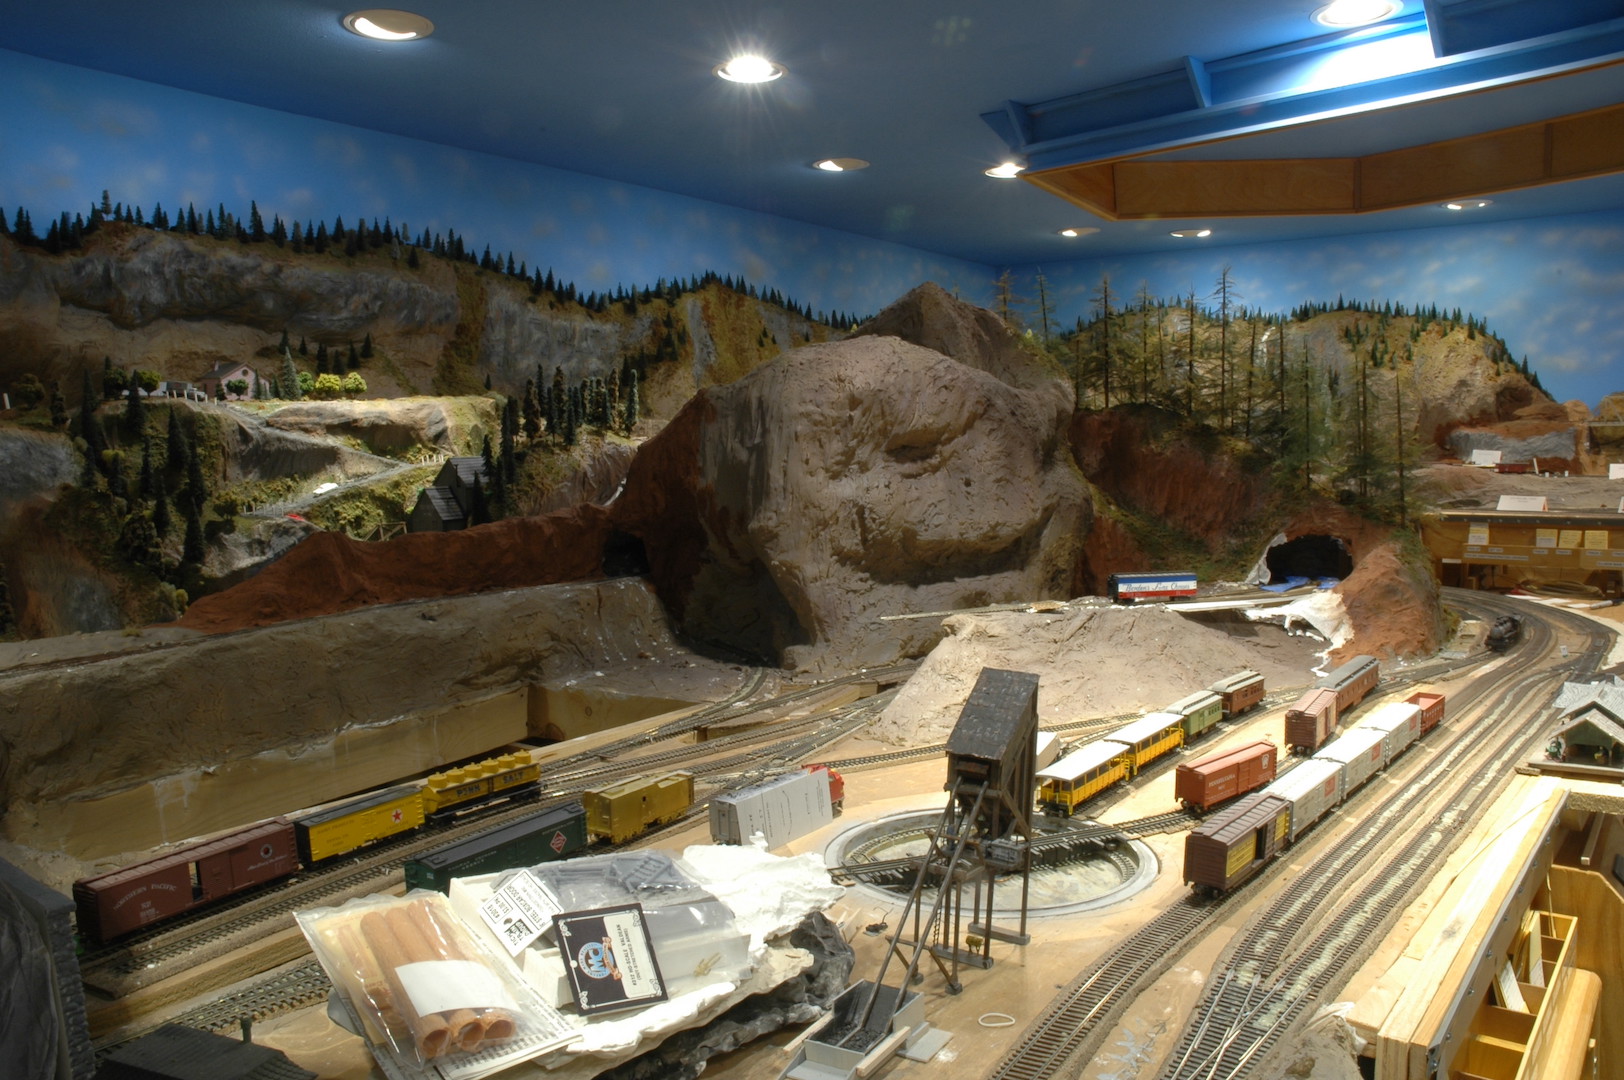
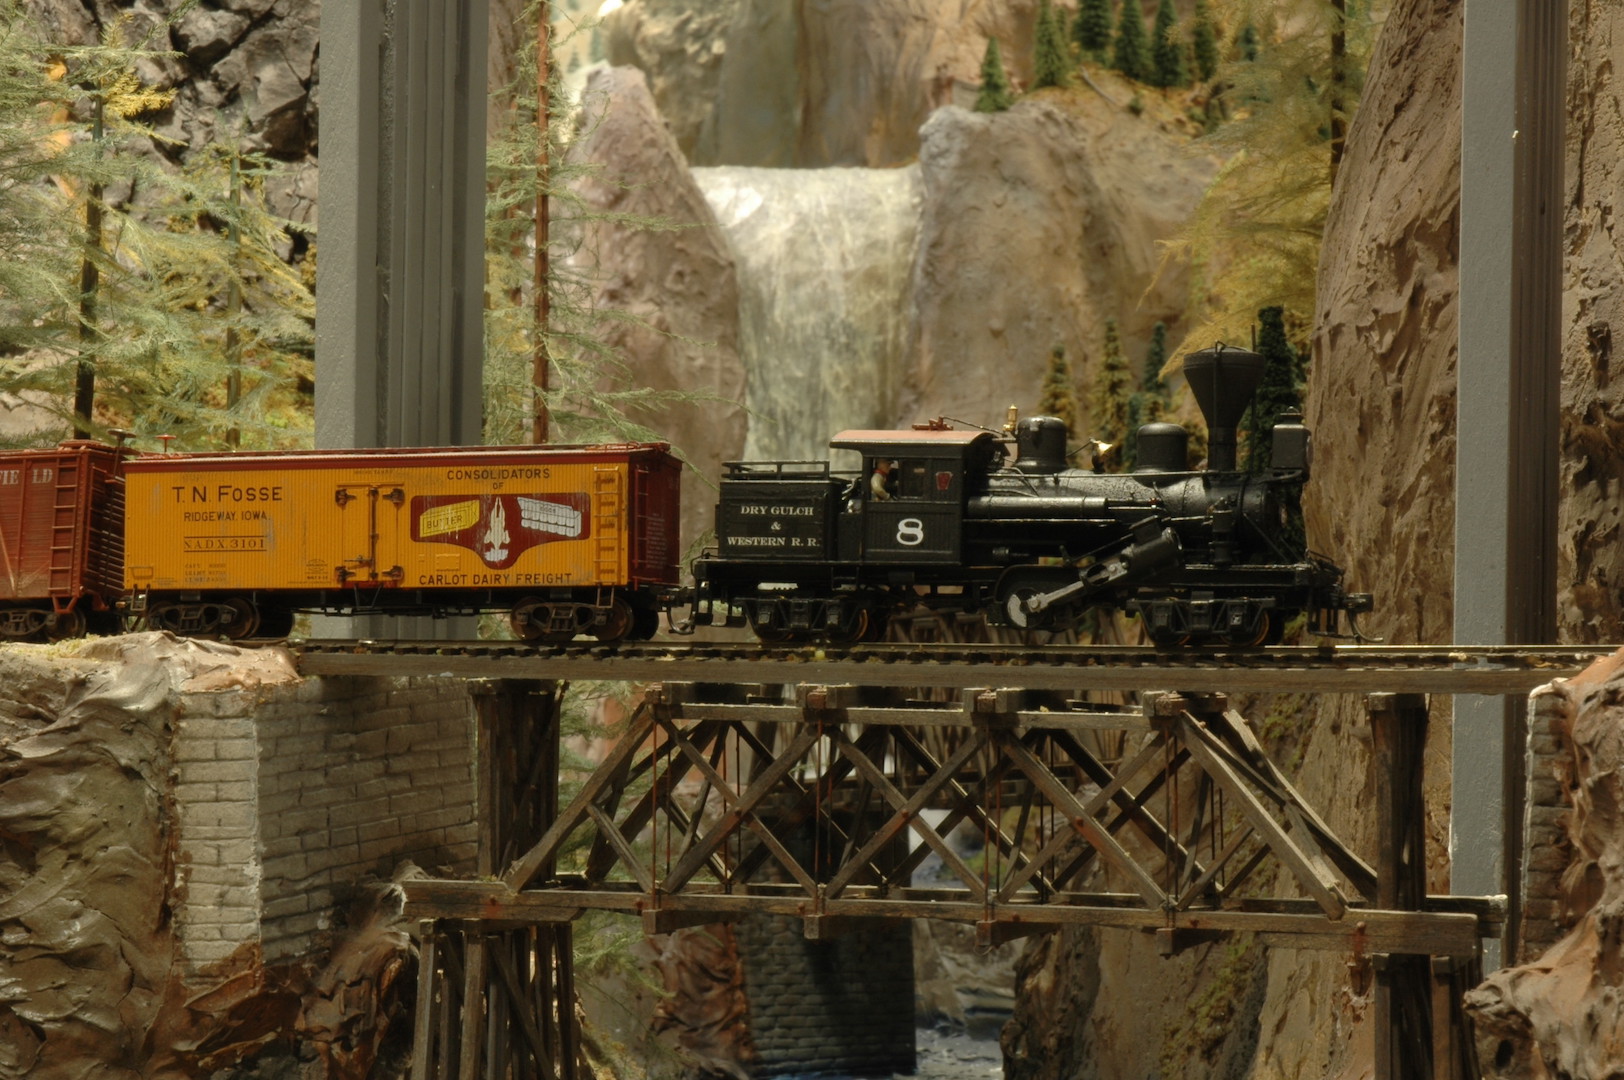
Photo 13 shows a close-up view of some of the new track and turnouts. I added more plywood to give some needed real estate for future structures. Woodland Scenics wall units were added to finish off the front height gap that was created. In this photo you can see the run-around track and one of the straining beam wood bridges. The bridge was a highly modified Campbell kit that carries one of the turnouts for the run-around track. The track then continues on to yet another straining beam bridge and then finally to a coal pocket.
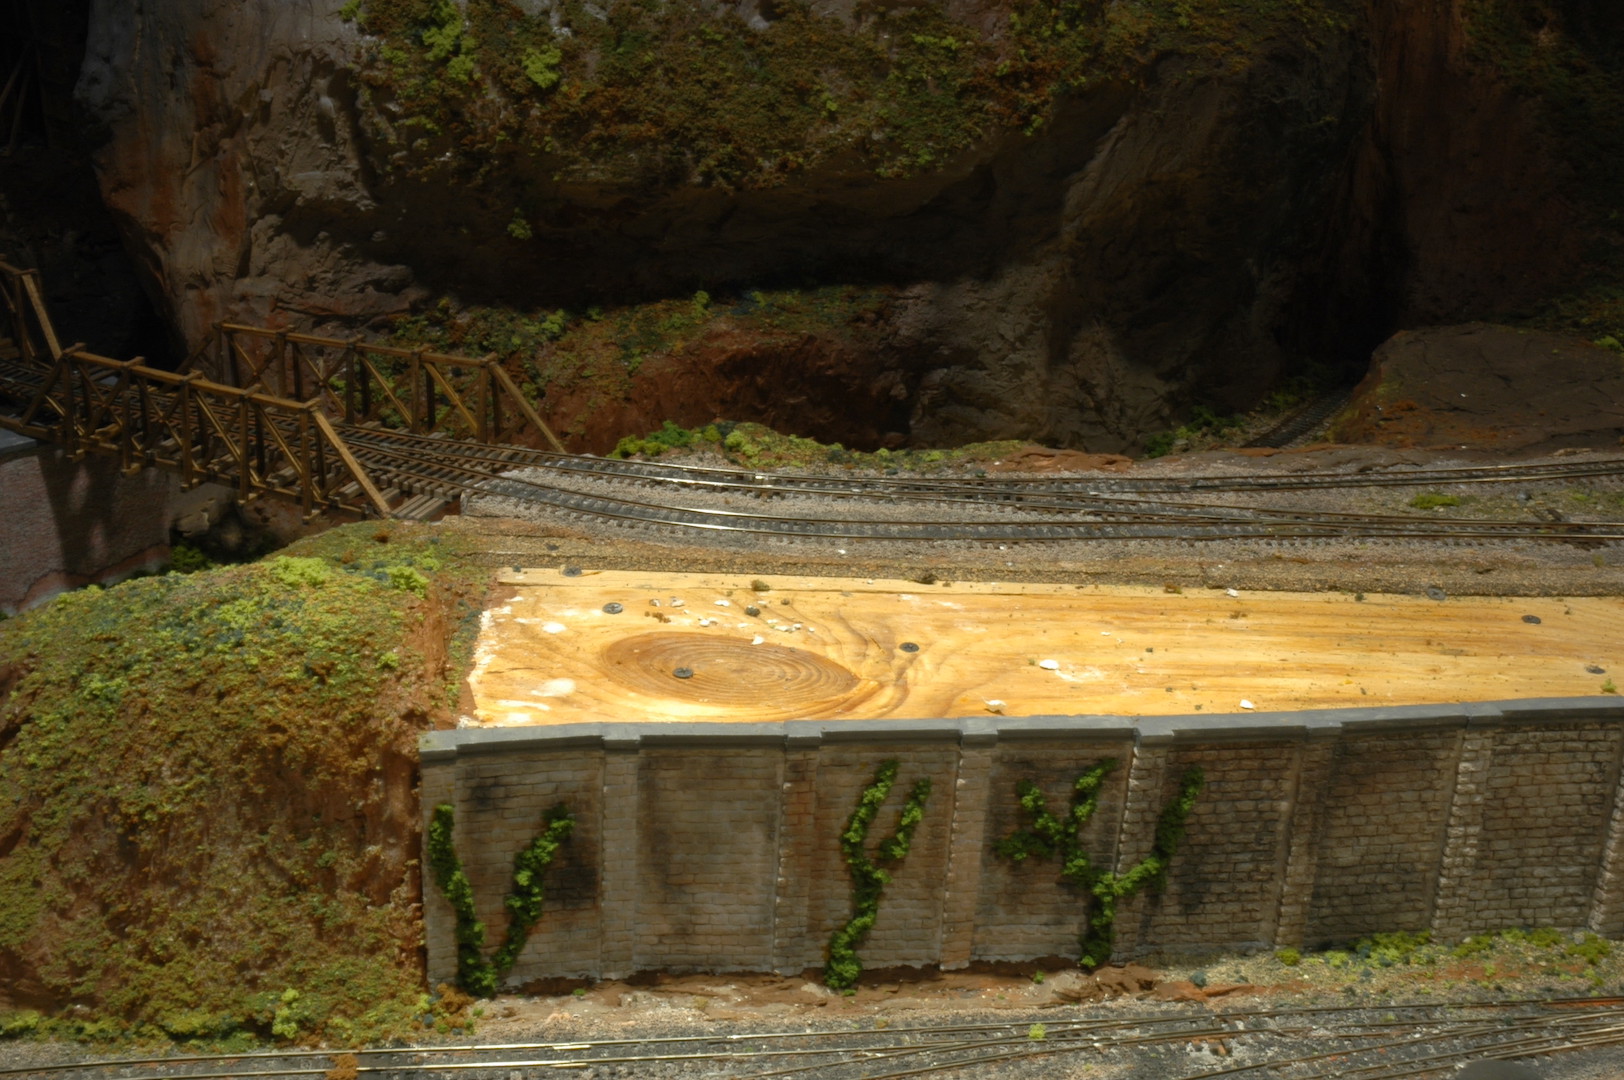
Photo 14 is an odd photo, but it shows half of the new crossover that has been added to the mainline (north of the roadway). The rest of the crossover is in the mountain. This crossover is directly behind the mountain in the center of photo 12. To give a frame of reference for this photo, the photographer (me) was standing on the Ellison yard tracks hovering just over the forest above Gornitzka Crossing. If you look at photo 11, I would be just in front of the small waterfall cascading down the mountain along the back wall pointing my camera directly across the room. I admit, I will probably never take a photo from this vantage point ever again! When this photo was taken there was still some scenery to complete by the crossover and vehicle roadway.
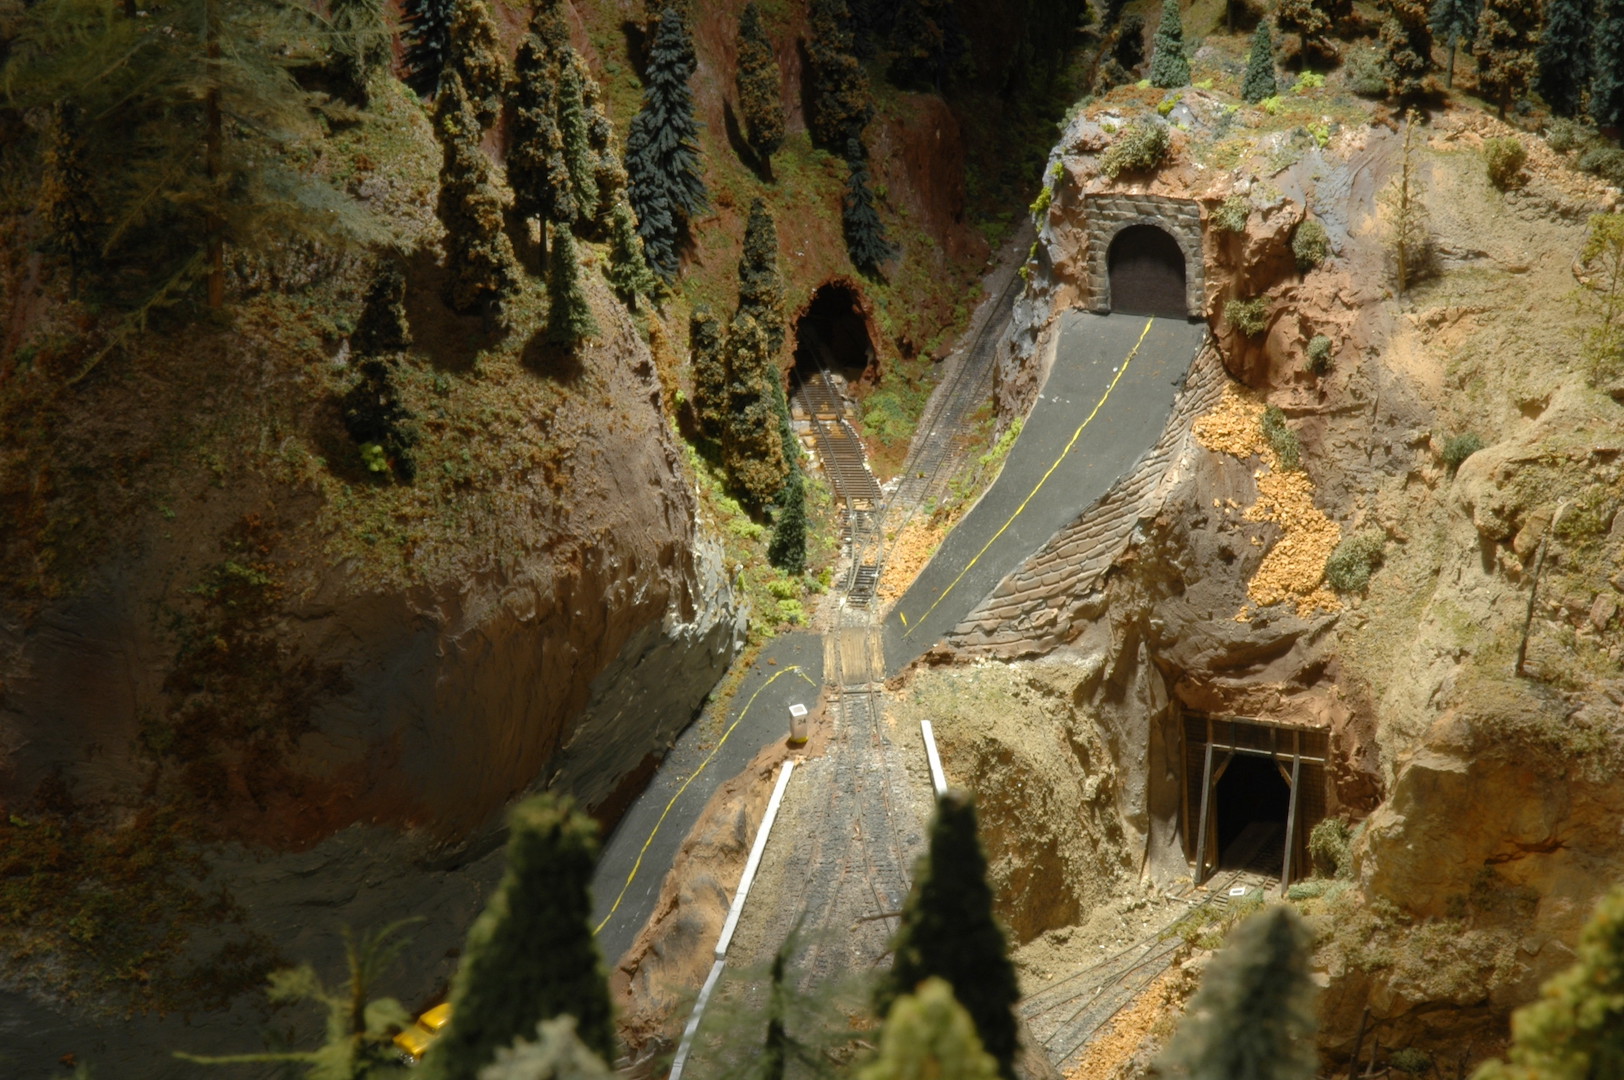
Photo 15 shows a closeup of the tunnel entrance. The branch line is the track closest to the front and is one leg of the crossover from photo 14. The next track is a long siding that curls into the mountain and can be used store several freight cars for switching or storage. The next track in the photo is a siding coming off the small yard in Dry Gulch. This track is about 4 inches below the branch line tracks. That will be a loading area for cut stone. Construction of a stiff leg wooden derrick has begun and will be placed next to that siding. A small station will be located by the turnout at the bottom center of this photo.

Photo 16 shows an overall “helicopter view” of the area. There isn’t very much space, but it will make for an interesting section of the layout. The run-around track will allow for locomotives to complete switching of businesses. Here you can see the two bridges and the coal pocket. The original branch line track to Raade Springs is directly behind the coal pocket. This portion of track is still used while most of the other track that was buried in the mountain has been removed. Only some more trees and structures to be added to the area, then it will be complete.
This new portion of track has changed the way trains will function out of my layout’s namesake town. It will give new operational challenges as well as opportunities. This just goes to show you that a layout must remain fluid and can be changed at any time. Next time I’ll give you a view of some more new scenery additions to the Dry Gulch & Western.
David
Bremerton Northern April 2021 Flimsy
Click here to read the April 2021 issue of The Flimsy Board from the Bremerton Northern Model Railroad club.
David Yadock’s Dry Gulch & Western Update 2
Article & Photos By David Yadock
Dry Gulch & Western, Update 2
Not only have I been working on logging locomotives, but I have been adding some rod engines to my fleet. I even added one of those new-fangled diesel things! It seems that all model railroaders have the same problem, too many locomotives. I decided to join the crowd. Again, some of these engines were what I consider “basket case” repair projects. These have always interested me since they can either be used for spare parts or can be resurrected to operating status. I used to be able to obtain these locomotives for a reasonable cost off of Ebay. Over the years that has changed and now parts locomotives command about the same price as their fully functional counterparts.
Photo 7 shows my refurbished PFM 2-6-0 Boston & Maine B-15 locomotive. It was another “basket case” Ebay purchase. Someone tried to re-motor the locomotive but failed in their attempt. The drive assembly was a complete shamble. I installed a newer very small can motor along with a sound decoder and keep alive system. This locomotive has always interested me since it sports a highly detailed front snowplow. I changed out the front cast coupler for a working Kadee coupler on the plow. Doing so was an interesting task.
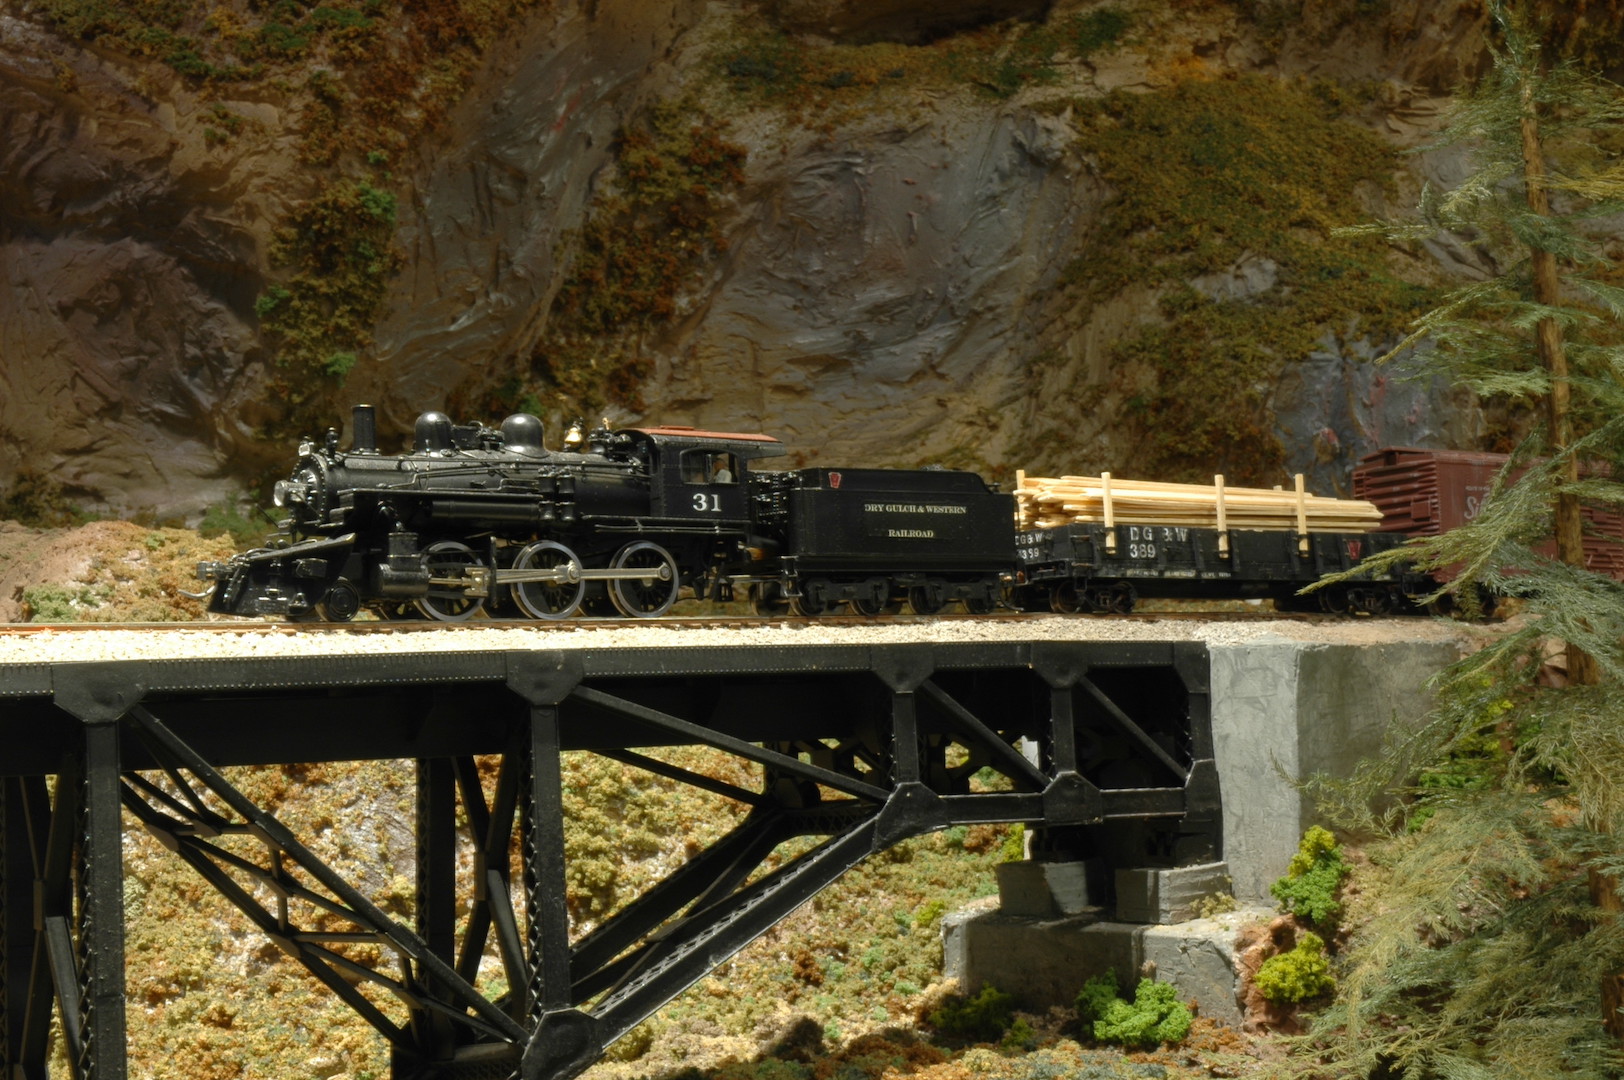
Photo 8 is my Boston & Albany Custom Brass 4-6-6 tank locomotive. Yet another “basket case”! The cab and boiler needed to be soldered back together (I can’t believe someone used epoxy to glue the two parts of the locomotive back together). It also had some driver issues. There was a short in just one of the drivers. It was located on the center driver and this type of short is a common problem, especially with this locomotive. The paper that is used as an insulator between the hub and wheel rim degrades over time and allows the passage of current. I replaced the paper with new friction tape and the short was eliminated. All the drivers needed quartering. When I purchased this locomotive, it came in pieces and was not put together, so I can understand the quartering issue. The front 4-wheel pony truck was not included, but I found a good substitute on a separate Ebay purchase. This locomotive has been a real challenge. It is still a work in progress since I am still tweaking that front lead truck. The back set of wheels hit parts of the main front frame of the locomotive. I have finally found a solution to the front truck problem but will require a complete disassembly of the locomotive to complete the work. Since I have just gotten the locomotive all put back together, I really do not want to tear it down! It also has a sound decoder and keep alive system installed.

Photos 9 shows my 0-8-0 switcher. This started out as an AHM import of a Rivarossi locomotive. As a plastic model with pizza cutter flanges on its drivers things needed to be changed. I bought this locomotive brand-new many years ago when I first started model railroading. This was from the good old days of code 100 brass track and saw dust scenery! This locomotive had lots of good aspects to it, so I wanted to make it be able to run on my train layout. To get it to that point a lot of work had to be done on this model. A new motor/drive system was constructed and installed. The flanges on the drivers were carefully ground down to follow RP-25 flange size. It had a sound decoder and Keep Alive capacitor system installed along with a sugar cube speaker. A new LED headlight was installed along with a LED flicker firebox light. Finally, a Tenshodo brass “clear vision” tender with booster truck was mated to the locomotive. This heavy locomotive will be used for switching duties in one of my railroad’s yards. I submitted a feature article for publication about the entire process of rebuilding this locomotive and hope to see it in print soon.
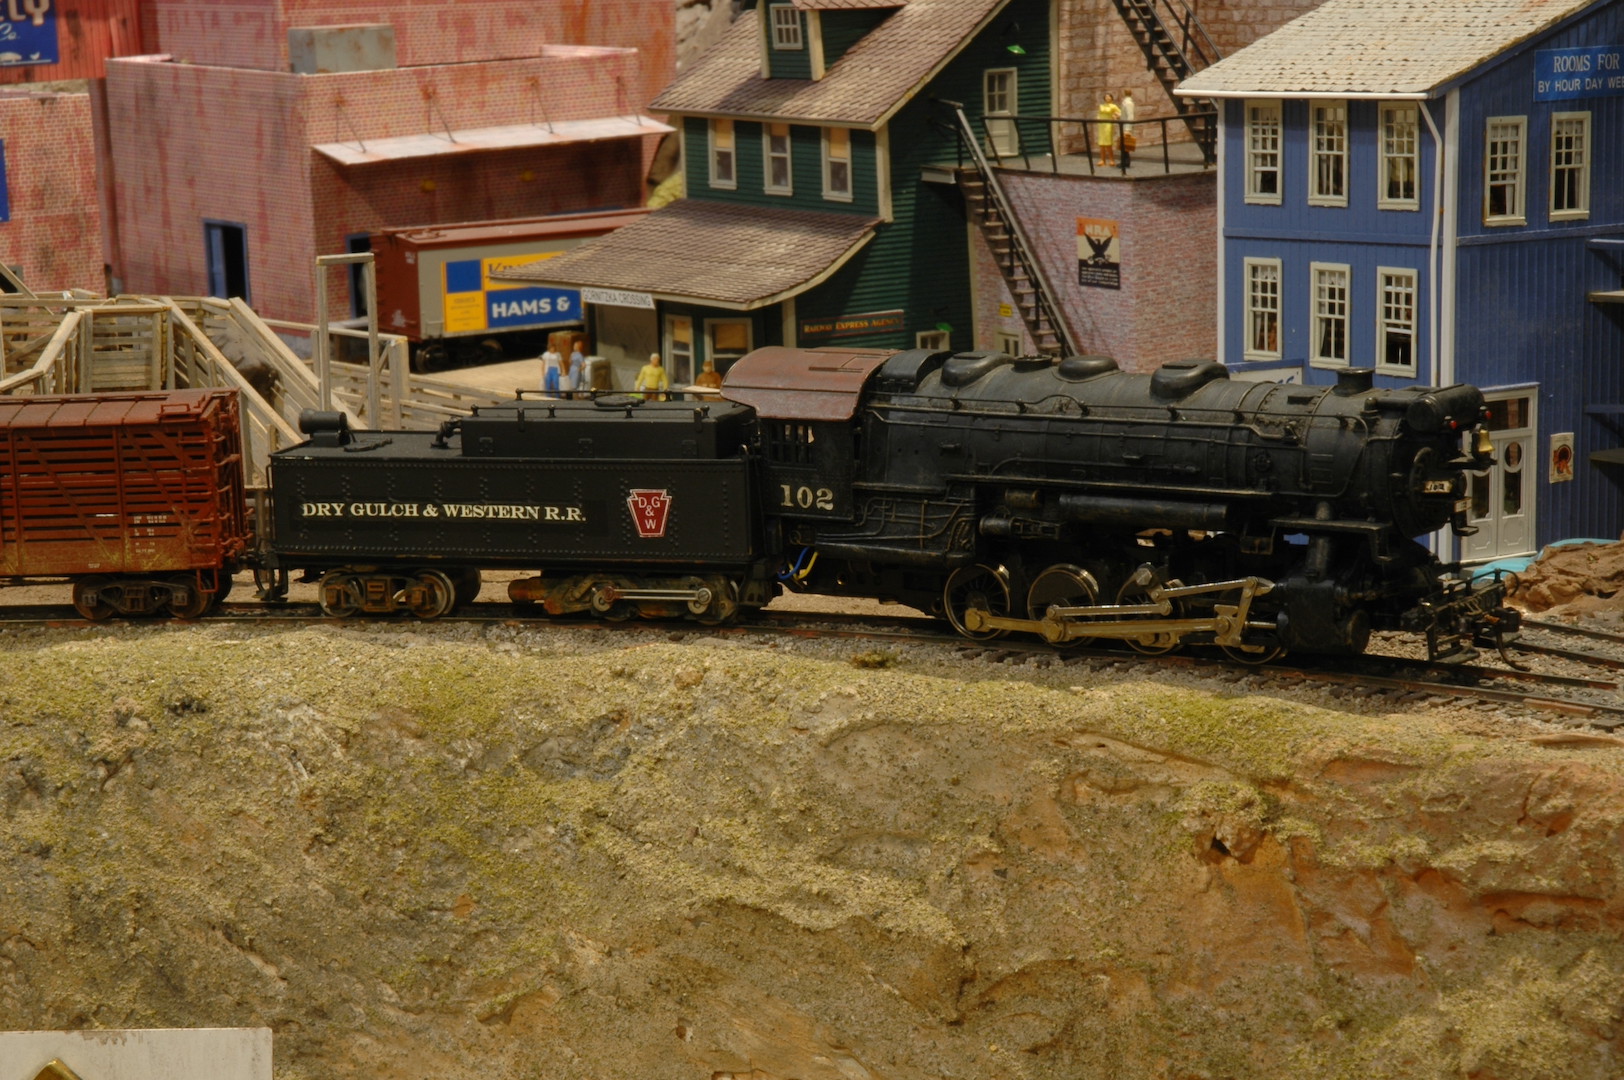
Photo 10 is a nod to all you modern diesel fans. This is my Oriental model of an Erie oil electric locomotive. This model was purchased many years ago and it sat in a box. It was in perfect shape. Originally it was to be cut it in half and used for a doodlebug project. I admit I really didn’t want to cut it in half, so that is why it sat in a box! As I was looking though my various locomotives for new projects, I opened this one up. I figured the Dry Gulch & Western needed to step into modern times! So, it now has a diesel. This one only needed paint, window glazing, lighting, addition of a sound decoder, and a Keep Alive system. I was able to use the original motor and driveline. This locomotive went from box to layout in less than a week. I have grown fond of this model since the locomotive was painted and detailed. The roof top vents and piping make it interesting.

There are several other rod locomotive projects that are still patiently waiting their turn for renovation. Currently on the work bench I have three 2-8-0 locomotives that are in the process of being refurbished. On one I have just finished installing the new drive assembly and motor. The boiler and tender have been painted. It is now ready for the installation of the decoder, speaker, and Keep Alive system. The other two are in various stages of driveline design or teardown. Yes, I do all these projects all while working on other projects on the train layout. It really does keep me busy and out of trouble! Next time I’ll begin my updates on the train layout. Quite a few changes have happened, new track has been added or adjusted along with a lot of new scenery.
David
Mount Vernon Winter 2021 Non-Clinic Report
Click here to read the Mt. Vernon Non-Clinic Report for Winter 2021.
David Yadock’s Dry Gulch & Western Update 1
Article & Photos By David Yadock
Dry Gulch & Western, Update 1
Wondering what has changed or been modified on the Dry Gulch & Western railroad? As mentioned earlier, I have been working on several locomotive projects to provide a varied locomotive roster when conducting operating sessions. Before showing the changes to the layout I’ll show you some of the locomotive projects. I have decided to re-motor and install sound decoders in some of my locomotive collection. I have had several locomotives waiting a long time to roam the rails of my basement empire. My logging locomotive fleet originally had several Bachmann locomotives. Unfortunately, Bachmann’s quality control and availability of replacement parts relegated many of these great looking locomotives to the bone yard. I needed to rebuild that fleet with some more dependable locomotives.
Photos 1 and 2 show the first locomotive I tackled. It is a PFM 2-truck Pacific Coast Shay. It had a new motor and driveline installed. I also installed micro LEDs to the headlight and backup light. To dim down the harsh white color of the LEDs I coated them with transparent orange paint. A flicker firebox light was also installed. A SoundTraxx TSU-750 sound decoder with a Keep Alive capacitor system was used for the locomotive control. I used a sugar cube speaker for sound. This locomotive came painted and numbered, I only needed to add my railroads name to the sides.

Photo 1 
Photo 2

In photo 3 is a view of my PFM 2-truck Climax locomotive. This was one of two “basket case” Ebay purchases. This one had many things broken or damaged, such as, a broken universal joint that I had to manufacture out of flat brass and brass square tubing. It also had been left against some of the original foam padding from the PFM box. That foam had deteriorated and stuck to one side of the locomotive’s paint. It had to be thoroughly cleaned and buffed prior to painting.
The next locomotive shown in Photo 4, is a 3-truck Climax. It was the other Ebay “basket case” purchase. The locomotive had driveline deficiencies that didn’t allow it to run at all. The entire drive mechanism from the wheels to the motor had seized. The only thing I can think is it was stored for a long time in a damp location. The entire drive mechanism had to be taken apart. Once apart, the gearing was cleaned and polished. When it was all back together and lubed it now runs very well. Many hours were spent on the gentle cleaning process to bring this locomotive back to life. Both Climax locomotives had the same things done to them as the Shay mentioned above (re-motor, flicker firebox light, micro LED lighting, Keep Alive capacitor system). The only difference is that I used SoundTraxx Tsunami-2 decoders in these locomotives.
Photo 5 shows another PFM 2-truck Climax. This locomotive was a breeze to work on. It was another Ebay purchase but was all intact and complete. I did notice that it did not have a backup light on the model, so I built the light out of brass tubing. To complete the backup light detail, I added several small pieces of brass for hinges and latches. It was then added it to the top of the cab. Yes, this locomotive received the same sound system and electrical details as the other two Climax locomotives already mentioned.
Photo 6 is yet another PFM 2-truck Climax. This one was a swap meet purchase. At first glance it looked like a great model but when I began my teardown to replace the motor several issues came up. The main shaft from the upper driveline to the lower drive assembly was bent. I’m not sure how the previous owner bent that shaft! This caused the locomotive to lurch when power was applied. I have attempted to straighten the shaft as best as I could, but the lurch remains. Luckily the lurch is slight, and it is oddly only in the reverse direction. I decided that I would continue with the project to completion and be on the lookout for a replacement drive mechanism for this locomotive. This locomotive had other damaged items that I was able to repair. It also received the same sound and detail treatment as the other locomotives. The Dry Gulch & Western now has a sizeable fleet of logging locomotives but I still have a couple PFM Heislers and two PFM Shays to add to the roster. Eventually they will all have sound decoders and such added to them. No, not all these locomotives will be on the layout at the same time but will be rotated. That will give the layout operators some variety in motive power.
Next time I’ll show some of the modified rod locomotives that I have been working on.
David
Bremerton Northern February 2021 Flimsy
Click here to read the February 2021 issue of The Flimsy Board from the Bremerton Northern Model Railroad club.