
Grab Iron Posts

A Narrower View – Roadway

Syd Schofield

Editors note: Welcome to the third article of a series on narrow gauge by Syd Schofield. The previous article is available by clicking here, or by filtering with the category “Narrow Gauge”. Syd welcomes discussions and feedback, which can be made by clicking on the comment link at the bottom of the post.

Of the many narrow gauge railroads that were in the US and Canada, a key factor was the roadbed requirement. The sizes of two feet, 30 inch, 36 inch and 42 inch for common carriers were established out of need and equipment availability. Private lines were influenced by most of the same conditions, all based on economics. While the standard and larger gauges were capable of heavier loads, the disadvantages were greater construction and equipment costs and less flexibility in traversing rough terrain.

Preparation of the route was less demanding such as smaller tunnel dimensions, roadbed width on ground and built-up structures, tighter curves and rolling stock accommodations. This lends itself to the small area we have available for our modeling. Slower speeds, shorter cars and trains and tighter curves gives us longer operating sessions and a larger sense of scale for a given amount of space. With the grand sweeping radius curves needed for a large articulated locomotive and many very long cars of the Golden Age standard gauge lines, most of us don’t have the space available for a suitable representation. Technically, a common surveying technique is to project a curve from the connecting straight (tangent) sections in degrees of turn per 100 feet which can be translated to a radius in our particular scale. Prototype railroad specifications can then be used as modeler guides.

As in civil engineering projects built on solid ground (as opposed to semi-liquid high water content soil and small, rounded stones) the structural base was prepared by excavation (cut) to the desired dimensions. Once the material is removed the remaining base is ready for roadbed. That same removed material, if cleverly planned, can be used for fill in the nearby shallow dips. Otherwise expensive “borrow” material and bridging structures must be used. The fill, like the roadbed, must consist of an aggregate of solid angular geometric shapes of differing sizes to minimize shifting under load. Supplements such as cribbing and retaining walls can be used. Care must also be taken for drainage and compacting, hopefully before use of the rolling stock. As these same rules apply to larger railroads, the smaller size and tighter curves of the narrow gauge railroad yields less effort and expense in the roadway preparation.

The Railroad Really Did Change Everything – Docent-Led Tours at the NWRM

Peggy Barchi

Get a behind the scenes, docent-led tour of the Northwest Railway Museum and find out how the railroad really did change everything!

The Train Shed Tour Package is a docent-led experience at the Northwest Railway Museum. Learn all about how the railroads changed everything in the Pacific Northwest! Start your tour at the 1890-built Snoqualmie Depot, before you board the Snoqualmie Valley Railroad for a ride to the Train Shed Exhibit Building. Detrain and enjoy a 30 minute tour of the 25,000 sq. ft. building that includes large and small artifacts and several exhibits including the award-winning Wellington Remembered exhibit. Docents will lead guests through the building, interpreting railroad and Northwest History. Large objects include freight and passenger cars, maintenance of way equipment, the nationally significant chapel car 5 Messenger of Peace, as well as large artifacts with local ties. Learn about what the Northwest Railway Museum is doing to preserve and perpetuate northwest railway history.

Re-board the train and travel west to the top of Snoqualmie Falls where you will view a large scale construction project, water going over the top of Snoqualmie Falls, and a beautiful view of the valley and river below the Falls. Your docent will stay with you during your trip to the Falls, interpreting the scenery and providing both historic and contemporary context. The Package ends when the train returns to Snoqualmie Depot. The round-trip experience lasts approximately 2 hours.

Please note: Tour Package participants do not go into North Bend by train. However, they will get to see equipment and exhibits that are only available at the Train Shed. Another bonus – guests have their own personal tour guide for their train trip to the Snoqualmie Falls! The Train Shed Tour is offered once a Saturday at 1pm and is limited to 15 participants.

2015 Dates and Times: (please arrive early to purchase tickets)

April-October: Saturdays, 12:30pm. (Black-out dates: Saturdays July 11 & 18, 2015)

Cost: Adults $20, Seniors (62+) $18, Children (2-12) $12, under 2 = no cost

The Tour Package is not recommended for children under the age of 5.

Reservations: you may reserve your Tour Package by contacting the bookstore clerk at 425/888-3030 x 7202. Please note: payment is required to make a reservation and there are no refunds.

A full list of NWRM 2015 events and extensive contact info is available at this previous Grab Iron post.

Chapel Car and Donated Organ at Train Shed Building, NWRM

Chapel Car and Donated Organ at Train Shed Building, NWRM

Mothers Ride Free on Mothers Day Weekend at Northwest Railway Museum

Peggy Barchi

Celebrate mom this Mother’s Day with a scenic train excursion through the Cascade foothills. You and your mom will journey to the top of Snoqualmie Falls and enjoy the view of the valley below. The Northwest Railway Museum invites mothers to enjoy a free ride aboard our antique train, when accompanied by a paying child – of any age. Passengers may board in Snoqualmie or North Bend. The round trip takes approximately 70 minutes. Passengers may get off at the halfway point, shop, eat lunch, or take a stroll before returning on any later train. Trains depart every 90 minutes beginning at 11:30 AM from the Snoqualmie Depot at 38625 SE King Street and at noon from the North Bend Depot at 205 McClellan Street. Roundtrip fares: $10 ages 2-12, $16 ages 62 and up, $18 ages 13-61, Under 2 are free!

A full list of NWRM 2015 events and extensive contact info is available at this previous Grab Iron post.

Clinics Listed For 4D Spring Meet

Russ Segner

There will be a full Saturday of clinics at the 4th Division Spring Meet to help us all enjoy our hobby more and become better model builders. A list of the clinics and the presenters has been posted to the Spring Meet web site. Come and enjoy learning from some of our best.

The date is Saturday, June 6 at the Bellevue Sheraton Hotel. Registration is available by mail or online and includes lunch. Additional details including online registration are in the previous Grab Iron post.

We will hold our 4th Division Annual Meeting during lunch and hand out some special recognition to some of our members for their fine work and contributions to the hobby.

Skagit Valley and Whidbey Clinic Report, Apr 2015, Al Carter Signs

Rich Thom, photos by Rich Thom

Clinic Chair Rich Blake welcomed 28 other folks to the Skagit Valley & Whidbey Clinic’s April meeting at the Summer Hill facility in Oak Harbor. Attendance this season continues to be strong, so planning next season’s program was up front and center, with Program Chair Susan Gonzales requesting further ideas. She and Rich have already fleshed out some of the program, with Russ Segner presenting in September, the ever-popular Mini-Clinics in October (five or six 15-minute clinics by our own talented members), and a reprise of the Model Contest in February. The theme for next season’s contest will be flatcars with loads, any scale as usual. Jack Tingstad, volunteering as contest shepherd, said that the contest rules will be presented at the September meeting, but broadly either a flat car must be scratch built, or a load (or both). There will be a humor award as well as others. Get a-building now!

Without further ado, Rich introduced well-known model building artisan Al Carter for the evening’s clinic on how to apply distinctive period signs to buildings, of brick, wood, stone, or any other material. Al uses three techniques: (1) dry transfer lettering; (2) thin paper method; and (3) decal method, often combining them on the same model.

Fig 1 - Al Carter introduces the dry transfer method

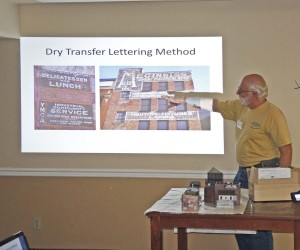
Fig 1 – Al Carter introduces the dry transfer method

The Dry Transfer Lettering Method uses self-adhesive letters available at stationery or craft stores. The letters are used as masks, rather than applying them to a wall and leaving them in place. Start by painting the wall:

  • Choose your base structure color
  • Spray on primer (rattle can or air brush)
  • Add mortar
  • Add weathering (optional at this point)

After the wall is prepared, select the location for lettering and:

  • Mask wall so area of lettering is exposed (all other areas covered)
  • Paint with desired color of letters, usually white; use a spray-on primer for this step, not a craft paint, for better adherence
  • Add individual lettering (note the letters can be any color you can find since they are removed later)
  • Paint over letters, usually black; craft paint can be used for this step
  • Carefully remove letters
  • Remove masking
  • (Optional) Lightly sand or scrape sign to reveal wall material—brick or wood—to simulate a well weathered sign

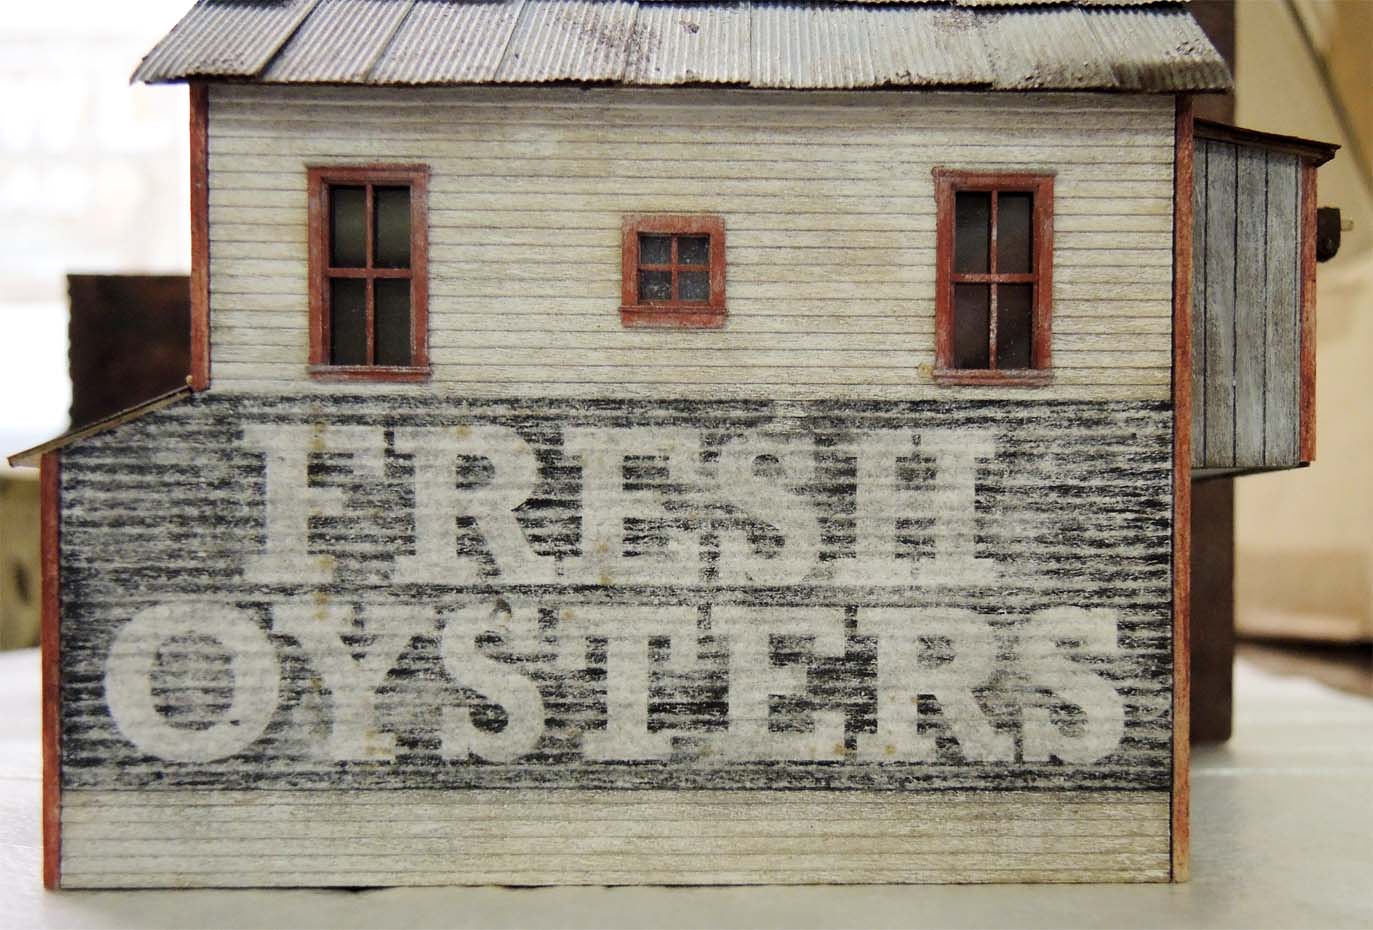
The end result is white lettering on a black background. See the excellent example in Figure 2. (You can also create black lettering on white, or use other colors, but white on black was most common.)

Fig 2 - Signage on Al's Franklin Garment Co. building

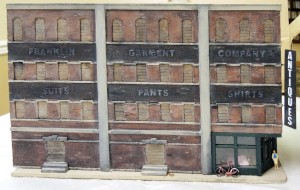
Fig 2 – Signage on Al’s Franklin Garment Co. building

The Thin Paper Method makes use of color reproductions of signs that can be found in multiple sources including magazines and on-line. The trick is to print them on very thin paper so that the signs, when glued to the structure, conform – or “snuggle on” – to the texture of the building wall.

  • Select sign graphic—from magazines, internet, books, your own artwork
  • Copy on thin paper
  • Carefully cut ou
  • Apply 50/50 white glue/water to backside
  • Place sign
  • Carefully press into place with damp sponge
  • Weather to suit
Fig 3 - Some of Al's signs printed on thin paper

Fig 3 – Some of Al’s signs printed on thin paper

Several kinds of thin paper are suitable, but it may take some experimenting. Al uses “flimsy” paper he obtained many years ago, but others will work, too. Ted Becker said that he has had good results with the tissue used with gift wrapping. Other options are “onionskin,” tracing paper, and airmail paper. Whatever you try, the next challenge is: will the thin piece of paper run through your printer without jamming? The only way to find out is to try. If it doesn’t, Al suggested that you can tape the thin sheet to a carrier sheet – a piece of ordinary copy paper – and run it through your printer that way. Another hint: whenever Al obtains a new kit or sheet of signs, he always makes a copy on his home copier of the signs so he has a backup in case of errors made with the original. A terrific example using the thin paper method is shown in Figure 4.

Fig 4 - One of Al's buildings with sign created by the thin paper method

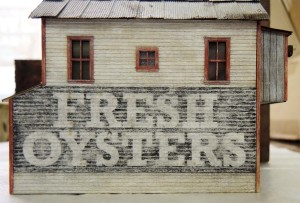
Fig 4 – One of Al’s buildings with sign created by the thin paper method

The Decal Method is essentially the same technique that modelers use to letter rolling stock except that the decals are just substantially larger.

  • Select sign decal
  • Apply decal
  • Use setting solution; on hydrocal buildings, use lighter fluid (extinguish cigars before performing this step)
  • Carefully press into place with damp tissue or sponge
  • Seal with Dullcoat (or alternatives—see below)
  • Weather to suit

Some sources for sign decals include Art Griffin Decals (www.artgriffindecals.com), T2 Decals, and Largemouthlodge Decals. The latter two suppliers do not have websites, but both sell on Ebay under those seller names. Do an Ebay search (in model railroading) on Ghost Signs.

Al has also experimented with various dulling finishes, and has found that an even flatter finish than the popular Testors Dullcoat is another Testors product named Modelmaster Lustreless Flat.

Two of Al’s buildings with signs applied using decals are shown in Figures 5 and 6.

Fig 5 - The Manhattan Hotel overlaid signs, a decal by Art Griffin Decals

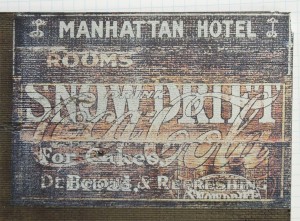
Fig 5 – The Manhattan Hotel overlaid signs, a decal by Art Griffin Decals

Fig 6 - Another sign created using an Art Griffin decal

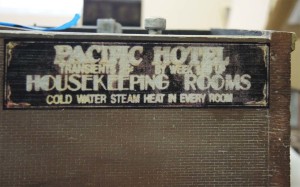
Fig 6 – Another sign created using an Art Griffin decal

Fig 7 - Side of one of Al's buildings with signs made by a number of methods

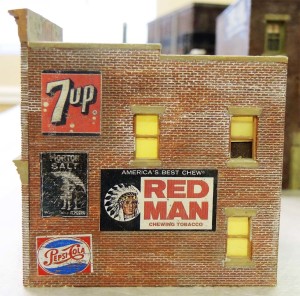
Fig 7 – Side of one of Al’s buildings with signs made by a number of methods

Al concluded by noting that these methods can be used in combination, such as in Figure 7. The Pepsi sign is a Woodland Scenics dry transfer; the Morton Salt sign a decal; and the Seven Up sign a thin paper example. The Red Man sign is a paper sign that was slightly sanded on the back (but not as thin as a thin paper sign) so it doesn’t conform to the bricks as well,

Never one to leave the stage without an encore, Al showed pictures from his and his wife’s recent cruise to Brazil. No flash pix of Rio or Carnival here, just photos of cluttered and well-weathered rooftops on wharf side buildings for modeling inspiration. Al really knows how to enjoy his vacations!

Tacoma Clinic

by Al Babinsky

Editors note: The date of Walt Huston’s open house has been corrected to May 23rd.

Al Babinsky moderated the clinic since MMR Gene Swanson was unable to attend (he was bringing his wife home from the hospital). We had 45 modelers attending with no newcomers at this time. Walt Huston announced that he was having an open house of his layout on Saturday May 23rd, and invited anyone that was interested to come out and visit. Jim Sabol made a couple of announcements on the Mount Rainier Scenic Railroad and the future of the passenger service along the Prairie line. The Mount Rainier Scenic Railroad will have its shop facilities at Mineral open for visitors and the owner will move his 7.5” railroad to Mineral in the near future. The Freighthouse Square Sounder Station will be expanded to accommodate the Amtrak Coast Starlight as well as the Amtrak Cascades and the line will go through Lakewood and connect to the mainline near Olympia.

“What’s New at the Hobby Shop” was presented by Bill Sandstrom for Tacoma Trains hobby shop which included a number of scenic items from Woodland Scenics, one of which was a burning structure. A firetruck and its crew could be used to make a scene of extinguishing the structure fire. A set of N scale weathered hopper cars, an Athearn Genesis locomotive, and a set of ON30 wood-sided dump cars from Bachmann completed Bill’s announcements.

In the “Model of the Month” category Chris Clancy had a couple of GE UC33Cs and weathered freight cars, some of which he purchased at an antique store. Paul Vaughn brought one of his HO to Sn3 conversions which always looks great. Tyler Wickham modified a Blair Line Pizzeria kit into a tavern called Drunken Clam which sported a Miller Engineering animated sign proclaiming the Drunken Clam. MMR Dale Kraus brought a European box car that he shortened so it could be used on his narrow gauge line. Jim Clower brought a couple of Oriental Import hopper cars. Ken Levine brought a box car and B&O passenger car kit that he purchased at a swap meet, adding weathering, metal wheels, and Kadee couplers. The “Model of the Month” winner was Tyler Wickham with his Drunken Clam tavern.

Our clinic for this month was given by Steve Carter on operating train order boards. These train order boards are going to be used in eight locations on the PSMRE layout. The train order board (signal) is from Tomar, the control board, servo motors and linkage are from several manufacturers including the radio controlled airplane world. At this time one train order board is installed on the layout at the Kanasket station and is operational with computer control. The signals will eventually be controlled by the dispatcher with a control panel.

Next month’s clinic will be on May 14th at our usual location in the Pierce County Library Admin Bldg. on the corner of 112th Street and Waller Road at 7:30 PM. Hope to see all of you there. The clinic for May will be given by Mike Shaw on the use of Fast Track jigs when building switches and crossings.

Foss Waterway Seaport Layout Help Still Needed

Bud Thompson

Construction is progressing but help is still needed!

How often do you have the chance to build a layout that 100’s of people will get to enjoy? Help us complete the model of Tacoma’s Half Moon Yard. Our typical schedule is Mon thru Fri, 9 am to at least 1 pm. We may be able to work longer if museum staff is available, up to 5 pm. Always call before coming in to ensure there have been no last minute changes.

Additional details are on the previous Grab Iron blog post.

Please contact me (Bud Thompson) to let us know if you can help, at 206-310-9414 or budmanthe3rd@yahoo.com.

Eastside Get-Together Intense Free Scenery Clinic April 16th

JJ Johnston

Reminder: The Eastside Get-Together meets next Thursday, April 16th at 7:30 pm. This is an intense scenery clinic you don’t want to miss as the clinician is our very own structure model multiple award winner David Yadock.

David says:

It is called “Helpful Structure Hints on the Dry Gulch & Western”. It will explain three or four techniques and materials that I use for modifying structures, modifying windows, and creating various scenic items around my train layout. Some are “old school” while some are new. There are even a couple of new ideas that I will mention that have not even made it to my layout yet. The clinic should last around 30-40 minutes.

It has a variety of subjects that will keep the audience interested and David will also bring some examples of his structures and such to show everyone.

Of course we will have all the other important stuff too. “Model of the Month”, maybe stuff to buy and sell, free coffee and dollar donuts and fabulous door prizes from the Inside Gateway Hobby Emporium. See ya.

For Eastside Get-Together location and other information, see the 4D Clinics page.

Westside Clinic April 14th, Bremerton

Bill Hupé

This coming Tuesday, April 14th, is our next Westside Clinic in Bremerton. The clinic is “Narrow Gauge Geared Locos” and will be presented by Steve Hauff.

For the March clinic, thanks go to Steve Neupert for presenting “Making Sure Your Freight Cars Are Ready for the Layout.” We also thank Jack “The Tool Man” Hamilton for sharing 4th Division, PNR and NMRA news, as well as sharing his screw head capture drives. Bob Jensen provided the latest news on the Bremerton Northern Model Railroad layout. He invited those present to join the BNMR at Retsil Veterans Home on April 4th and 5th.

We were joined by visitors Steve Hauff and his wife, Steve Ragan, and Bob Preece.

As always we will have a “Model Contest” and “Show And Tell.” Coffee and cookies will be provided. Please come and bring a friend.

For those visiting us for the first time our clinics are held at the United Way of Kitsap Building in downtown Bremerton (647 4th Street) at 7:00 PM. For more information contact me (Bill Hupé) at whopay@tscnet.com or 360-621-5041.