Gary is our latest MMR in the Fourth Division. He has earned his designation as #626 for his fine model building on his layout, The Gilpin Tram. This layout features O, On3 and On30 trackwork and includes a helix between two levels of his mining scenes.
Gary holds operating sessions on a regular basis. His layout has been toured by many of us and will be open during the April – 6 Sn3 Symposium in Bellevue.
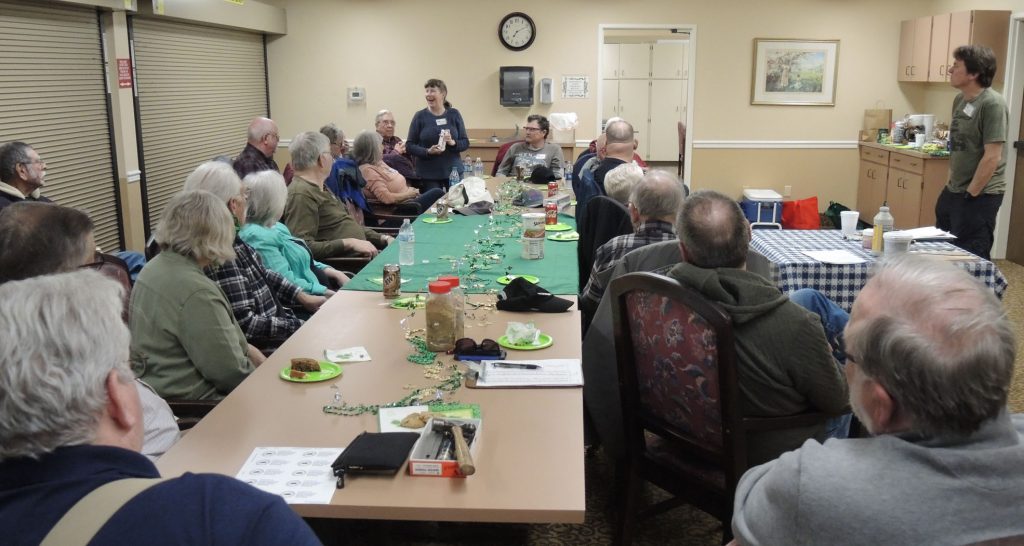
It wasn’t necessary for Clinic Chair Rich Blake to fire up enthusiasm. A St. Patrick’s Day mood was already in the air (Fig 1) at our March meeting, with green tablecloth, plates, hats and delectable cake (with green icing) laid out, all carried in by some of our keen members. Susan Gonzales (pictured, at end of table) announced our upcoming Lake Whatcom Railway outing (May 18th) as well as her work on recruiting. Susan created a small flyer for members to post in their towns to potentially attract new (younger?) members. Thanks, Susan; although our attendance is strong, we would be pleased to welcome more! Rich reminded all of the upcoming annual joint clinic with the Mt. Vernon NMRA Clinic on March 23rd, which will feature multiple clinics, swap tables, our annual model contest, NMRA achievement award judging, and more. Info is on the Grab Iron.
Fig 1 A St. Patrick’s Day Mood at the March Clinic
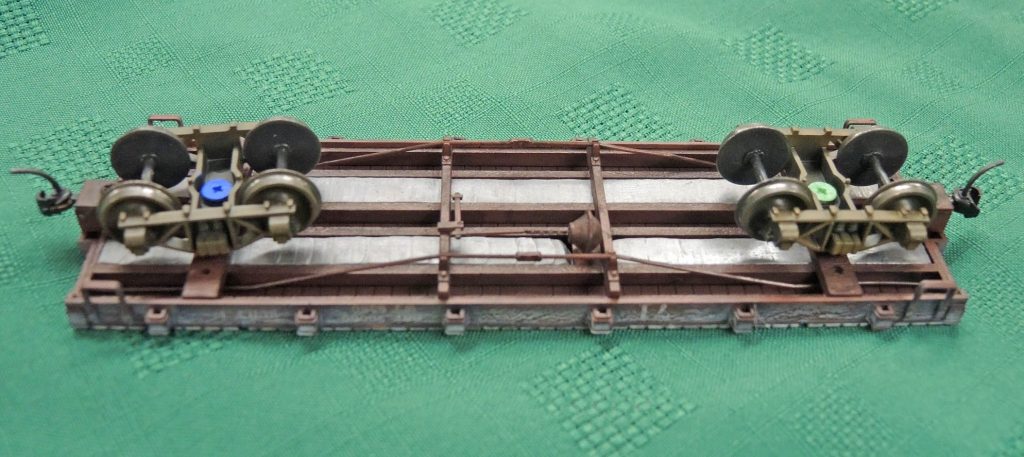
Alan Murray kicked off the evening by demonstrating a clever and simple way to add needed weight to Bachmann On30 flat cars. These are well-detailed, popularly-priced models but too light; Alan and his On30 modular group (https://www.pnwon30.org) endeavor to weight their cars to S-scale standards since no standards specific to On30 exist.
Fig 2 Alan Murray’s Car Weighting Method
Fig 2 shows the underside
of a weighted flat car using Alan’s method; two strips of lead are visible
imbedded between longitudinal frame members.
To fashion these, Alan starts with strips of ¼” diameter lead fishing
weight; it’s available in rolls in the fishing department at Sebo’s Hardware
stores or similar outlets. It turns out
to be just the right diameter that—when hammered into the frame as shown—fills
the spaces between the frame members perfectly.
(Trucks are obviously removed beforehand.) Following initial shaping with an ordinary
hammer, the job is finished off with a steel block and gentler hammering.
Cliff
Aaker was up next for
the main clinic of the evening, fashioning Roads
from Concrete Patch and Rocks
(and other things) from Concrete Crack
Seal. The selection of the right
materials is the key here, and Cliff tried several, so his trial and error will
save you a lot of time. He was led down
the right track by a video by Ken Paterson on making roads, which you can view
at https://www.youtube.com/watch?v=ZEhBYa9P-EA&t=1358s.
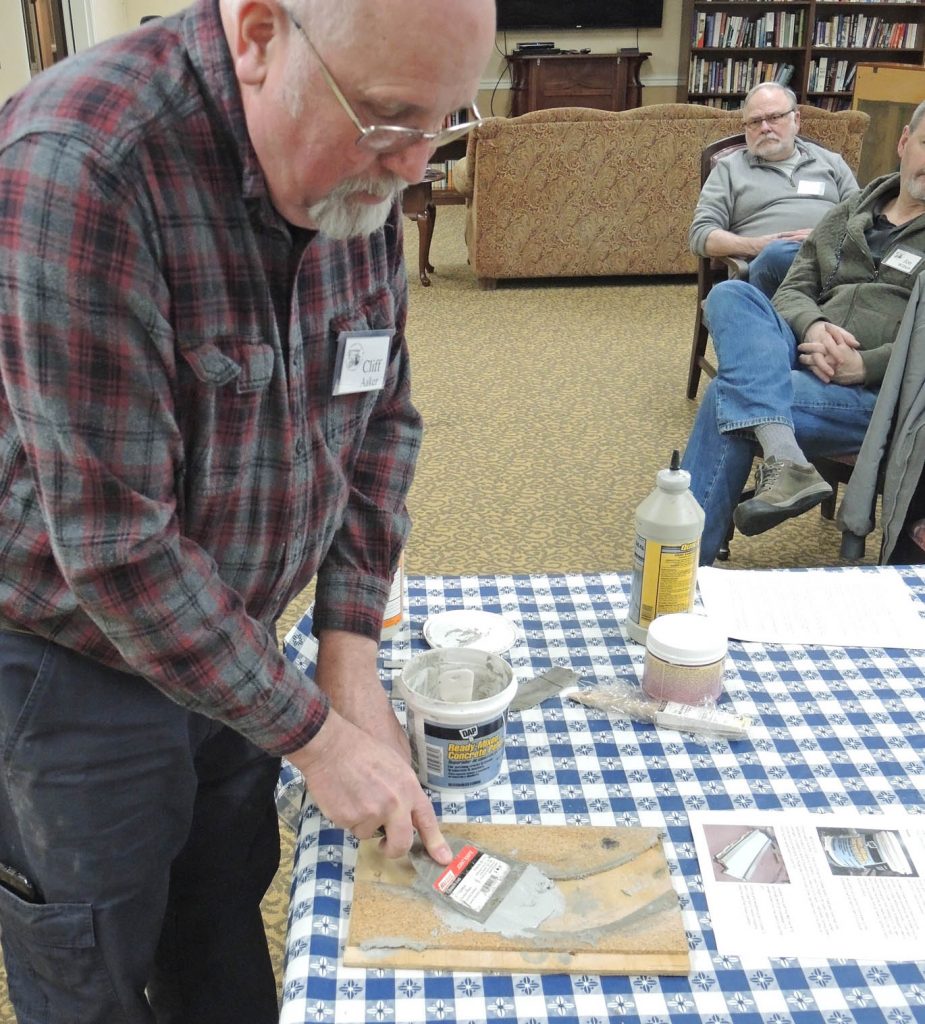
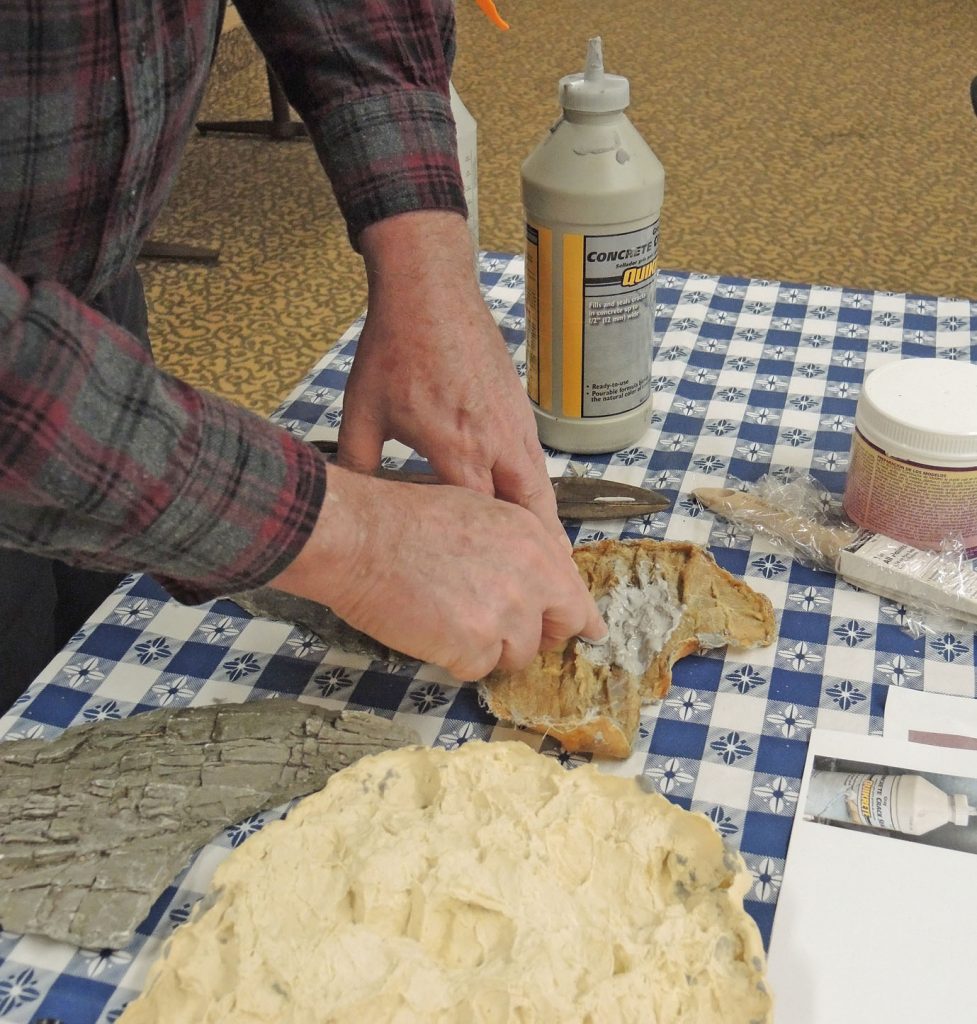
First, roads. Of many similar products, use only Ready-Mixed Concrete Patch by DAP. Other latex-based products may work, but acrylic-based will not. Cliff applies this product up to 1/8th” thick per layer and allows 24 hours to harden. It applies somewhat like drywall mud but you have to keep wetting your trowel (use wet water i.e. with a couple of drops of detergent) often to keep the compound from sticking to it. Also, keep the trowel as nearly parallel to the surface as possible and go slowly. See Figure 3. In this example Cliff is using a simple form of plywood and cork roadbed.
Fig 3 Cliff Aaker Demos Concrete Patch Roads
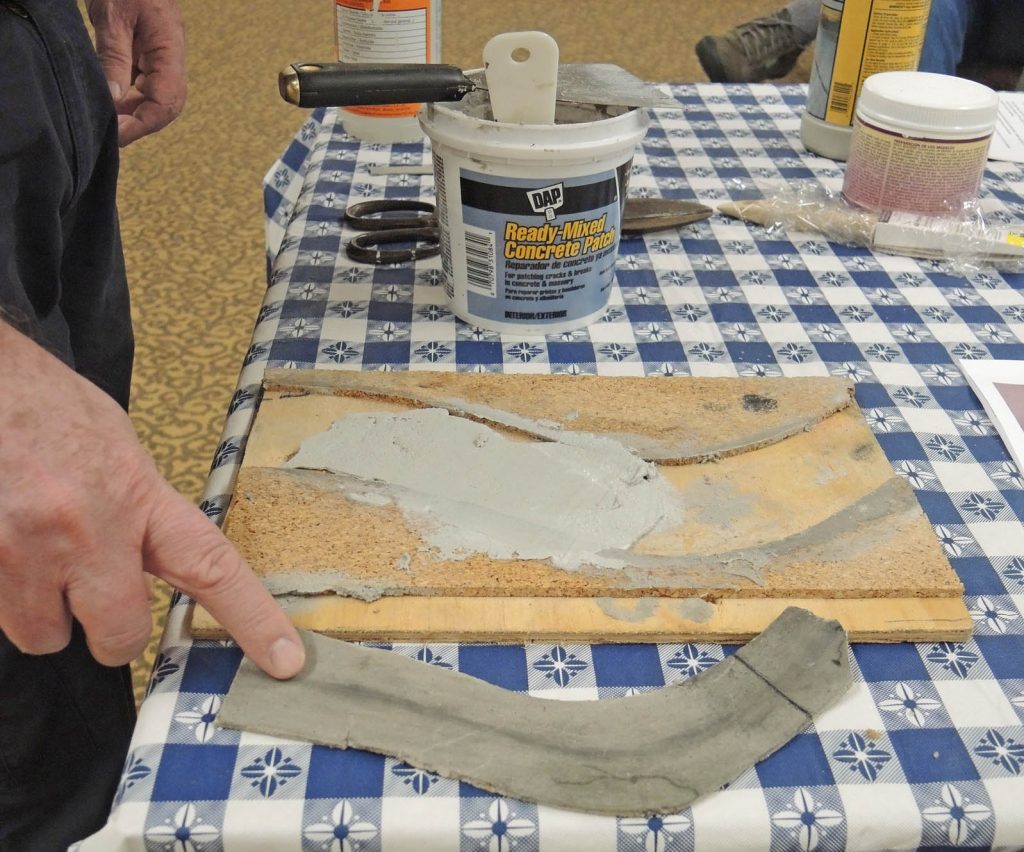
The concrete patch will shrink and crack on the first application. Applying a second coat is usually sufficient. After it dries, Cliff then sands first with #60 grit sandpaper followed by #120 and #400. Coloring and weathering are a matter of taste. One of the features of the patch is—well—it looks like concrete, so not too much effort is needed, as would be for, say, plaster or Sculptamold. Cliff uses India ink and Pan Pastel powders to age the pavement, and to add centerlines, joints and cracks. Potholes can be carved in later with a knife if desired. Fig 4 shows a section of finished road at the bottom, made from the same form. Another feature of the cured latex is that it is flexible, so you can easily create vertical curves in your roads.
Fig 4 The Finished Road at the Bottom
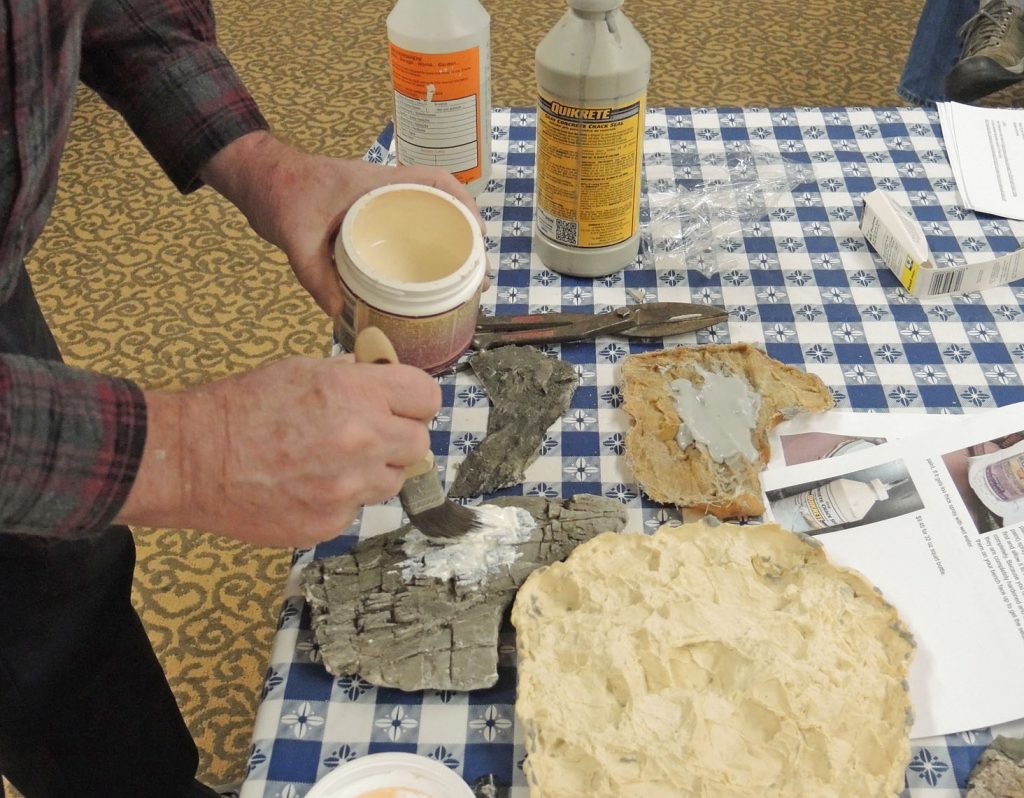
Moving on to rocks, a different concrete patch is used: Concrete Crack Seal by Quickcrete. In essence Cliff uses this material to make latex rock castings, using latex molds, in a similar way that plaster rock castings are made using these same molds. The end products are similar to—but far cheaper than–the so-called “rubber rocks” commercially available. The Crack Seal is much thinner than the patch material described earlier as it’s made to flow into cracks. That also means it flows into and conforms to tiny details of latex molds. In Fig 5, Cliff begins filling a mold with the crack seal material.
Fig 5 Rocks from Concrete Crack Seal
Perhaps surprisingly the Quickcrete material, despite being latex-based, doesn’t seem to stick to some latex molds, even without any mold release agent being used. Cliff has successfully used both home-made molds (such as the one he is filling in Fig 5) and Bragdon molds (bottom, Fig 5). However some have had trouble trying this material with Woodland Scenics molds, so experimenting with small pieces is recommended. If you run into an incompatibility, the crack seal material dissolves in alcohol before it cures.
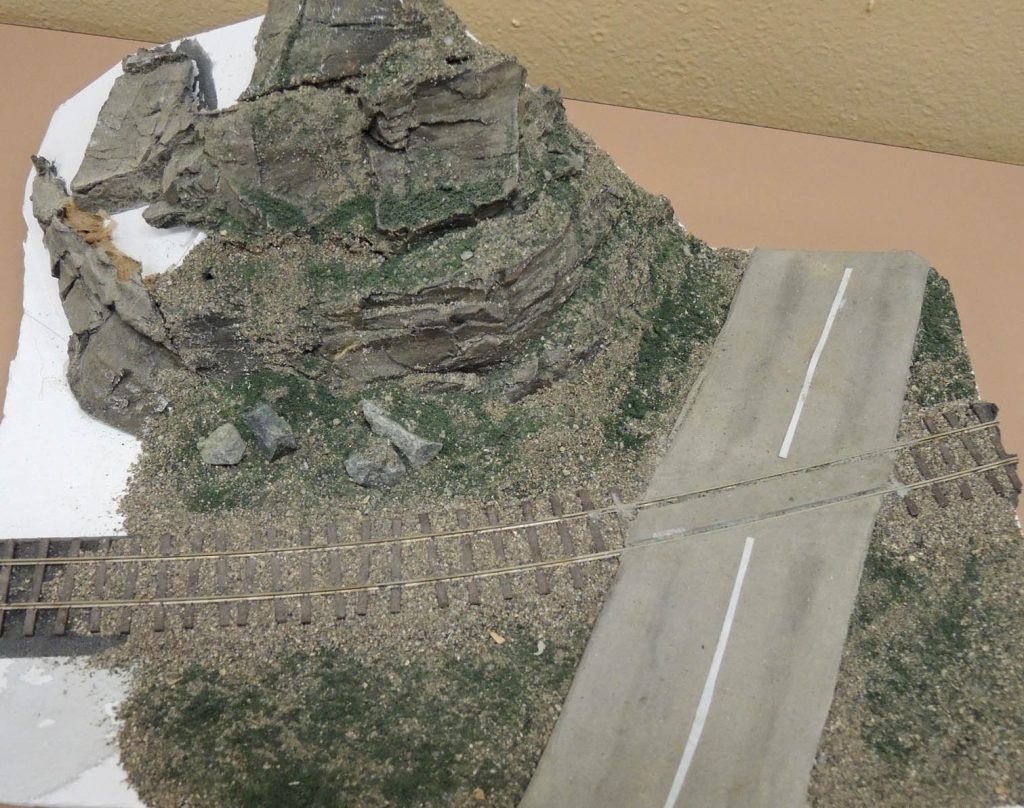
Fig 6 A Sample Showing both Rocks and Road Using Cliff’s Methods
Fig 6 shows a small display piece with both a concrete patch road and some rock outcroppings made with concrete crack seal as above. The crack seal rock pieces can be trimmed with tin snips to fit neatly onto hillsides or into cuts and are glued into place with hot glue (high heat type). Crack seal doesn’t stain the way plaster does: you must paint it. Cliff uses acrylic craft paints diluted 1 part paint to 4 water applied with a squirt bottle. He does black first and allows it to settle into the cracks and dry completely.
Fig 7 A Tunnel Lining for an On18 Ore Track
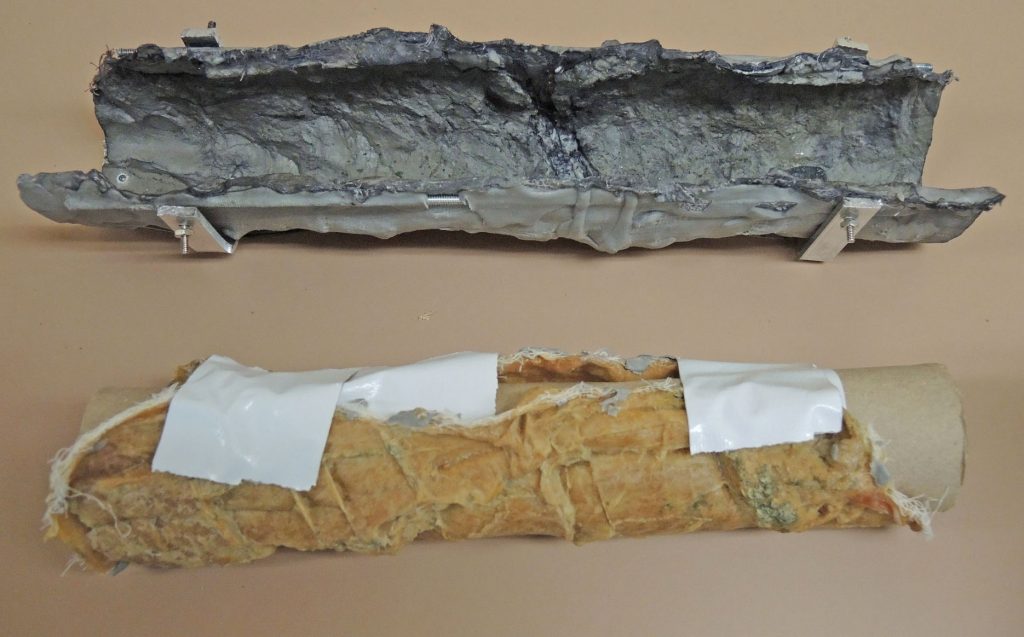
Cliff discovered other uses for the Quickcrete material. One example is shown in Fig 7: a tunnel lining for one of Cliff’s On30 modules. The module contains a small length of On18 ore track with ore cars shuttling back and forth using an automated reversing circuit. Train Show attendees would peer into the tunnel, Cliff said, and remark that it had no walls or ceiling. Easily fixed by using the crack seal to create a lining. The “mold” for the lining is at the bottom in Fig 7 and the lining produced at the top.
Fig 8 Cliff Making His Own Mold
Speaking of molds, Cliff makes his own (Fig 8). He uses Castin’Craft Mold Builder liquid latex rubber sold at Michael’s and similar craft stores.
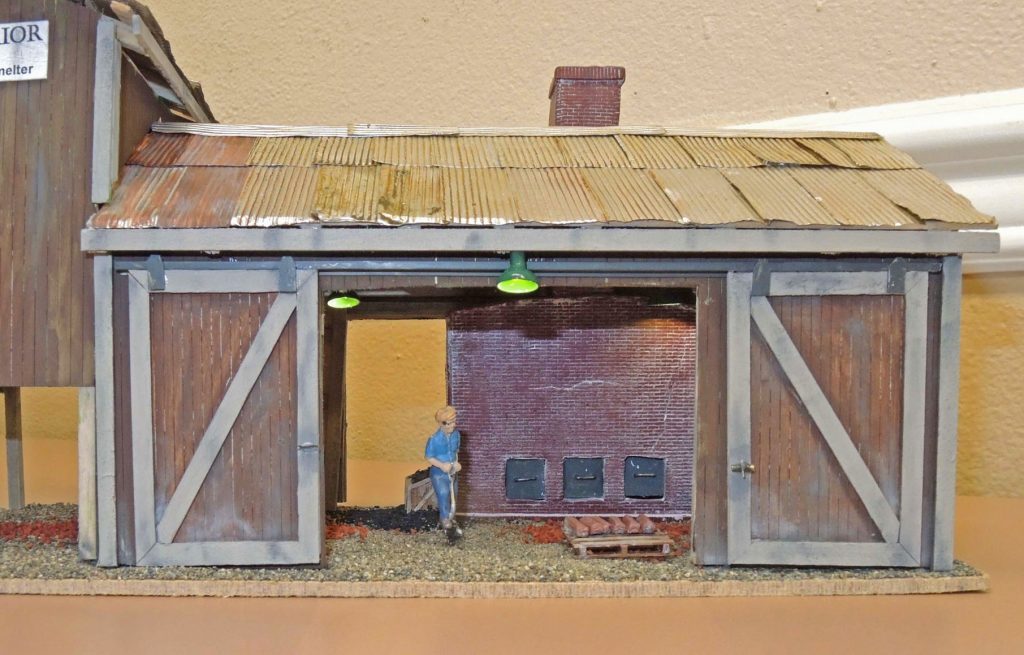
Fig 9 Cliff’s On30 Copper Smelter–See Text
Cliff has also used Quickcrete Concrete Crack Seal for creation of structural details. In Fig 9, a portion of a larger O-scale model of a copper smelter, Cliff used it to produce the furnace and chimney: beautifully done. The material accepts common acrylic craft paint—Cliff used Black Cherry to create the brick tones here. He earned a well-deserved NMRA Achievement Award for his copper smelter.
This year the Fourth Division will hold its annual Spring Meet on June 22, 2019, at Tacoma Community College. Three classrooms will host informative clinic sessions from 9–4. The 4D’s Annual Meeting will be held during lunch, and the GoldenGrab Iron winner will be revealed and new MMRs announced. And there’s even a free lunch (assuming you pay in advance).
4dSpringMeet.com will be updated with complete information about the 2019 clinic in a few days. You may also preregister there via Paypal.
One extra cost option will be the Make and Take Clinic: “The DPM KIT Done Right,” hosted by Jack Hamilton. Email Jack promptly if you’re interested. You can read more about it in the latest Train Ordersr.
June 22, 2019 9:00 a.m. – 4:00 p.m. Tacoma Community College 6501 South 19th St Tacoma, WA 98466-6100
The 2019 Sn3 Symposium is just around the corner. Come explore some of the finest Sn3 model railroads on the planet. There will be excellent clinics, a vendor room, world-class layouts on display, and a contest.
Sn3 Symposium – Bellevue Sheraton April 4 – 6 12 clinics featuring national instructors Local layout tours Check the website for details. www.sn3seattle.com
Other notable events coming soon:
Kootenay Express 2019 | May 29 – June 2, 2019
The Cranbrook History Centre is a museum and archive dedicated to the research, preservation, and restoration of heritage pertaining to the history of Cranbrook and the Canadian Pacific Railway. It is located adjacent to both active railway operations and the Convention Hotel. https://www.kootenayexpress2019.ca
For this month’s clinic, we are unable to meet at our usual location due to circumstances beyond our control. Fortunately we have found an alternate location – a room in the Burlington Public Library. Here are the directions:
Burlington Public Library 820 E Washington Ave. Burlington, WA 98233
Highway 20 to Fairhaven Avenue, East on Fairhaven Avenue (past Suzy’s old hobby shop), Right on Anacortes, Left on East Washington Avenue
Enter through the front doors, conference rooms are off the lobby. We are in the Skagit River Side room.
We will have some limited snacks and coffee available but it will probably go fast so plan ahead.
Entrance is through the rear doors (southwest side) not the main entrance on the street. Parking available next to the building and along adjacent streets.
Some local options available but our lunch break is only an hour. Highly recommend brown bag lunch for all participants.
Read on for more details on our clinics this year.
Ted Becker – Introduction to
Arduino
– What is Arduino? What can it do for me as a model
railroader? How does it work? How do I get started? How do I
learn more? There will be several projects on display and working.
Some of these projects you can do with off-the-shelf components and canned
software. Many model railroad functions can be done with more flexibility
and less cost with Arduino compared to other products. Bring your
questions. Bring a thumb drive so you can take home a lot of (hopefully)
useful information.
Jon Bentz – Updated L Girder Benchwork Construction – A different take on classic L girder design.
This will consist of Planning and layout of benchwork, photos of benchwork
constructed to date on my home layout, and full size samples of benchwork to
share with the group.
Didrik Voss – Create Your Own Virtual Railroad with Trainz – This clinic will explain
how to get started creating your own virtual railroad in Trainz. Didrik will show how he
downloaded the topographic maps for the Everett & Monte Cristo Ry, laid the track and
is currently creating buildings and structures based on photographs and Sanborn
maps.
Roger Johnson – Decoder
Installations & General Soldering – Roger Johnson will demonstrate decoder installations for
pre-screened projects. Prerequisite: If you would like to have a decoder installed in one of your
locomotives, email details to Roger at skagitrailbird@gmail.com no later than March 15th. Please include locomotive
(scale, maker, model, approximate year made) and decoder (make & model #,
if already purchased). Note: Depending upon time and the complexity of the project walk
up requests may (or may not) be accepted.
As time allows he will also demonstrate general soldering
of such things as LEDs and resistors, track and power bus, control panels,
multiple and other components and brass stock for framing signs.
Al Carter – Weathering With Pan
Pastels – How to use Pan Pastels to apply
weathering finishes and touches to both rolling stock and structures. We
will also look at how Pan Pastels can be used instead of paint to color
structures. You will have an opportunity to try your hand with this
technique, and if you want, bring a car to weather – Prequisite: Please first
spray your car with Dullcoat or a similar flat finish. This is approximately a half hour clinic,
followed by:
Al Carter – Improving The Appearance
Of Flex Track – How
to take that shiny plastic flex track and improve its appearance by applying a
base coat of acrylic paint (thanks, Martha Stewart!), then weathering the ties
with water based oil paints, then the rails, and finally the ballast.
Sample track will be provided so you can try your hand at this technique. This clinic is also approximately a half hour
long.
Russ Segner – Layout Planning – My clinic will focus on
some basic ideas helpful in planning a home layout. I will use several
layouts as examples with photos and track plans. It will be a Power Point
presentation with handouts. Questions will be welcomed. My home layout, The Coal Creek Lumber
Company, is point to point Sn3 lumber and mining and is built around the
perimeter of a 19 foot by 16 foot bonus room.
Rich Blake – Handlaid Turnouts and Soldering Basics – This clinic we will explore track soldering jigs (i.e. Fasttracks) and how to properly solder track and other electrical doo dads. Soldering is a craft that when done properly will last for many years, when done improperly will cause many headaches. This clinic will show you some best practices when using soldering equipment for model railroading. PREREQUISITES: If you want some real solder practice please bring a 40Watt or lower soldering iron and iron holder/stand if you have it. We will have solder/flux and other materials available for practice.
Don Jones – Passenger Car and
Caboose Lighting Options, using
LEDs, super capacitors, pickups and light boards – Included will be
“cheapo home made” wire and tube pickups for Athearn passenger
cars with modified Rapido light boards using LED’s and super capacitors.
Also to be
shown will be Streamline Back Shop pickups and light boards for Rivarossi
passenger cars and clones. Included will be examples of Voltscooter Electronics
light boards.
I will
bring examples of the Voltscooter and Streamline Back Shop boards installed in
Rapido and Walthers passenger cars. For the Walthers passenger cars I
will bring and example which uses the Owl Mountain pickup lug kit used to
improve the passage of current from the car trucks to the light board.
I will show
examples of the space saving KSQ2 miniature board which eliminates the need for
a separate resistor and diode rectifier when lighting DCC passenger cars.
Caboose
lighting with marker lights will be demonstrated using the Light It board from
NCE.
Consultation
services will be available for hard to light cars.
Three positions will be on the ballot: ASSISTANT SUPERINTENDENT and two DIRECTORS.
The
duties of these positions are as follows:
The ASSISTANT SUPERINTENDENT shall perform all duties assigned by the Superintendent
and serve in the Superintendent’s absence.
DIRECTOR. Serve as the direct representative of the members. Act in the best
interest of the members in the management of the Division.
The
Board of Directors currently meets 6 times a year, generally in the area of
Tukwila or Kent. The meetings usually last for about two hours.
This
is a great opportunity to serve the 4th Division and at the same
time, earn points for you Volunteer Certificate in the NMRA Achievement
Program.
If
you or someone you know is interested and willing to serve, please contact one
of the Nominating Committee members:
A Nominating Committee has been appointed to receive nominations for the upcoming election. Three positions will be on the ballot: ASSISTANT SUPERINTENDENT and two DIRECTORS.
The duties of these positions are as follows:
The ASSISTANT SUPERINTENDENT shall perform all duties assigned by the Superintendent and serve in the Superintendent’s absence.
DIRECTOR. Serve as the direct representative of the members. Act in the best interest of the members in the management of the Division.
The Board of Directors currently meets 6 times a year, generally in the area of Tukwila or Kent. The meetings usually last for about two hours.
The current holders of these positions will be asked if they wish to continue and if so, their names will be placed on the ballot.
If you know of someone interested and willing to serve, or if you wish to nominate yourself, contact one of the Nominating Committee members:
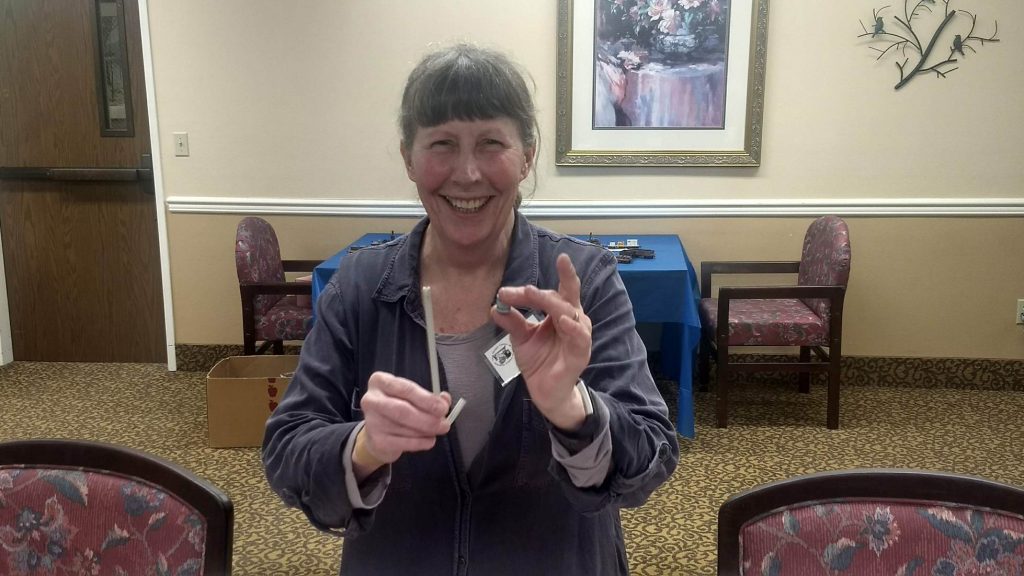
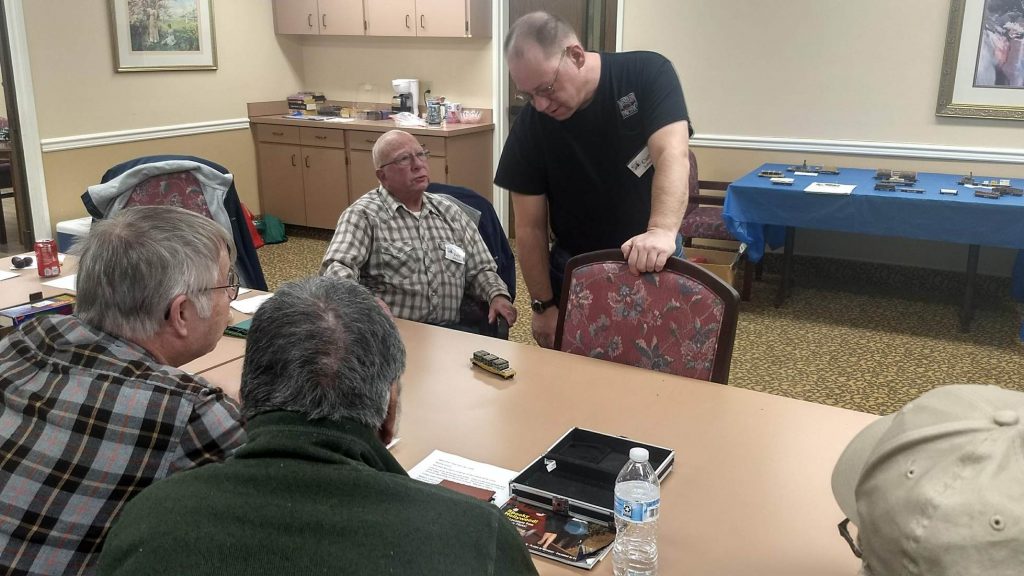
The Skagit Valley and Whidbey’s first 2019 clinic was an excellent event presented by Susan Gonzales.
SV&W’s Make and Take Clinician Susan Gonzales showing her coiled steel rolling tool.
Our objective was to show various types of open car loads and explore different techniques for making loads using common materials found at box stores. We started out the clinic with a display of various clinic members cars and loads and some show and tell on each.
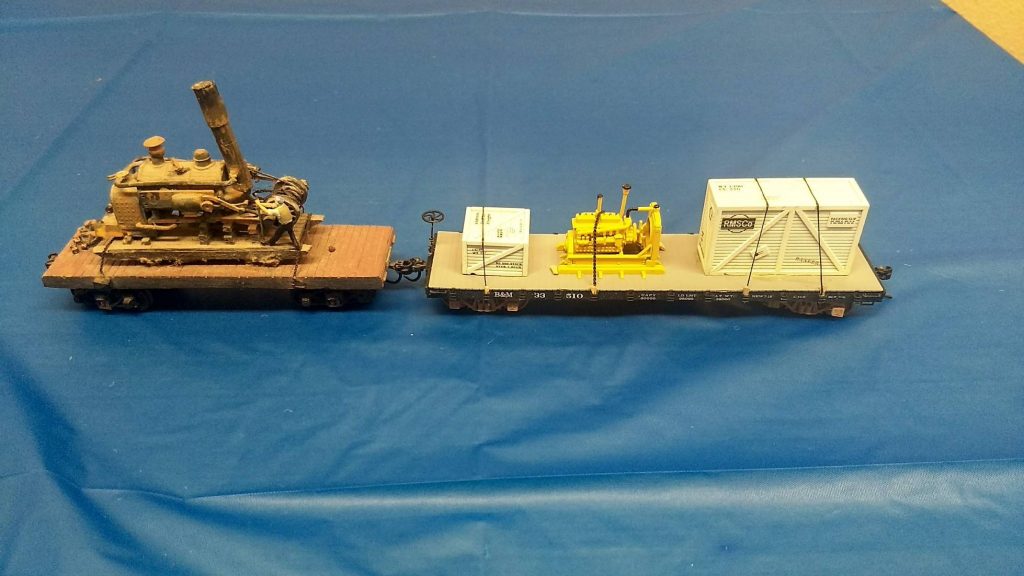
Mike Garcia brought two HO flat cars with a nicely detailed logging donkey and the other with diesel engine loads. All loads were tied down properly.
Curt Johnson had two HO cars for work train support. One car contained sets of ties all blocked and staked together and the other with sets of rail segments with blocking in between.
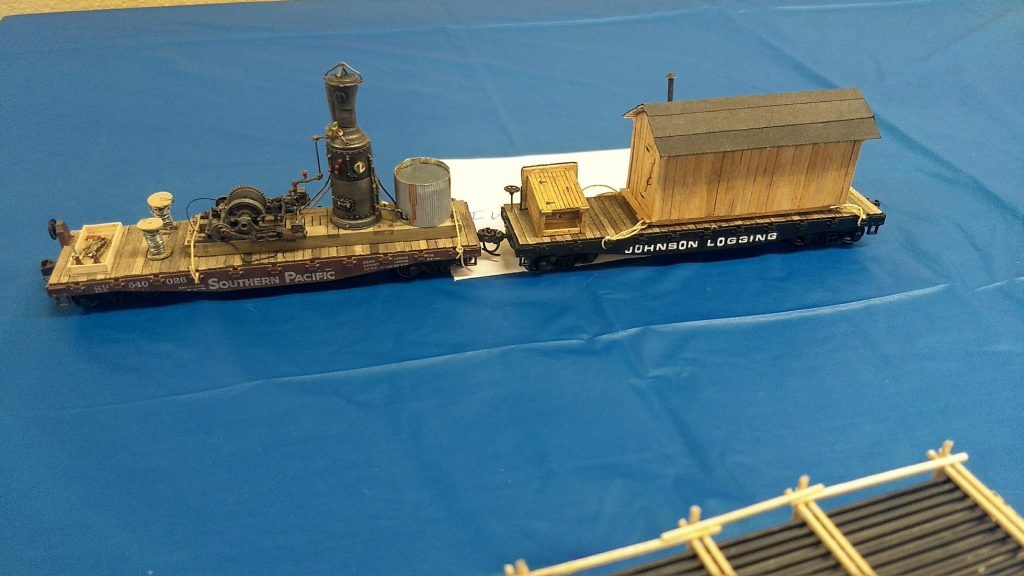
Curt’s dad Iver brought a couple HO logging support cars with a steam donkey load and a camp cabin load complete with outhouse.
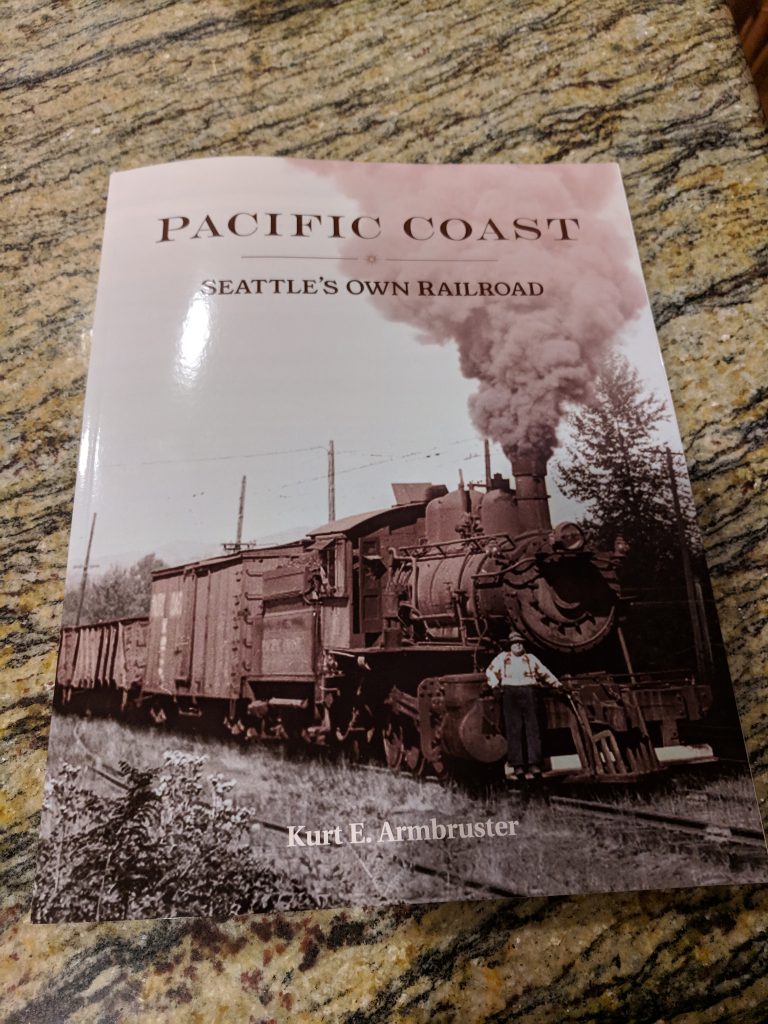
I will be bringing copies of Kurt Armbruster’s new book on the Pacific Coast railroad centered around the coal mines of the area. It is soft cover, some 127 pages, with good maps and many photos we have not seen before.
Pacific Coast – Seattle’s Own Railroad
Each copy is $20 with all proceeds going to local museums and historical societies. I am selling them for the Newcastle Historical Society.