by Dale G. Kraus / Photo by the author
Remember, guys & gals: For good operation of long passenger cars there can be NO kinks in the track!

(Emeryville, CA Amtrak Station)
You are browsing archives for
How to’s, presentations, and informational articles
Remember, guys & gals: For good operation of long passenger cars there can be NO kinks in the track!
(Emeryville, CA Amtrak Station)
As part of Cascade Rails 2011 (the National Railroad Historical Society’s annual convention) in Tacoma, WA, the group chartered ex-SP 4449 and train for a trip over Stampede Pass on Saturday, June 25. This was the culmination of a week of various tours and charters to railroads and museums around the Puget Sound area, much like that of an NMRA or PNR convention. Despite leaving Tacoma about 30 minutes late, it appeared that all on board weren’t too bothered with the delay. The train ran up the BNSF Seattle Subdivision to Auburn, where they turned east onto the Stampede Sub for the trip over the pass to Easton.
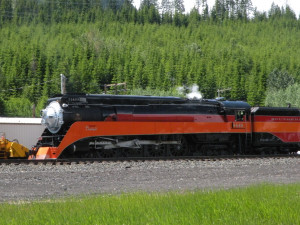
SP 4449 Pauses in Easton, WA
Once in Easton, the power was cut off the train and run around the wye before rejoining the train for the run back to Tacoma. The train had actually been pulled backwards over the pass on the eastbound leg so that it would be headed the right direction for the westbound run. This also put it in the right direction for the run home to Portland after the convention. The run over the pass started under cloudy skies, but the sun broke through east of the Cascades and remained for the rest of the trip.
It’s not often we get to see mainline steam in these parts, so it was a treat to see 4449 on this run. Several photos and videos of the trip are now online. Google 4449 and see what comes up.

BNSF's Latah Creek Bridge over I-90
BNSF heading over Latah Creek Bridge near I-90 last summer in June.
The NMRA Data Sheets are a resource for modelers with information on General Modeling, Scenery, Trackwork, Motive Power, Rolling Stock, Structures, Electrical Work, Operations, and Prototype Information. The Data Sheets are available on the new Members-Only Section of the NMRA website.
However, many Data Sheets are out of date, originally prepared in the 1940s, 1950s, and 1960s. For example, Data Sheet D4g (Diesel-Electric Locomotive Specifications) was first issued in April of 1960 and doesn’t include data on any locomotive newer than a GP-9. So the NMRA Data Sheets Managers are going to bring the Data Sheets up to date and add new sheets when possible.
We’ve already added four new Data Sheets which were published in the NMRA Magazine, two of which are also on the website and we’re working on three more.
If you have ideas for improvements or new Sheets, email me at mdj@bds-soft.com.
Note: Bob wrote this as a a Letter to the Editor of the Seattle Times in regards to this article in February 22’s paper. –Al Lowe
Nice piece on the closing of American Eagles and North End Train Center. It is unfortunate that we live in times where the sources of much our learning is disappearing, the building of kits and railroads forces us to learn how things come together and how many things we take for granted are the result of technical revolution.
In addition to the electronic age taking away much of our free time and the potential for interacting with other age groups, shops like these are vital to neighborhoods and are not just part of the ‘Mall Scene’ where we see more and more jewelry, fancy clothes, food courts and telephone stores. The disparaged ‘Strip Mall’ is where we find most of our necessary things such as groceries, drug stores, auto supply and even newspaper stands.
For the hobbies, we are doing it to ourselves as more and more of the sources of knowledge and assistance are moving to ‘on-line’ sellers and even these begin to dry up as inventory in shops that are closing is not replaced.
For my own life, it is a scene that will never be replaced. The 70 years I have spent in prowling hobby shops has been most enjoyable and a source of much knowledge. The ‘hands on’ feel of a product and the accessories that are needed to support it are gradually disappearing. Even the newsletter from our model railroad group has moved on-line and has largely disappeared. Thanks.
(Apologies to Dorothy, Scarecrow, Tin Man, and Cowardly Lion.)
These three track alignments have been the bugaboos of model railroading since the invention of 2-rail DC wiring. Letting locomotives run through them smoothly and without shorting or stopping has required the use of toggle switches, relays linked to the position of switches and, for turntables, careful positioning of split pit rail pickup or similar installation on the central pivot shaft. While certainly a “do-able” method, the results were often fussy and required a lot of additional wiring.
Now we have it easy. Several manufacturers, Lenz, MRC, and Digitrax come to mind, have come out with a little magic box called the “Auto Reverser” which does the job without operator intervention. How does it work? Well…inside each device is a very tiny witch doctor with a machete and a large supply of minuscule chickens. When he senses the onset of an out-of-phase “short,” he quickly sacrifices one chicken and the problem goes away. (You’re buying this, right?) OK, OK! Actually there is a bunch of sensing circuitry and a fast-acting relay, but the first explanation is more fun. Each of these devices has a pair of “input” and a pair of “output” wires or screw terminals. The input is attached to the track buss and the output is attached to the “reversing section” or, through sliders, to the turntable rails.
The neat thing is, so long as the input and output wires are not attached “backwards,” i.e., hooking the input to the reversing section and the output to the buss, it does not matter which wire goes to which buss wire or rail. The first loco to enter the section will properly align the reverser. If you do wire it wrong? Not to worry; it just won’t work. The loco will just stop dead. If that happens, disconnect it and hook it up t’other way.
Now, keep in mind that this really is technology, not magic. The reversing section, be it loop, wye leg, or turntable track, must be completely insulated. Gaps must be placed in both rails at each end of the section and the turntable rails must not touch any of the approach track rails. If there are switches in the reversing section, be sure that there are no “sneak circuits” through the switch. If there are, cut gaps beyond the frog in both rails of the diverging route. This will eliminate the “sneaker.” Be sure to feed the reversing section only through the reverser output.
One final thing: The reversing sections must be longer that the longest loco lash-up. For most of us this is no problem. If you are in N scale and insist on running mid-train and rear helpers, your reversing section needs to be short enough that the lead set and the first helper aren’t leaving and entering the section simultaneously. This will cause the witch doctor to have a schizophrenic episode and possible cut off his own head instead of the chicken’s. Smoke may mysteriously issue from the auto-reverser … NOT a good sign!
And please, DO READ THE INSTRUCTIONS!
Congratulations! You have just been appointed “Editor for a Day” of the NMRA Magazine. Well, not really, but you get to act like it anyway. During your assignment you get to revise, reformat, or recreate the magazine in any way you choose. Let out all those pent-up frustrations and “pet peeves” you’ve held for so long.
The question is: What would you change? How would you change it? What would the magazine look like after your change? Why would you make the change? (“Because I think it’s better” is an okay answer.)
Please send your input to kitsapmmr@wavecable.com.
Al Lowe
We just added Kevin Klettke’s Washington Northern Railroad to the Layouts page of www.4dpnr.com joining the other 11 to make an even dozen great, local model railroads featured.
If you’re a 4D member with a layout and a web site and you’d like the world to see your work, just email me its URL (see address at bottom of any page on the site). I’ll get it posted ASAP.
When’s the last time you heard model railroading discussed on a late-night talk show?
Here are a few tips from Sandy Webster concerning decoder selection and use.
I have used and liked the NCE DASR drop-in decoder on many of the old Atlas/Kato model Alco diesels (RS1, RS3, RSD5, RS11, RSD12, C424/5). I just discovered there is a drop-in decoder for the old Atlas/Roco model EMD diesels too, although it’s not labeled as such. It’s the NCE BACH-DSL decoder made to replace the really basic decoder in Bachmann diesel like my FT’s. I bought them figuring I might use them in my FT’s. I decided to use them in something else and have been looking at various candidates. I decided to try an Atlas/Roco SD24 since I had a couple with the shells off due to body kitbashing.
It’s a no-brainer, just as simple as the DASR. All I had to do was cut the wires from the trucks to the motor, unsolder the motor contacts from the actual motor tabs and replace them with wires, cut the old headlight bulb tabs off the top of the original plastic strip to make it level, run the 6 wires up through holes on the decoder and solder them to six pads. Add the supplied LED’s in the proper location and you are done. The LED’s may need wires to extend them to the proper place and pay attention to the polarity instructions. Don’t panic, it’s a picture! This works on the GP38, GP40, SD24 and SD35. One of the best things, the list price on the decoder: $19.95.
Sometimes ya gotta ignore the labels and use the decoder that fits.