Announcing the annual “Clamshell Days” in Ilwaco at the Columbia Pacific Heritage Museum 13 and 14 July 2019 celebrating the historic Ilwaco Railway and Navigation Co which was the northwest’s only long standing narrow gauge railroad.
While not as famous as the Colorado and California narrow gauge railroads, the IR&N is no less interesting and is steeped in unique history. The museum keeps this history alive and well with their exclusive exhibit and preservation of an original IR&N passenger car, the “Nachotta” that is only open for public inspection during the Clamshell Days weekend. Self guided tours are also offered over the southwest peninsula touring various historical sites and structures along the original IR&N railroad right of way. If you have any interest in northwest rail history, the IR&N certainly shares a significant part and shaped the heritage of the southwest coast of Washington.
This event is attended annually by the Pacific Northwest On30 Modular Group and the museum provides an ample space for a large layout configuration. Operating sessions are hosted each day and any 4D member is invited to come out and run an op session with us. Note that this is not a “trainshow” in the usual format (i.e. no vendors or swap meet) but is a celebration of local railroad history. The event is open from 10:00AM to 4:00PM on Saturday and Sunday. See the Clamshell Days webpage for directions and more information.
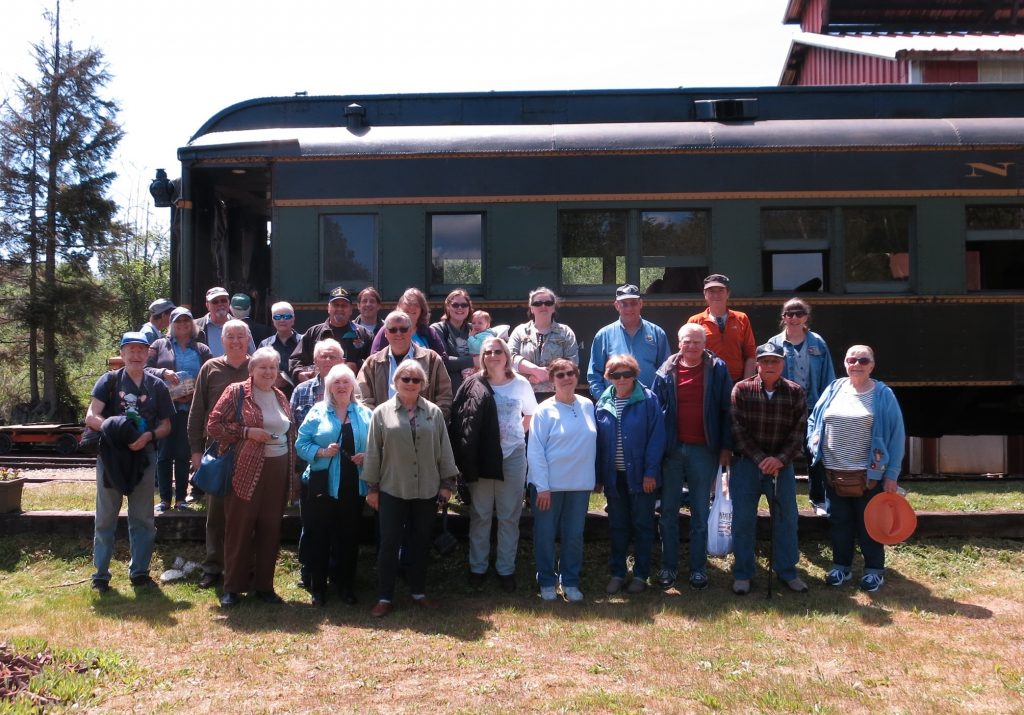
On 19 May 2019 thirty members and guests of the SV&W Clinic attended their second spring train excursion field trip on the Lake Whatcom Railway in Wickersham WA just east of Lake Whatcom and Bellingham.
Skagit Valley and Whidbey members and guests at the Lake Whatcom Railway.
Our trip was once again coordinated by our excellent Program Coordinator – Susan Gonzales who also somehow gave us a brilliant sunny spring day as well. A special note of appreciation also goes to Jan Clarke who coordinated food orders and provided picnic box lunches for our train riders.
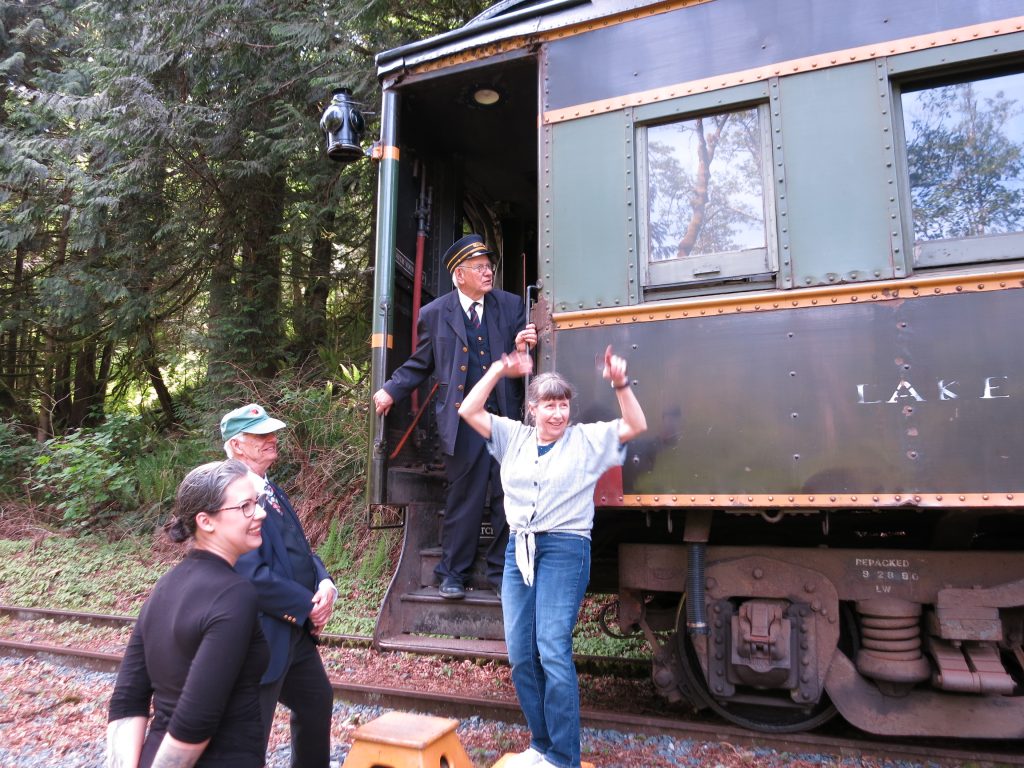
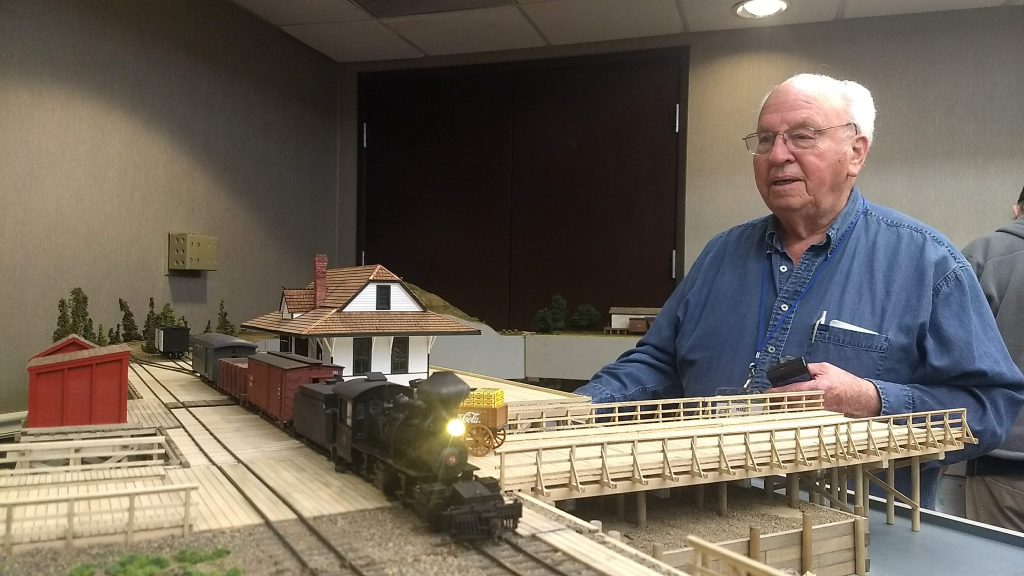
Lake Whatcom Railway owner/superintendant Frank Culp looks on from the footboard of a vintage NP passenger car while SV&W Program Coordinator Susan Gonzales enthusiastically gets an “all aboard” call going.
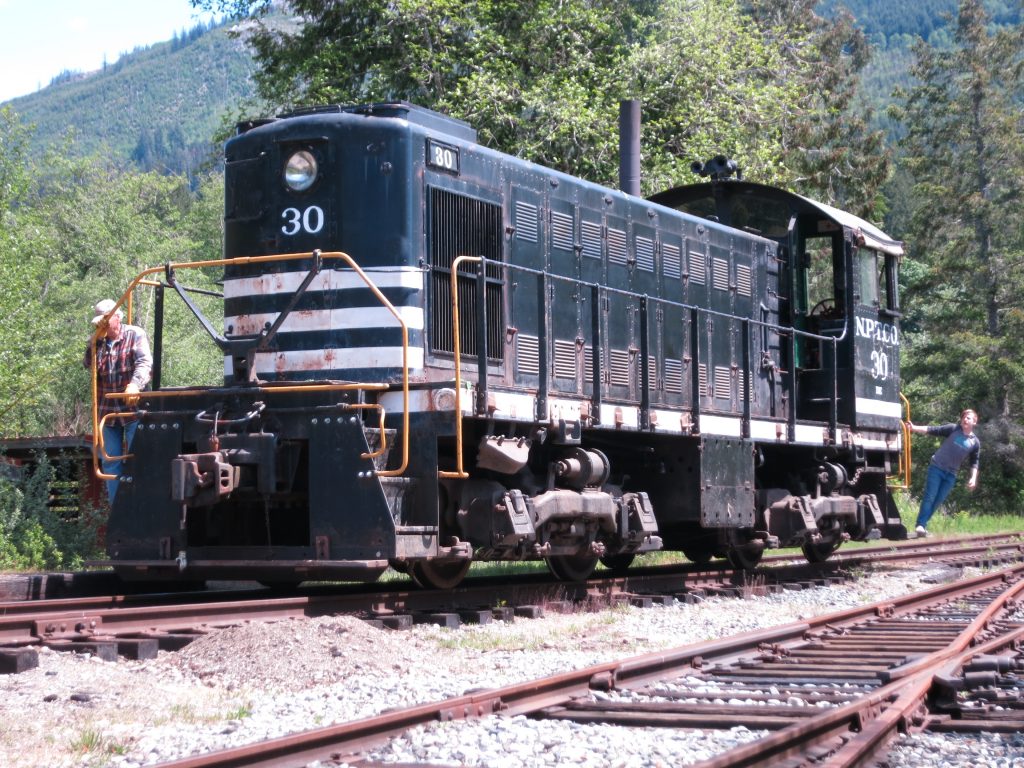
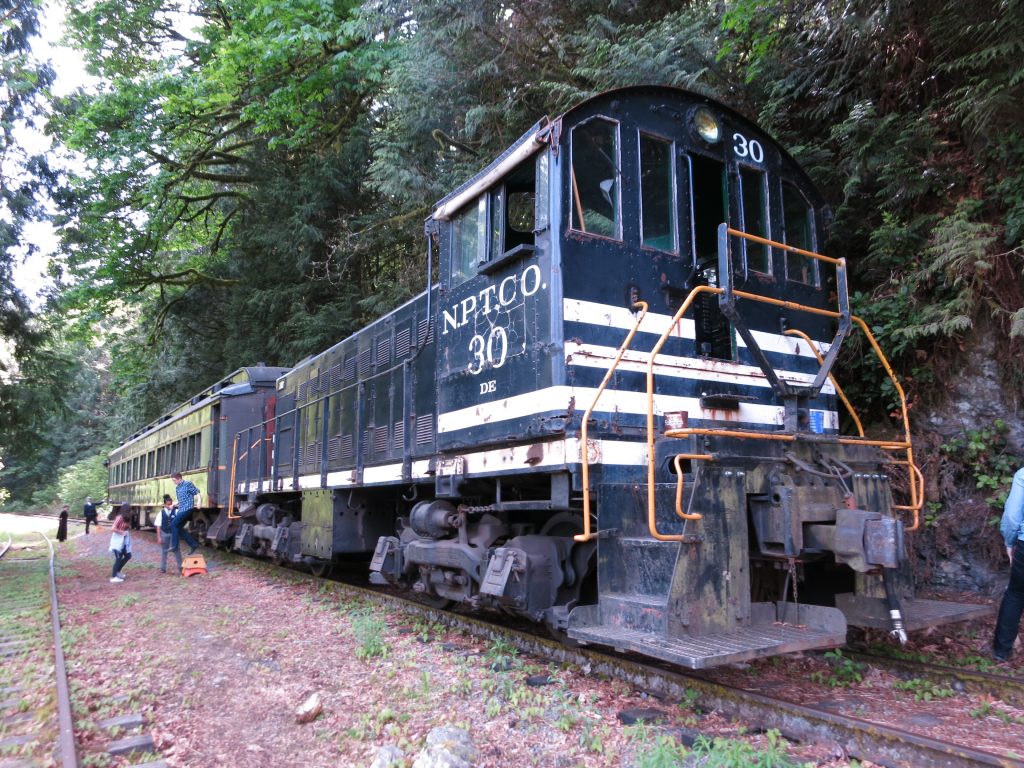
Our trip started in the tiny village of Wickersham which was once a station stop for the Northern Pacific on it’s way to Sumas. The BNSF branch still runs through this area today. The railroad grounds contain a wye and a large engine shop/car shed. We rode behind a vintage Alco S1 diesel which was originally assigned to the Northern Pacific Terminal Company as No 30 in Portland OR.
Vintage Alco S-1 which once served on the Northern Pacific Terminal Co. in Portland OR. working the yard at Wickersham.
After boarding we headed out on what was once a branch line along the south shore of Lake Whatcom on the Bellingham Bay and Eastern Railroad Company line that connected Bellingham to the NP Mainline at Wickersham. Our ride took us to the shores of Mirror Lake for a picnic stop and some fun on a pump car for the kids (and adult kids).
Picnic stop near Mirror Lake.
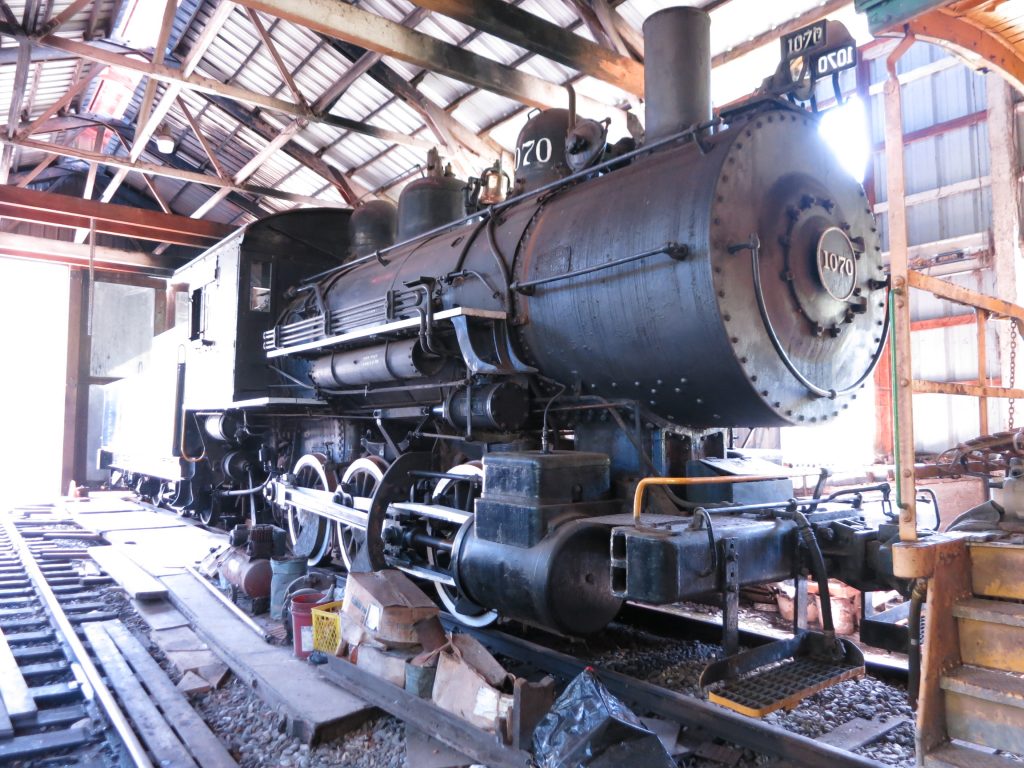
Once back at Wickersham, some of us explored the NP No 1070 Class L-9 0-6-0 steam locomotive in the shop and watched the crew turn the Alco on the wye to put the passenger coach away. It was a great day out in the sun and everyone had a good time. Check the Lake Whatcom Railway’s website for their event schedule, it is worth the trip.
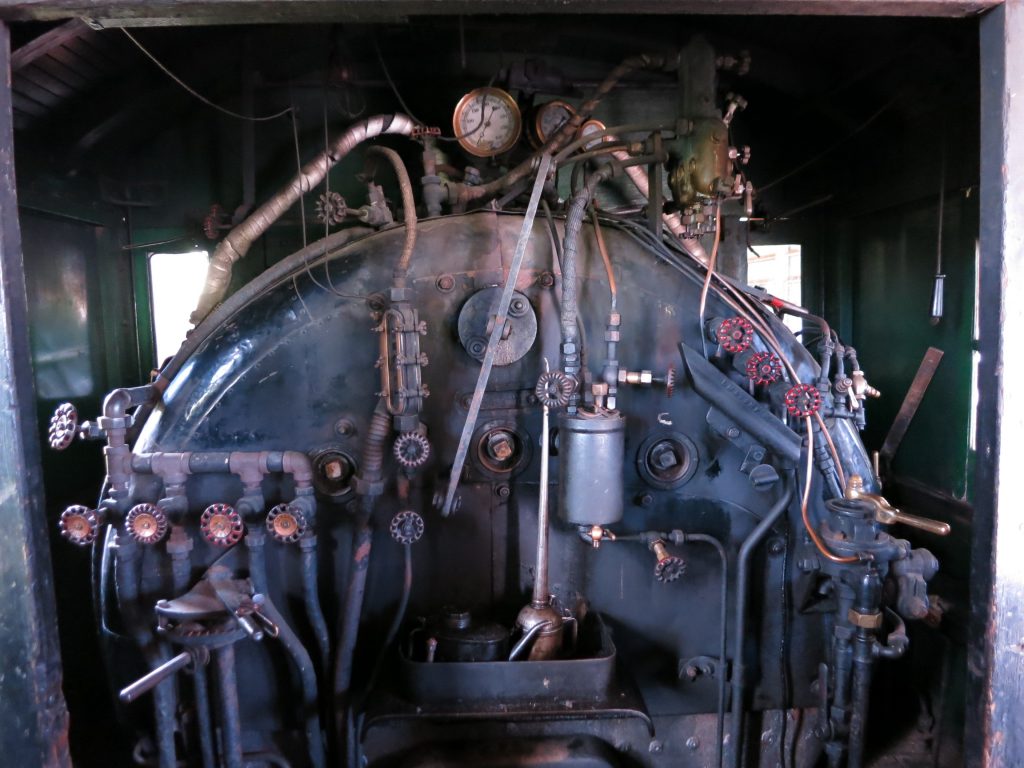
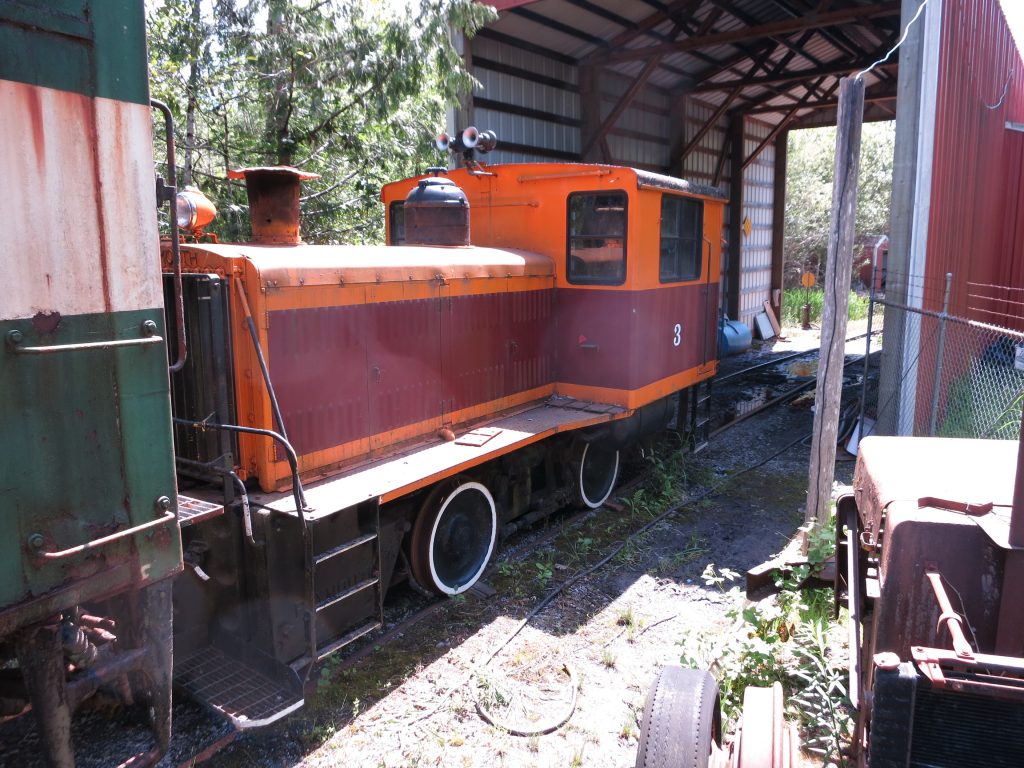
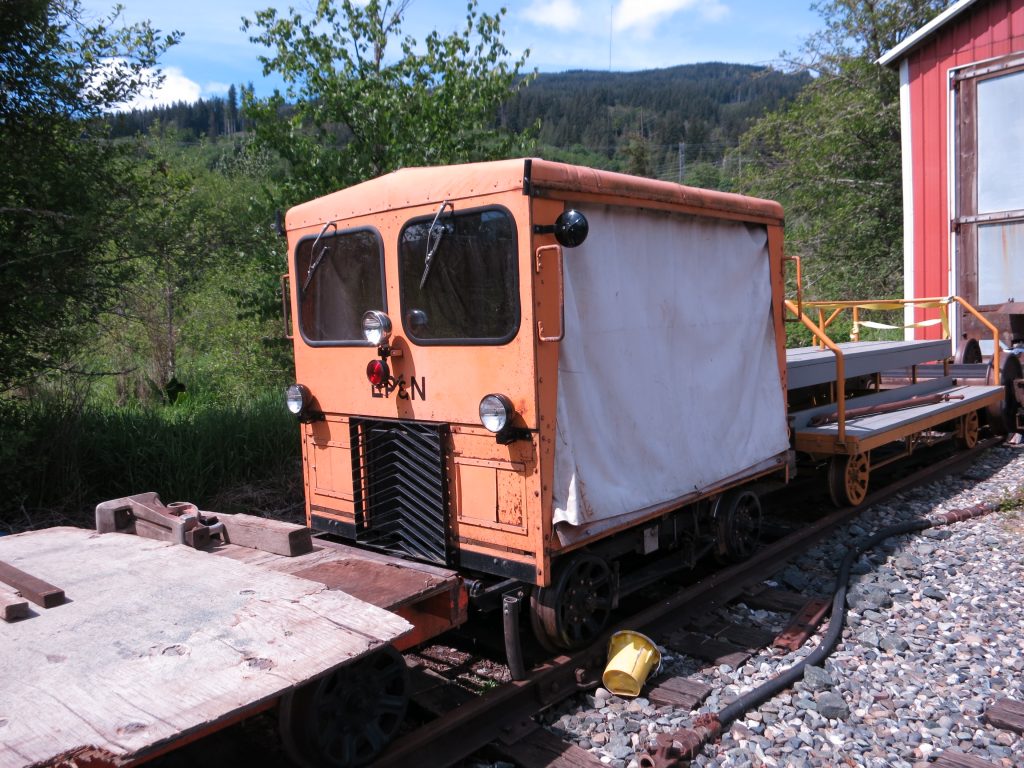
Northern Pacific 0-6-0 Class L-9 No. 1070 in the Wickersham shop awaiting restoration. The locomotive is in very good condition and will likely be seen under steam again.Backhead details on the NP No. 1070.Mount Vernon Terminal No 3 a Plymouth Diesel sits near the engine shed.Ex Longview Portland and Northern speeder which is used for track maintenance.
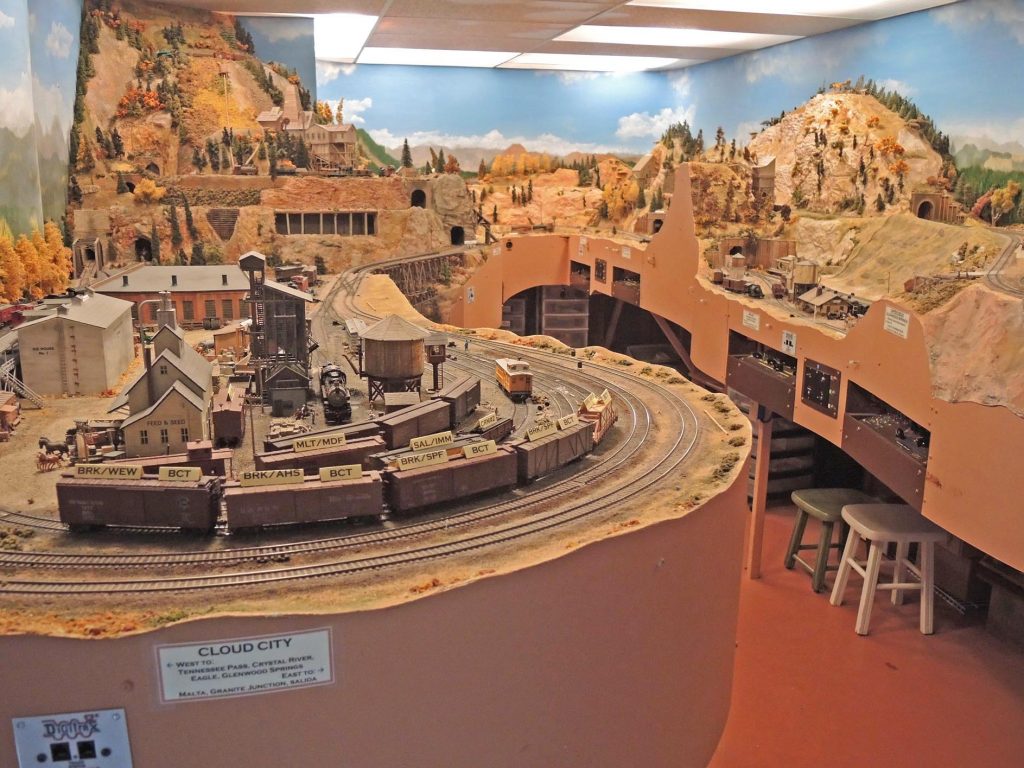
Cliff Aaker, filling in for Clinic Chair Rich Blake on business travel, introduced tonight’s two clinicians who presented two highly interesting talks about track planning for operations. Both presenters are NMRA MMR’s with decades of experience between them. Their layouts are very different not only in the era modeled, but also in their builders’ “druthers” (as layout design guru John Armstrong put it). One shared feature, though, is that both railroads center on Colorado—not surprising considering the fascinating prototypes that this mountainous state offered.Jack Tingstad, MMR was up first with his talk titled “Making an Old Track Plan Work.” Jack’s HO-scale Cloud City and Western RR, begun about 20 years ago, has now been hosting operating sessions for 12 years,
Fig 1 – Jack Tingstad’s Cloud City & Western
with crew sizes varying
between 6 and 8. The main section (Fig
1) is in a ground-floor room 12’ by 21’ in Jack’s home in Coupeville. Jack’s layout was adapted from a John
Armstrong plan (thus the “old track plan” descriptor) but whereas Armstrong’s
plan featured a “big city” setting, Jack wanted his set in the Colorado
mountains in the steam era and revised it accordingly. His “druthers” included:
“Massive”
scenery—extending to the room ceiling and to just feet above the floor in
places
Maximize
switching opportunities
No
duck-unders
“Visually
separated” town scenes to the extent possible
24”
radius minimum mainline radius with easements
Minimum
#6 mainline turnouts
Micro
Engineering track in Codes 83/70/55 for mainlines/passing tracks/spurs
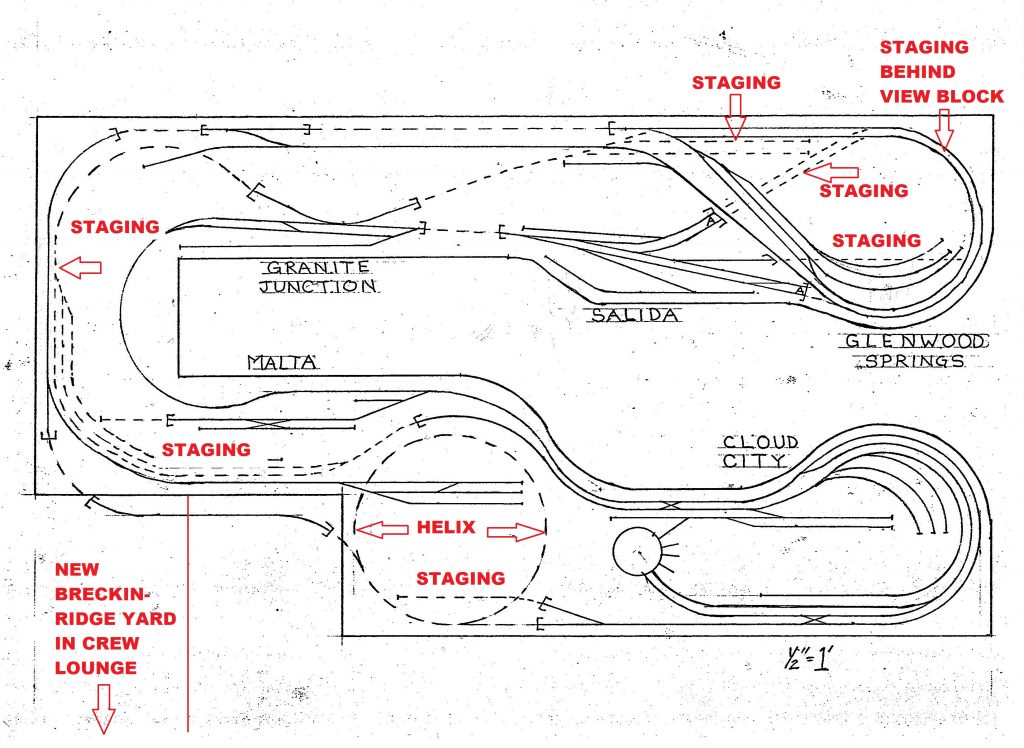
Jack’s resulting track plan is shown in Fig 2.
Fig 2 – Track Plan for Jack Tingstad’s Cloud City & Western
The plan is “loop to loop”
with the eastern and western loops at Glenwood Springs (upper level) and Salida
(lower level) shown at the upper right-hand corner of the track plan. The two levels are connected by a 24”-radius,
two-turn helix at the lower center of the plan.
The layout’s major yard is at Cloud City (Leadville), midway between
Glenwood Springs and Salida, lower right in Fig 2. All of the towns are named for actual places
in Colorado but their relationships to each other on the layout do not adhere
to their actual prototype locations.
Whereas large staging
yards, either concealed on lower levels, visible, or in separate rooms, are
currently in vogue, Jack built what might be called distributed staging all
around the layout, all hidden from view, most below scenery. See Fig 2.
He can stage up to 15 trains prior to starting an operating
session. A few years ago Jack acquired
“trackage rights” to a room adjacent to his original layout space, in which he
added a new yard, East and West Breckinridge, with tracks leading through the
wall from Granite Junction and Cloud City.
This room also functions as crew lounge.
The addition greatly expanded operations and adds two crew slots to work
the busy yard.
Jack’s “old track plan” certainly
works well as this reporter–a regular crew member–can confirm, and he
considers it a success. However, there
are always lessons learned and Jack shared a few:
Make
sure to provide access to all hidden track; Jack has no fewer than 20 lift-outs,
of which 4 or 5 are used frequently, others rarely
Although
they save much space, avoid 3-way turnouts as their complexity can cause loco
hesitation and other issues
Ditto
double-slip switches; Jack has one in his town of Malta, as part of a switching
puzzle in a small space, but crews can have trouble with it
Ensure
spurs and sidings where cars are to be spotted are dead-flat—otherwise clothes
pins or other braking devices are needed to prevent roll-aways
Use
of compound ladders in yards on modest-sized layouts can save space; Jack used
them in his Breckinridge addition
Mark
Malmkar, MMR, was up
next. His layout is about the same age
as Jack’s but has traveled many more miles!
Begun in Nebraska in 1990, Mark’s layout—built in sections–was moved to
two more houses in that state, with revisions to fit the spaces available. Following some years of storage, the layout
has been moved yet again to its new home in Oak Harbor where it is now being
re-assembled, with plans to considerably expand it as well.
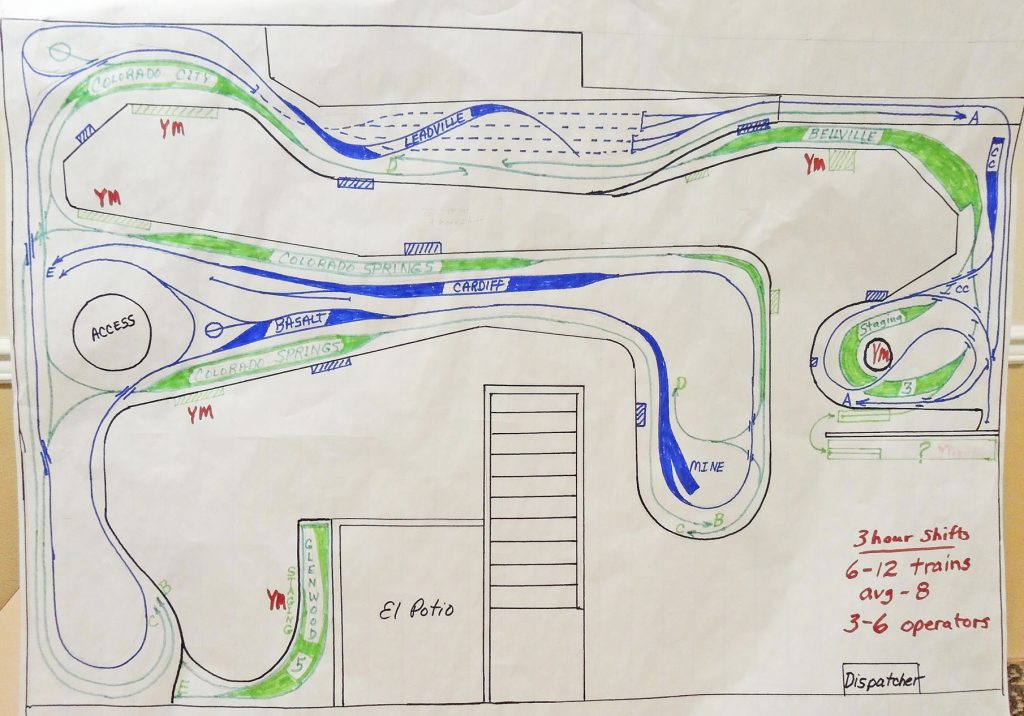
Fig 3 – Mark Malmkar’s HO-Scale Rocky Mountain Central
Mark’s current plan for his HO-scale layout
in its new location is shown in Fig 3.
The space is 40’ in its long dimension.
His freelanced railroad is called the Rocky Mountain Central. It’s
a two-level pike (lower level is shown in green and upper in blue) with a helix
interconnecting the two. Despite being
similarly located in Colorado, Mark has far different “druthers” for his layout
compared to Jack’s:
Transition
era, 1955, with some steam but mostly diesel
Town
plans replicating prototype as much as possible
Kansas
City and Chicago staging yards originating and terminating trains; most traffic
comes from Chicago
Rock
Island, CB&Q, and AT&SF trains cross Rocky Mountain Central’s trackage
Passenger
train emphasis, especially dome cars (Mark’s favorites)
Mark’s layout features
24-inch minimum radius curves and Code 100 track throughout for improved
operation. Referring to Fig 3, the
sections at the top and at the right of the drawing are mostly re-assembled and
in place; the central peninsula and Glenwood Springs at the lower left (now
Mark’s office space) are planned for later construction. Mark anticipates 3-hour operating sessions
with 6- to 12-trains running, with an average of 8, and 3 to 6 crew on the
mainline. Crews could grow to 12 to 14,
but aisle congestion, especially where switching districts are close together
and on both levels, might make that too optimistic. Mark’s first op sessions will tell!
Great ideas—from modelers
with years of experience—for our own layouts.
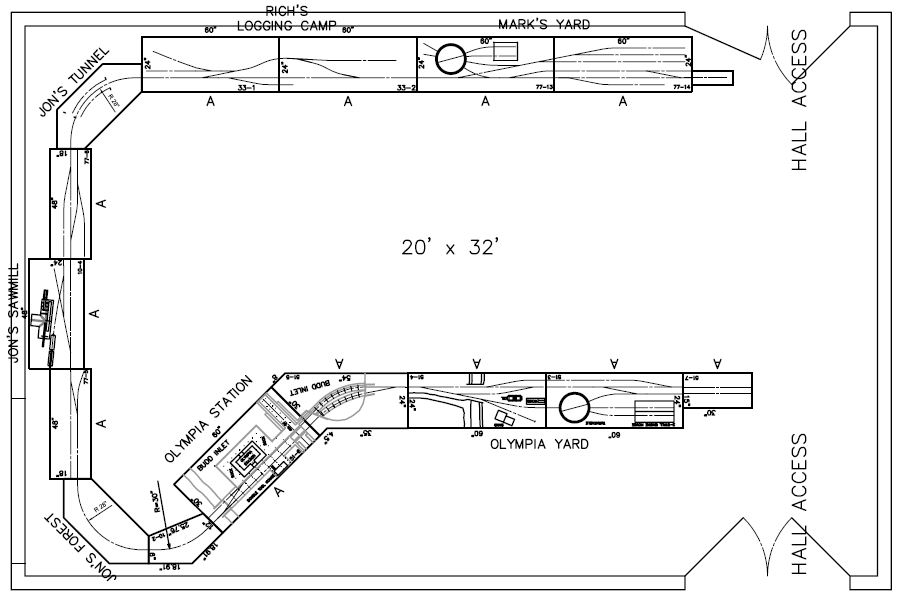
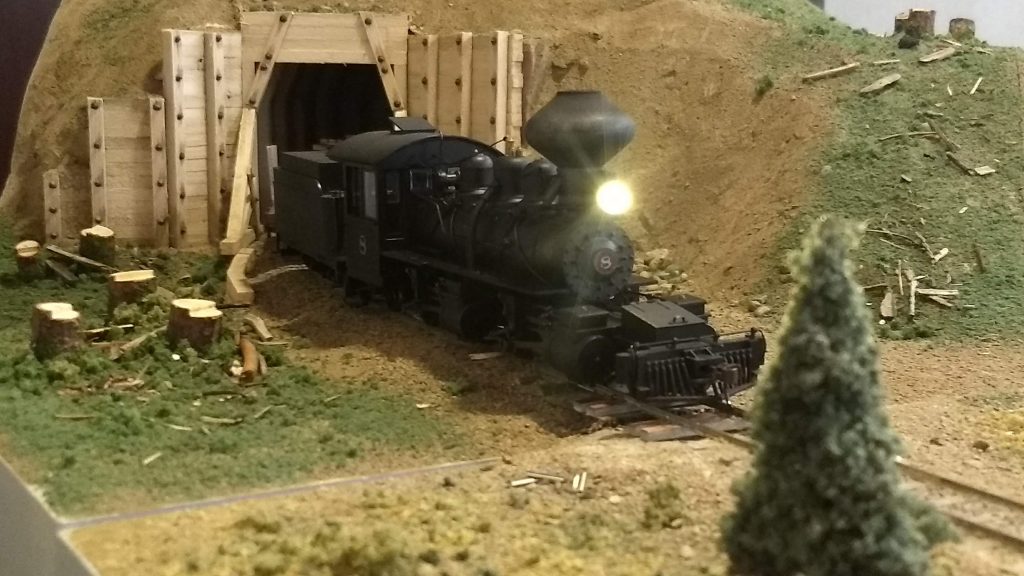
Overview of the PNW On30 Modular Group setup at the Sheraton Hotel in Bellevue WA.
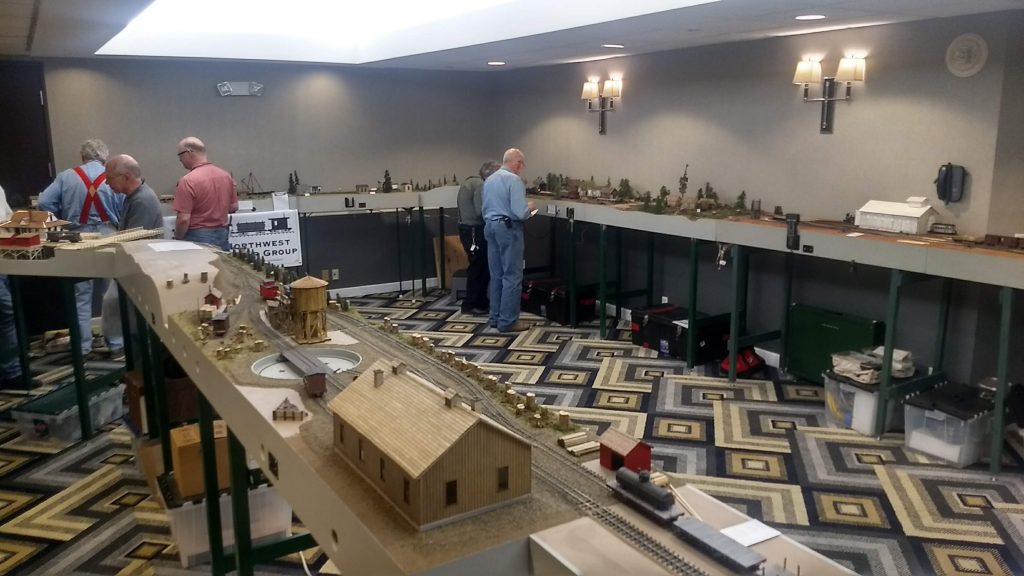
A nice change of pace however was afforded to our group with an invitation to the 34th Annual Sn3 Symposium at the Sheraton venue in Bellevue WA April 4-6 2019 from 4D Superintendent Russ Segner and Sn3 Symposium coordinators Robin Peel and Dale Kreutzer. This is a niche event that is similar to the National Narrow Gauge Convention but mainly focused on “S” or 1/64th scale. Although the space was smaller than our usual huge open train show venues, PNWOn30 Superintendent and CAD expert Alan Murray managed to design a layout to fit in the space that allowed for a nice point to point configuration providing a lot of operating opportunities.
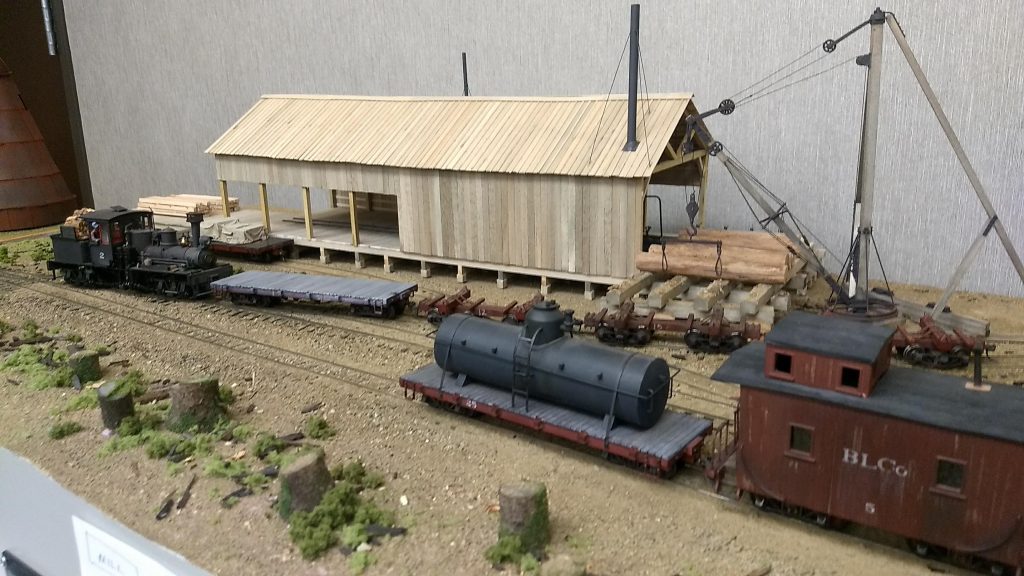
PNW On30 layout configuration for the Sn3 Symposium.
Alan along with PNWOn30 members Jerry Barnes, Jon Bentz, Rich Blake and Mark Clemmens set up the layout on Thursday April 4th in a well lit private space in the hotel. Even though we are 1/48th scale or O scale, the layout was a welcome attraction for the Sn3 Symposium participants and generated a lot of interesting discussion on modeling, construction of modules and DCC system control (we use NCE).
Chick Sweeny and John Dodds building up a train on Mark Clemmen’s yard modules.
Something new for the symposium and our modular group, was that we opened up the layout to guest operators on a fixed time schedule throughout the open viewing periods of the show. Normally we just operate with our own modular group members at shows but this time we opened up the layout as a bonus operating opportunity and ended up with twelve guest operators on the crew call list over the course of three days in five different sessions. Rich Blake ran the layout as Dispatcher/Trainmaster while the rest of the PNW On30 crew assumed yard and crew assistance duties for our guest operators.
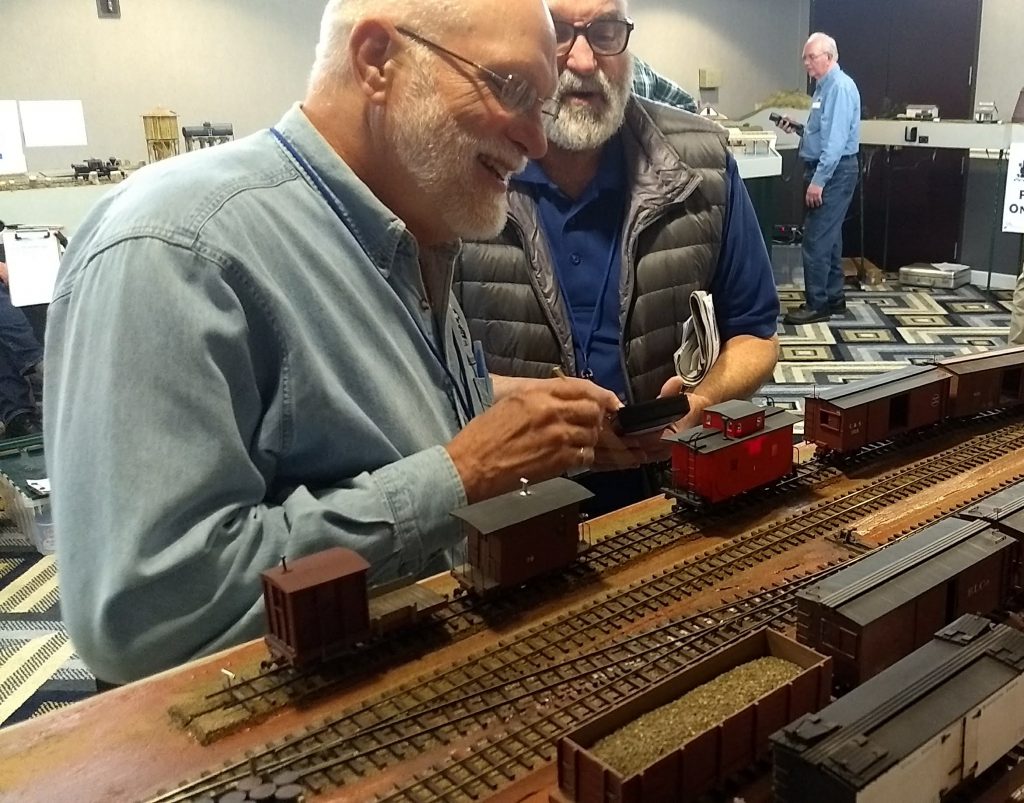
Jerry Barnes and Byron Osborn reviewing their orders and switchlist at the busy Sawmill Siding area. Bob Stafford switching the house track at Olympia Station.
We had several “old hats” as well as a few “noobs” to operations who learned a lot about this very intensely engaging aspect of model railroading. Our operating schema utilizes Time Table and Train Order rules typical of the early 1900s. We also use Java Model Railroad Interface (aka “JMRI”) Operations Pro to manage car inventory and generate switchlists for yards and industries. The operating style is laid back and slow moving but every train has a purpose and work to do. A typical job for a conductor/engineer two man crew would take about an hour to complete which was perfect for the time slots we had for guests.
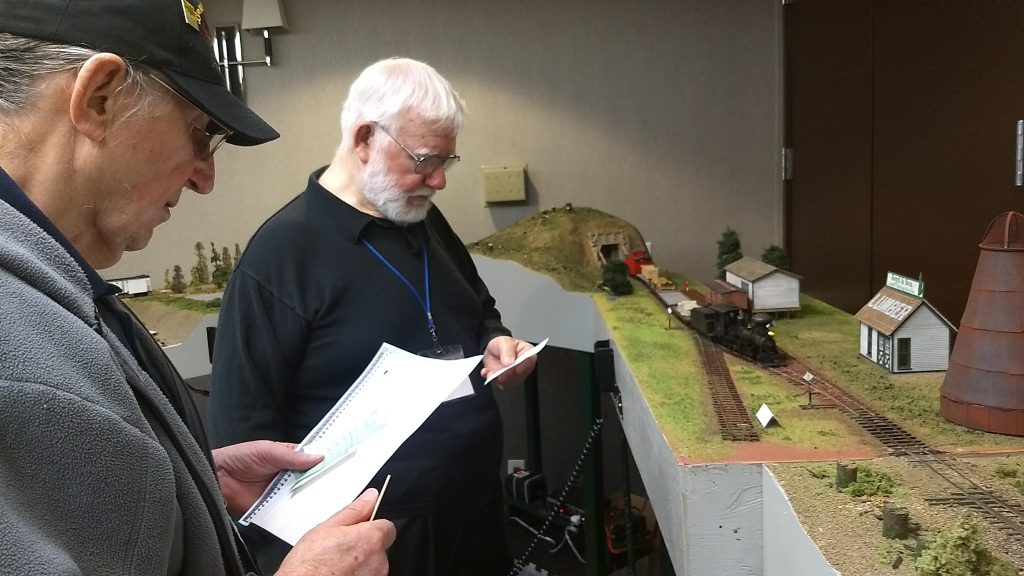
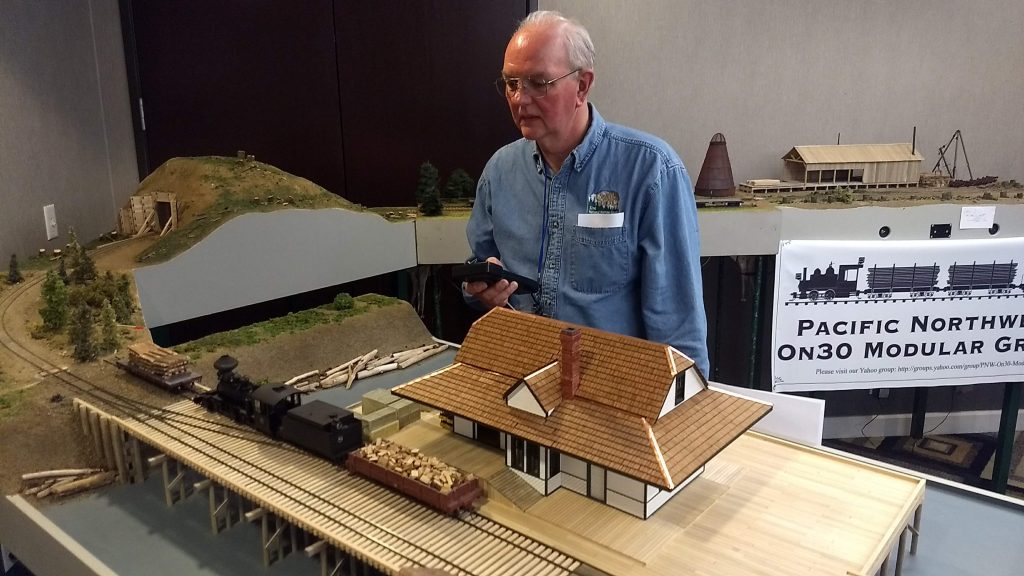
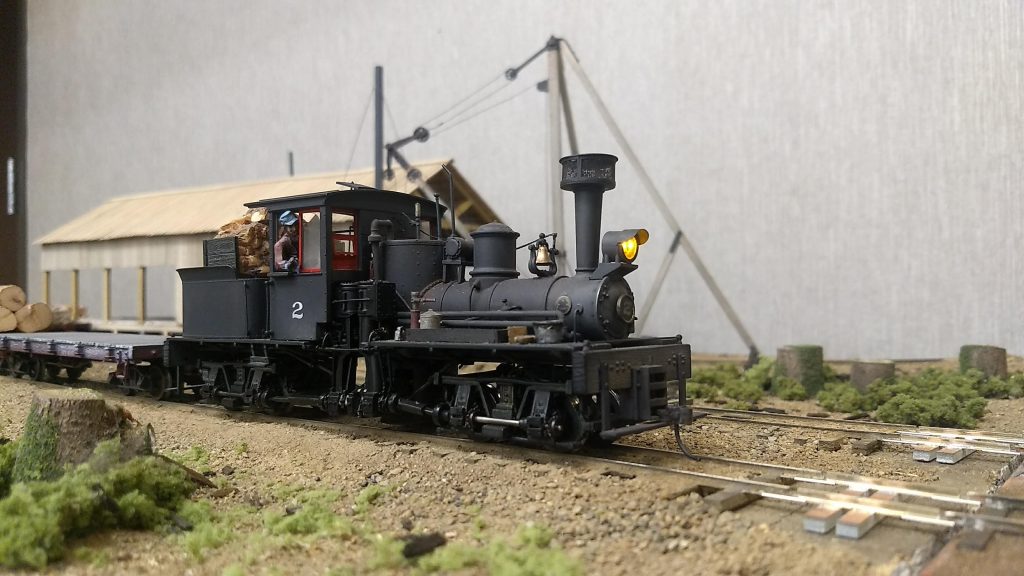
Ron Auletti running the morning westbound mixed at Alan Murray’s Olympia Station.Ed Roach enjoying his time working the Bay Lumber Company Camp 4 module.
Overall it was a great event and our group would especially like to thank all the enthusiastic operators who brought the layout to life as well as the coordinators of the Sn3 Symposium who provided the great space and support. If you would like to see our layout or are interested in operations, stay tuned here on the Grab Iron for show announcements or contact us via the Module Programs section of the 4D website or the PNW On30 website.
A few more shots from the event:
Motor No. 1 of the Nemah Valley Narrow Gauge making a stop at Camp 4. (Module and models Rich Blake)View of Alan Murray’s Olympia Yard section with locomotive servicing and turning facilities.The No. 8 2-4-4-2 of the Nemah Valley Narrow Gauge emerging from Jon Bentz’ Tunnel module.Bay Lumber Company No. 2 15 ton “Tee” boiler shay. (Model by Rich Blake) Bay Lumber No. 2 shay working Jon Bentz’ sawmill module.
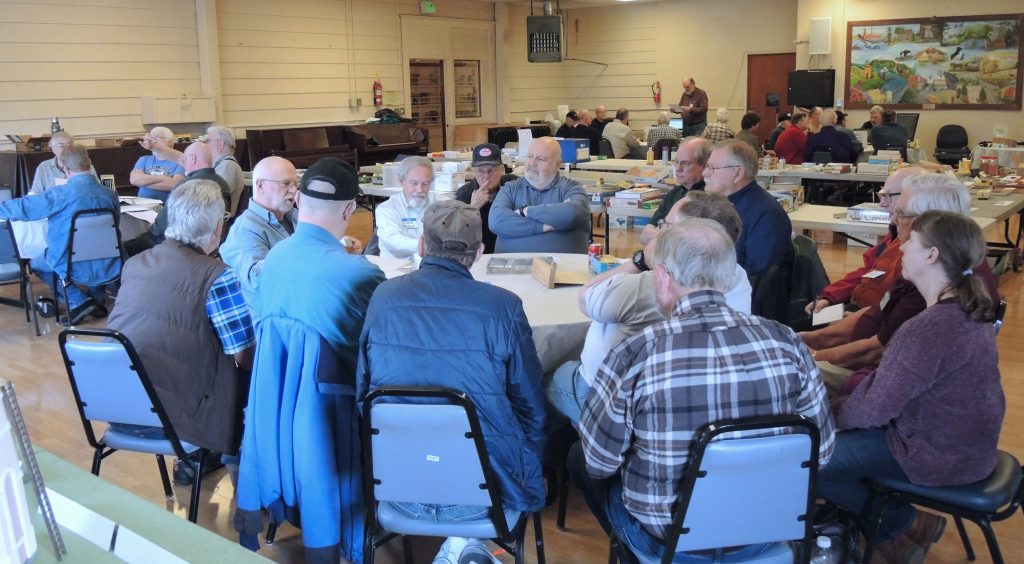
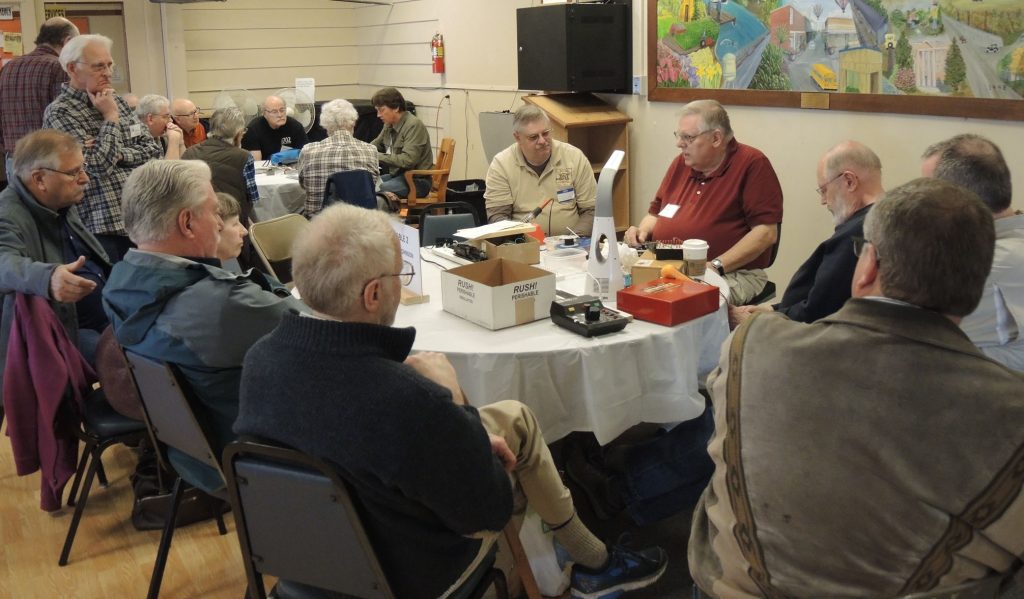
The 3rd annual joint Mt. Vernon – Skagit Valley & Whidbey (“Oak Harbor”) clinic held March 23rd at the Mt. Vernon Senior Center was by all measures once again a great success. At least 58 participated by one count but it might have been higher; a few may have slipped by the registration table. Thanks are due the Mt. Vernon Clinic for organizing the event, for which logistics and venue were flawless. Also many thanks to the “women’s auxiliary” of the Skagit Valley & Whidbey group to lay on a fine lunch, which allowed attendees to stay at the Center and socialize instead of scattering all over Mt. Vernon: well done ladies!
Fig 1-Mt. Vernon–Oak Harbor Joint Clinic
Eight clinicians conducted
clinics in morning and afternoon sessions, each given twice offering
participants more opportunity to not miss anything:
Rich Blake – Hand Laid Turnouts and Soldering
Basics
Roger Johnson – Decoder Installation/General
Soldering
Don Jones – Passenger Car and Caboose
Lighting Options
Russ Segner – Layout Planning
Ted Becker – Introduction to Arduinos
Didrik Voss – Create Your Own Virtual RR with Trainz
Jon Bentz – Updated L-Girder Benchwork
Construction
Al Carter – Pan Pastel Weathering
Several swap tables also overflowed with “I gotta have that” items and most sellers seemed to carry home less stuff than they arrived with, so we hope they had a successful day sales-wise—or just clearing out some of those boxes under the layout. Other tables along one wall were filled with the annual contest entries—but more of that later.
Fig 2–Roger Johnson & Rich Blake Clinics
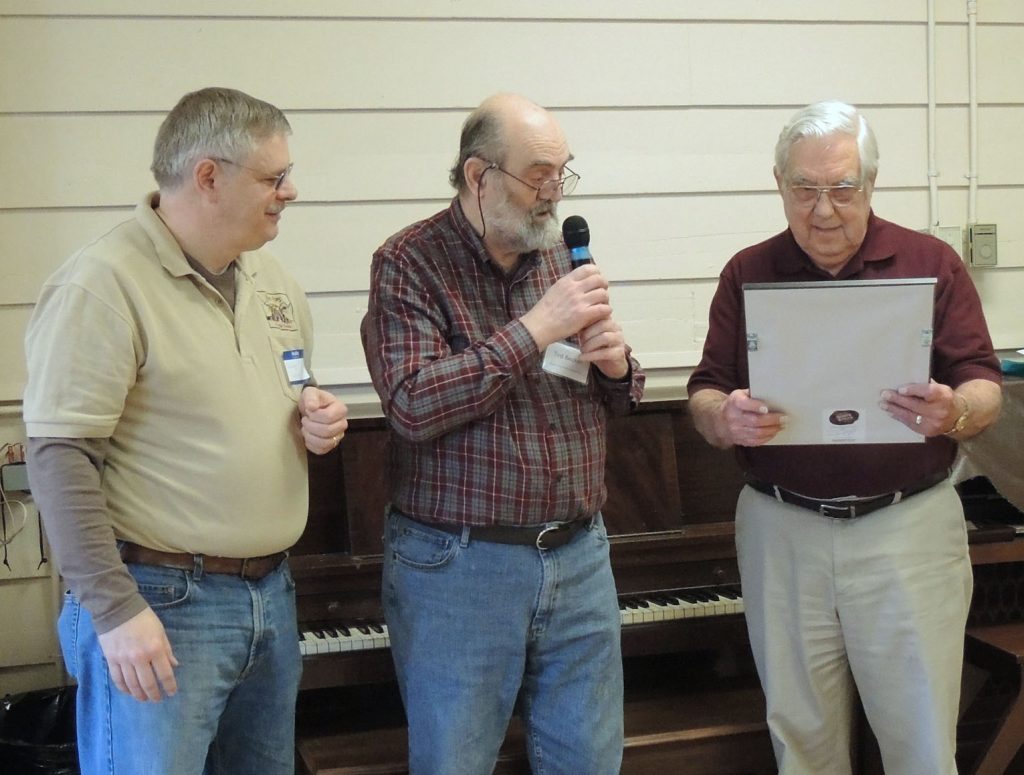
Before the lunch break, Greg Wright and Ted Becker, prior recipients of the 4th Division PNR NMRA Golden Grab Iron Service Award, presented this year’s award to Jack Tingstad (Fig 3). Jack has actively promoted the hobby for over four decades, participating in national, regional and 4th Division NMRA events, volunteering and opening his oft-published layout for many open houses. A founding member of his local area’s modeling group (now the SV&W NMRA Clinic), Jack has conducted dozens of clinics himself. Jack’s skills have earned him MMR 591. Jack was at the forefront of modelers keen on operations, and has also brought model railroading and the NMRA into the community. For fifteen years he opened his layout to the general public every Thanksgiving weekend, with extensive newspaper coverage, often welcoming over 400 people at each event, attracting many new people into the hobby. For good reason, Jack is known as the “train guy” on Whidbey Island. He’s well earned that title as well as the Golden Grab Iron Service Award.
Fig 3–Jack Tingstad Earns Golden Grab Iron
Next up, after the lunch break and judging of entries, the results of this year’s model contest were announced by contest organizer Mike O’Brien. Mike’s model railroad supply business also generously provided an entire tableful of prizes from which winners could select their choices. There were all together 17 entries in 4 different categories.
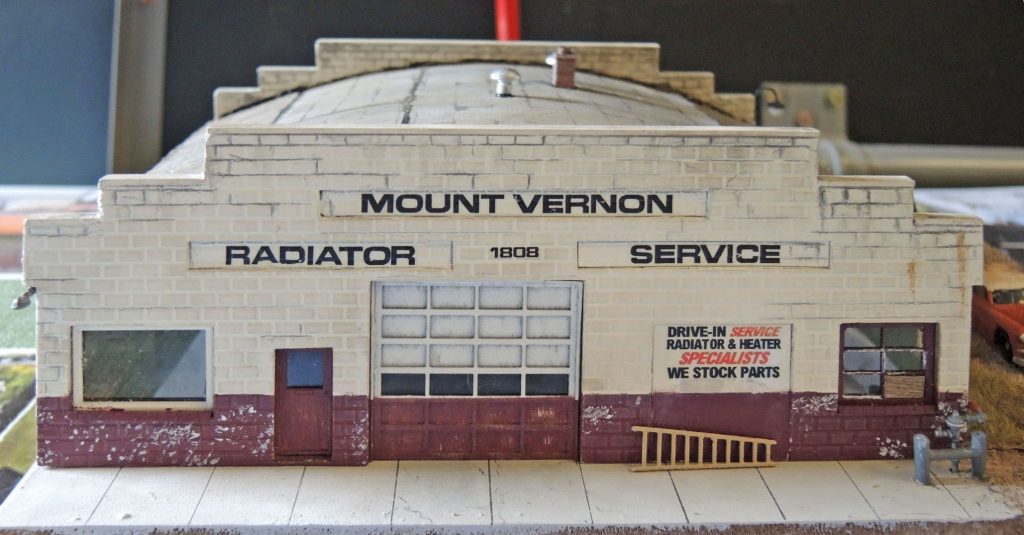
Fig 4–Scratch Structure 1st Place
First Place in the Scratch-built Structure Category was awarded to a magnificent reproduction in HO-scale (Fig 4) of Mount Vernon Radiator Service, located on S. 2nd Street in that Skagit County town. It was a team effort by Al Carter and Nick Muff who utilized CAD plans, laser cut wood and styrene, and finishing and weathering entirely as the original. It is one of those structures for which a single photo cannot do justice to the model. The model also won First Place in the Photo Match Category for most closely replicating prototype photographs.
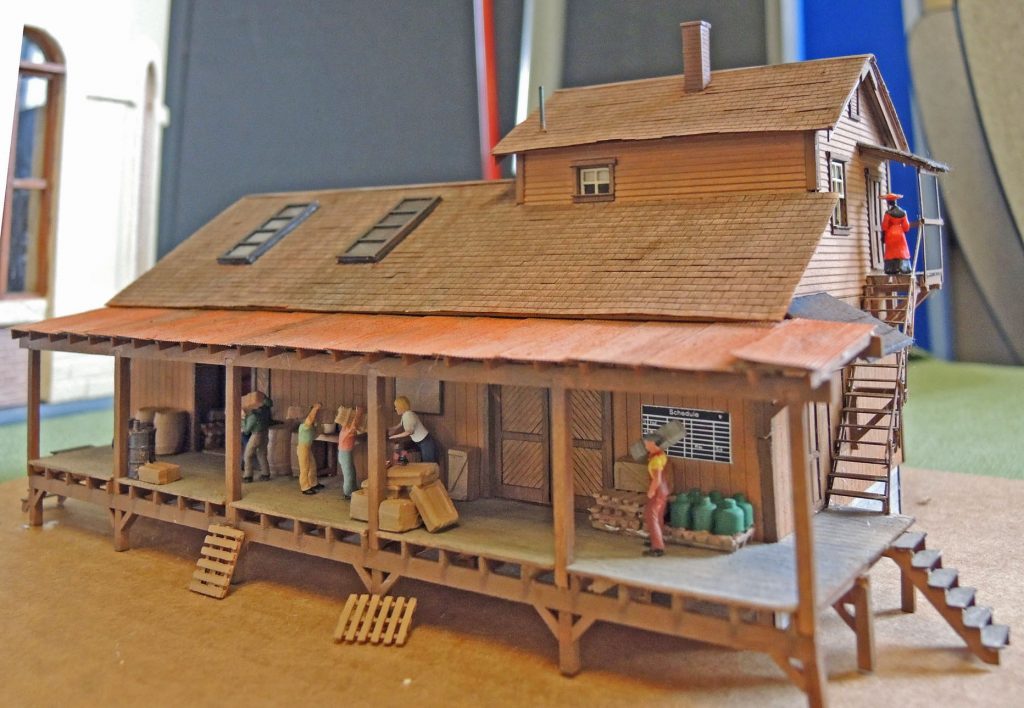
Fig 5–Kit Structure 1st Place
First Place in the Kit or Kit-Bashed Structure Category went to Jack Tingstad for his B.T.S. laser-cut generic warehouse, Master Creations kit #27106, again in HO-scale (Fig 5). Jack used Bragdon Chalks for weathering. Instead of etchants sometimes used to create “rust” on the corrugated porch roof panels, Jack used a combo of paint and chalk to create an equally-convincing result.
Fig 6–Rolling Stock 1st Place
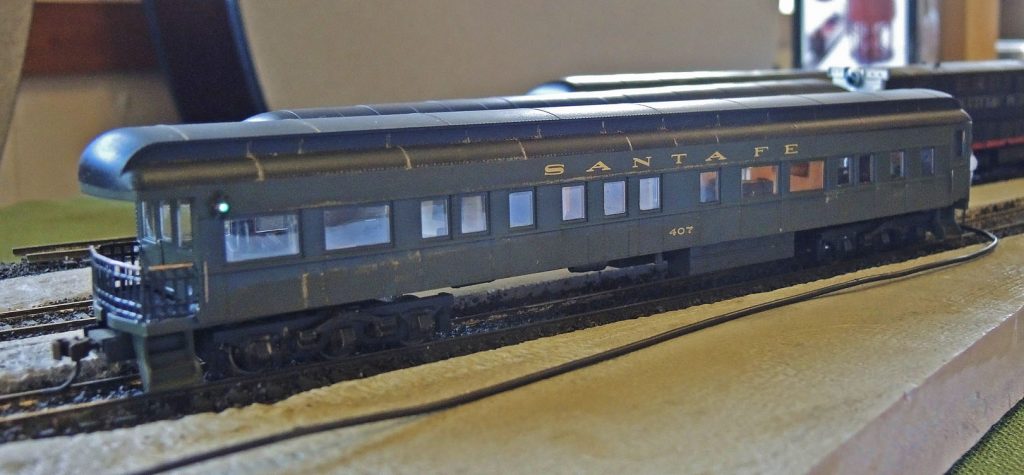
First Place kudos in the Rolling Stock Category (scratch or kit) went to John O’Connell for his 82-foot Santa Fe Observation Car No. 407 (Fig 6). It is an HO-scale kit by Bachmann. John added a fully-lighted, painted interior; working marker lights; wall art; and owners and guests enjoying their posh ride.
Fig 7–Scratch Structure 2nd Place
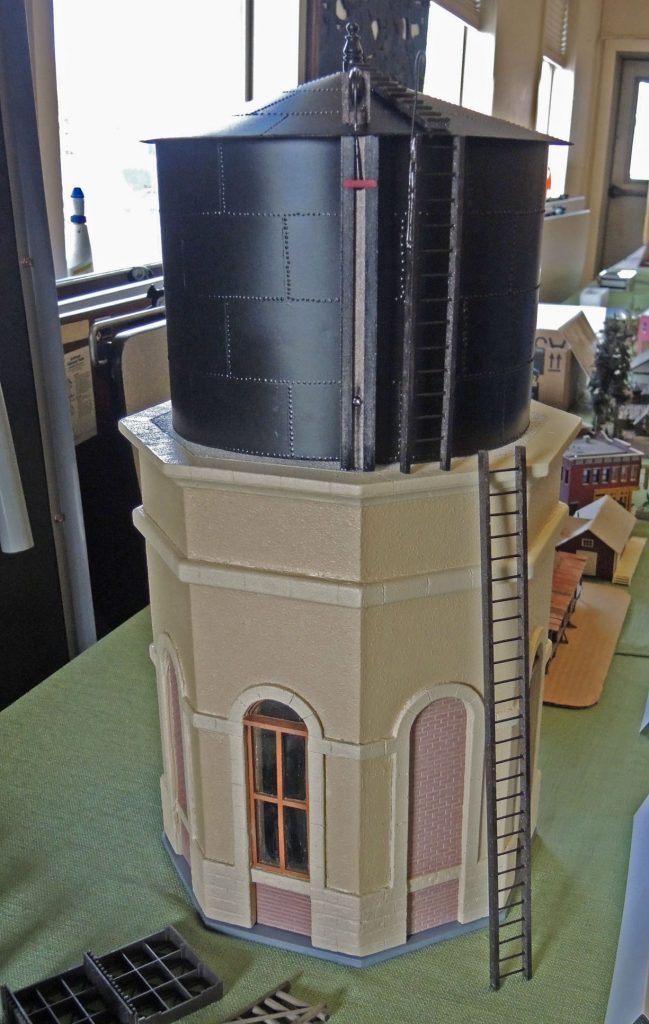
No, not every contest entry was HO-scale—to wit, see Fig 7. It’s the Second Place winner of the Scratch-Built Structure Category and was built by Doug Palm. Your reporter had to switch his camera from macro-mode to the distant scenery setting to capture this G-Scale behemoth. It’s a model of a water tower at the Gare d’Annot, France. The tank on top of the “water castle” has a capacity of 120 cubic meters, Doug wrote in his description of the model. Curious readers can do the conversion to U.S. gallons themselves—your reporter is tired.
Fig 8–Kit Structure 2nd Place
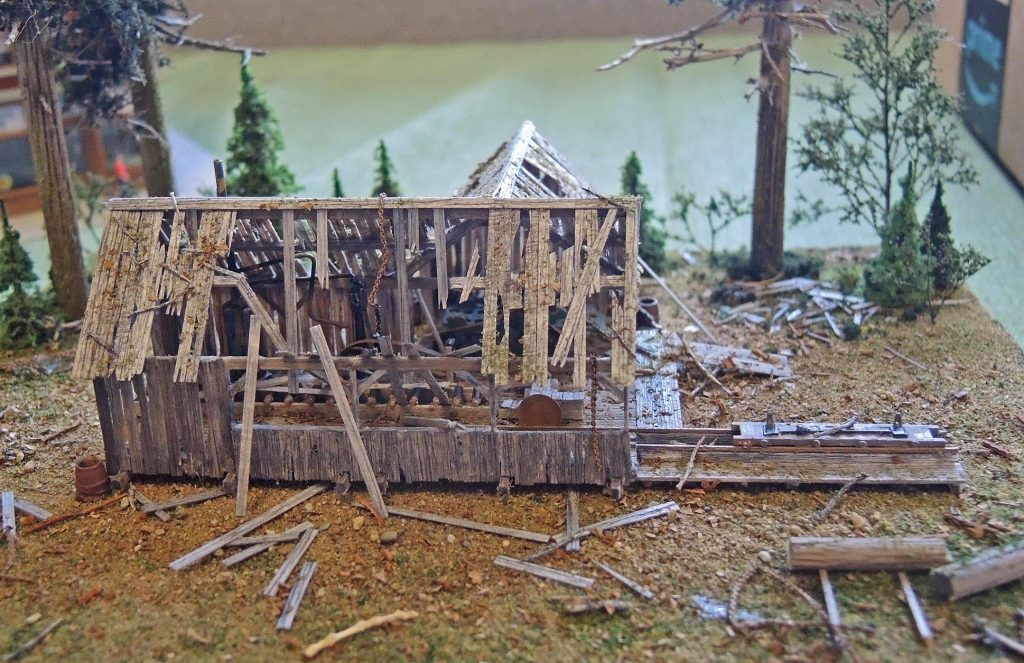
Second Place in the Kit or Kit-Bashed Structure Category was earned by Mike O’Brien for his Old Abandoned Sawmill located in the Oregon Cascades (Fig 8). Mike kit-bashed the N-Scale model, individually cutting, distressing, and weathering all of the boards. Another example where the photo can’t capture the detail of this impressive model.
Fig 9–Rolling Stock 2nd Place
Last but definitely not
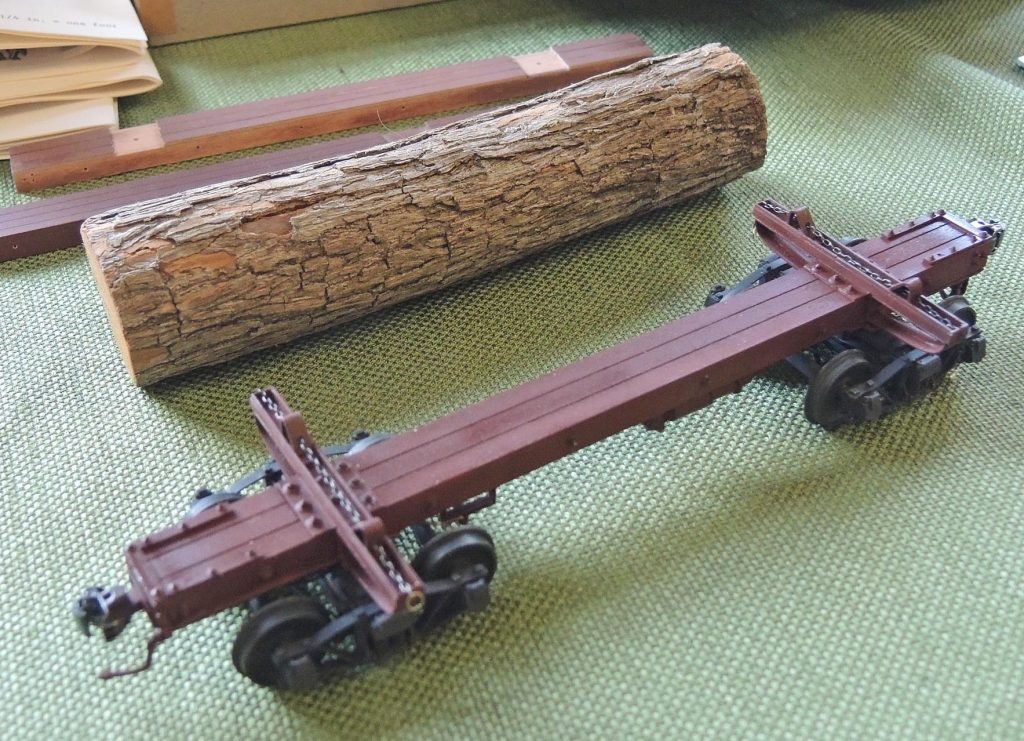
least, Fig 9 illustrates the Second Place winner in the Rolling Stock Category (scratch or kit) entered by Alan Murray. It’s a Keystone Model Works O-Scale log car
with brass core, Protocraft trucks, and Kadee couplers.
All the contest entries
including others we didn’t have space to show were excellent, and well-illustrated
the skill resident in both Mt. Vernon and Skagit Valley & Whidbey Clinic
modelers. We all look forward to a
repeat event in 2020!
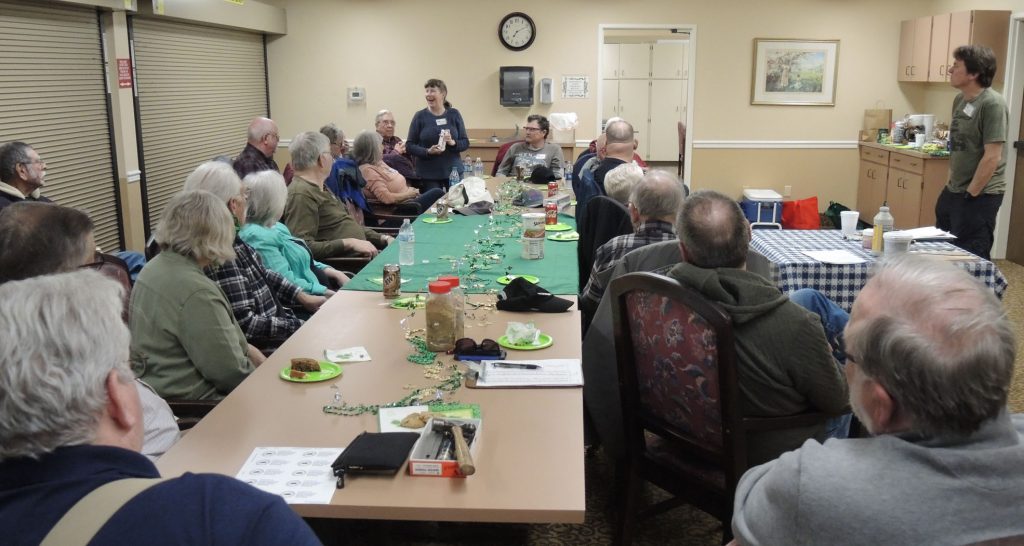
It wasn’t necessary for Clinic Chair Rich Blake to fire up enthusiasm. A St. Patrick’s Day mood was already in the air (Fig 1) at our March meeting, with green tablecloth, plates, hats and delectable cake (with green icing) laid out, all carried in by some of our keen members. Susan Gonzales (pictured, at end of table) announced our upcoming Lake Whatcom Railway outing (May 18th) as well as her work on recruiting. Susan created a small flyer for members to post in their towns to potentially attract new (younger?) members. Thanks, Susan; although our attendance is strong, we would be pleased to welcome more! Rich reminded all of the upcoming annual joint clinic with the Mt. Vernon NMRA Clinic on March 23rd, which will feature multiple clinics, swap tables, our annual model contest, NMRA achievement award judging, and more. Info is on the Grab Iron.
Fig 1 A St. Patrick’s Day Mood at the March Clinic
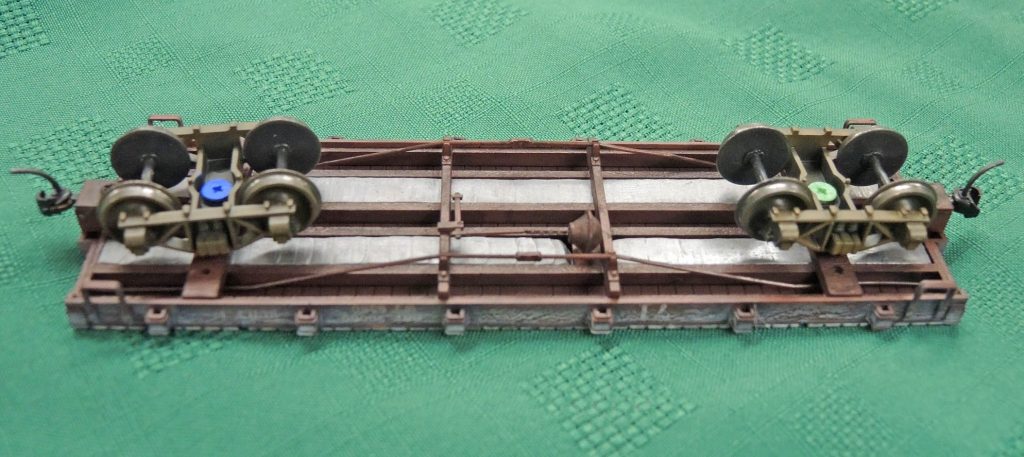
Alan Murray kicked off the evening by demonstrating a clever and simple way to add needed weight to Bachmann On30 flat cars. These are well-detailed, popularly-priced models but too light; Alan and his On30 modular group (https://www.pnwon30.org) endeavor to weight their cars to S-scale standards since no standards specific to On30 exist.
Fig 2 Alan Murray’s Car Weighting Method
Fig 2 shows the underside
of a weighted flat car using Alan’s method; two strips of lead are visible
imbedded between longitudinal frame members.
To fashion these, Alan starts with strips of ¼” diameter lead fishing
weight; it’s available in rolls in the fishing department at Sebo’s Hardware
stores or similar outlets. It turns out
to be just the right diameter that—when hammered into the frame as shown—fills
the spaces between the frame members perfectly.
(Trucks are obviously removed beforehand.) Following initial shaping with an ordinary
hammer, the job is finished off with a steel block and gentler hammering.
Cliff
Aaker was up next for
the main clinic of the evening, fashioning Roads
from Concrete Patch and Rocks
(and other things) from Concrete Crack
Seal. The selection of the right
materials is the key here, and Cliff tried several, so his trial and error will
save you a lot of time. He was led down
the right track by a video by Ken Paterson on making roads, which you can view
at https://www.youtube.com/watch?v=ZEhBYa9P-EA&t=1358s.
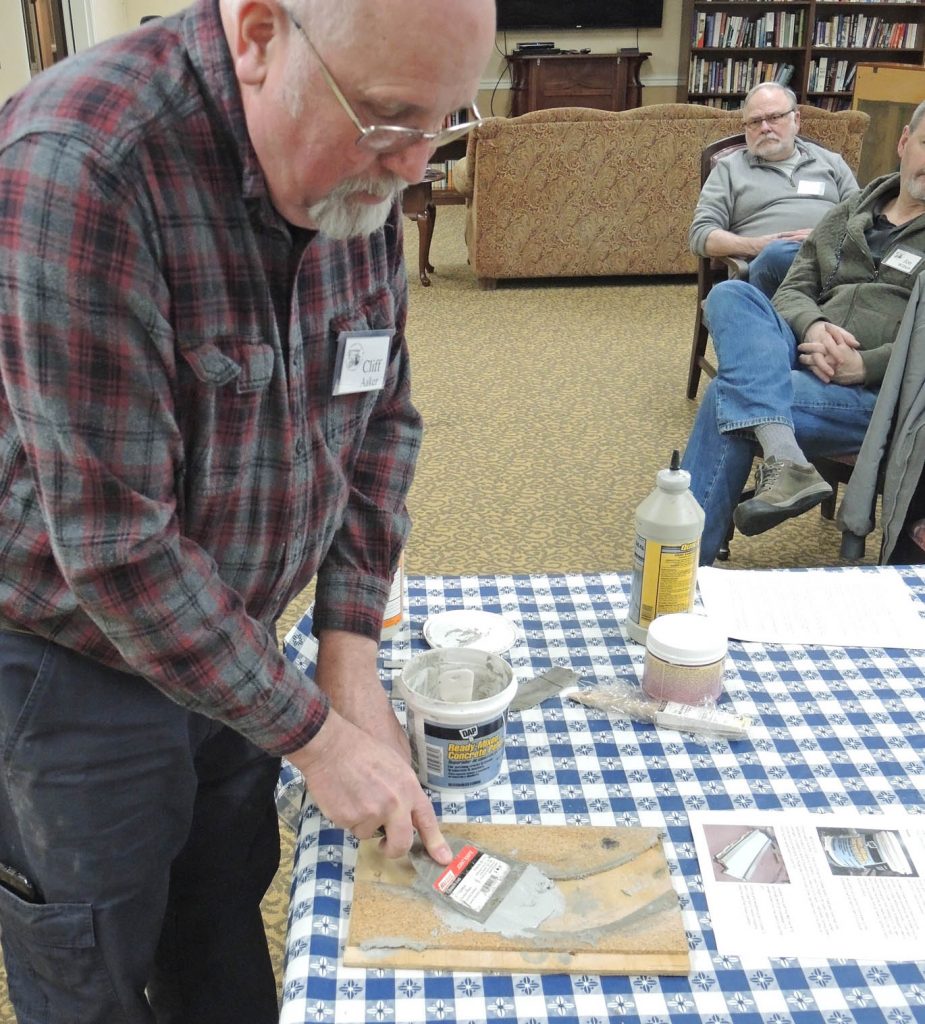
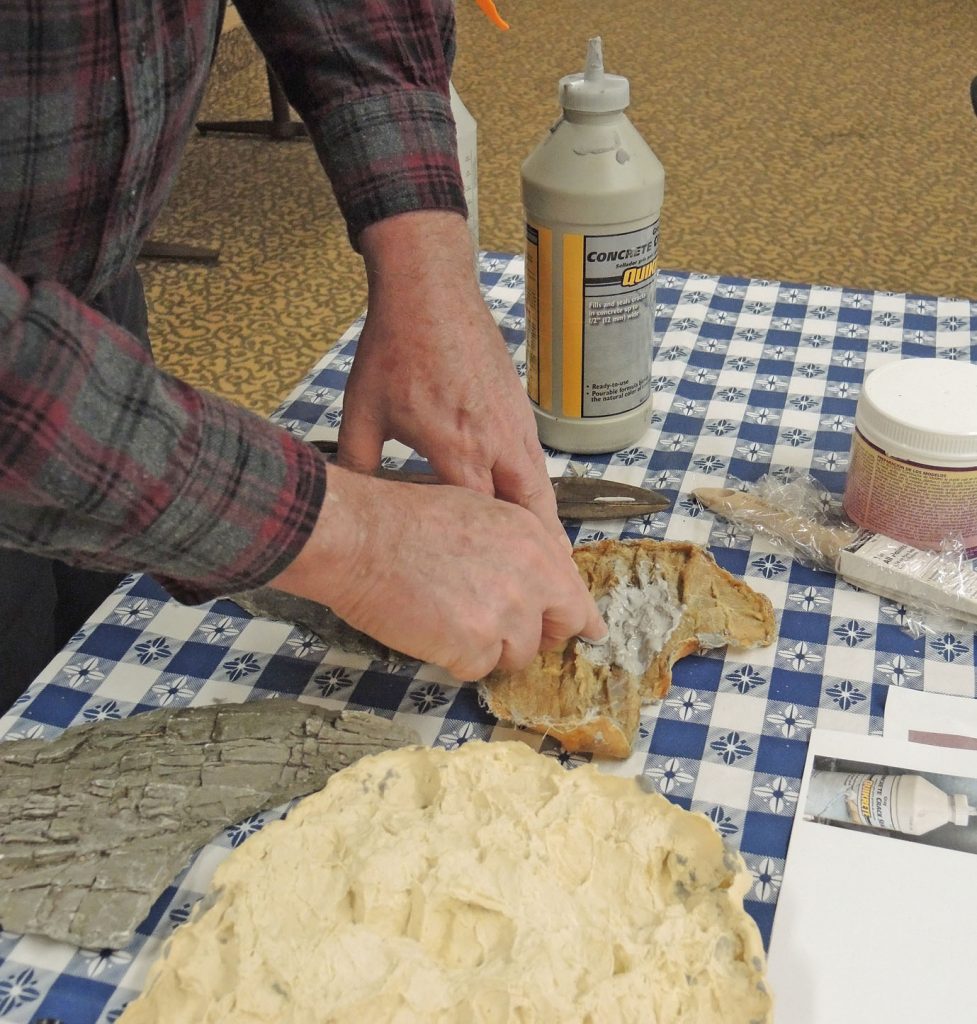
First, roads. Of many similar products, use only Ready-Mixed Concrete Patch by DAP. Other latex-based products may work, but acrylic-based will not. Cliff applies this product up to 1/8th” thick per layer and allows 24 hours to harden. It applies somewhat like drywall mud but you have to keep wetting your trowel (use wet water i.e. with a couple of drops of detergent) often to keep the compound from sticking to it. Also, keep the trowel as nearly parallel to the surface as possible and go slowly. See Figure 3. In this example Cliff is using a simple form of plywood and cork roadbed.
Fig 3 Cliff Aaker Demos Concrete Patch Roads
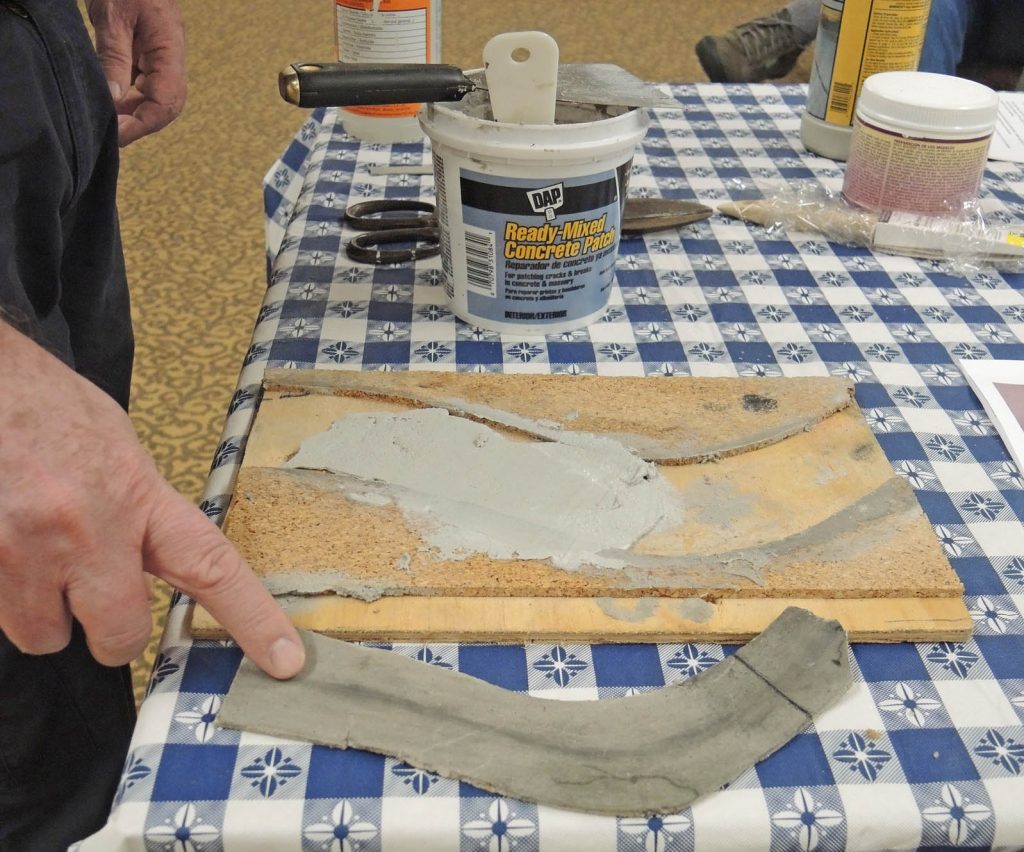
The concrete patch will shrink and crack on the first application. Applying a second coat is usually sufficient. After it dries, Cliff then sands first with #60 grit sandpaper followed by #120 and #400. Coloring and weathering are a matter of taste. One of the features of the patch is—well—it looks like concrete, so not too much effort is needed, as would be for, say, plaster or Sculptamold. Cliff uses India ink and Pan Pastel powders to age the pavement, and to add centerlines, joints and cracks. Potholes can be carved in later with a knife if desired. Fig 4 shows a section of finished road at the bottom, made from the same form. Another feature of the cured latex is that it is flexible, so you can easily create vertical curves in your roads.
Fig 4 The Finished Road at the Bottom
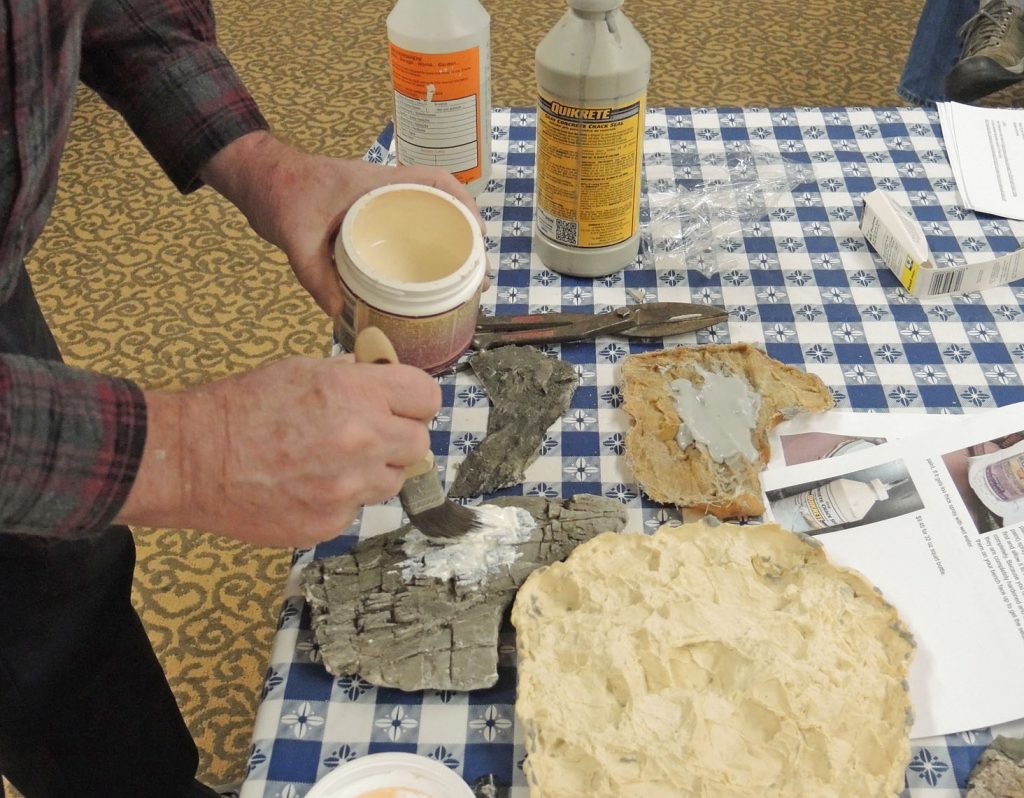
Moving on to rocks, a different concrete patch is used: Concrete Crack Seal by Quickcrete. In essence Cliff uses this material to make latex rock castings, using latex molds, in a similar way that plaster rock castings are made using these same molds. The end products are similar to—but far cheaper than–the so-called “rubber rocks” commercially available. The Crack Seal is much thinner than the patch material described earlier as it’s made to flow into cracks. That also means it flows into and conforms to tiny details of latex molds. In Fig 5, Cliff begins filling a mold with the crack seal material.
Fig 5 Rocks from Concrete Crack Seal
Perhaps surprisingly the Quickcrete material, despite being latex-based, doesn’t seem to stick to some latex molds, even without any mold release agent being used. Cliff has successfully used both home-made molds (such as the one he is filling in Fig 5) and Bragdon molds (bottom, Fig 5). However some have had trouble trying this material with Woodland Scenics molds, so experimenting with small pieces is recommended. If you run into an incompatibility, the crack seal material dissolves in alcohol before it cures.
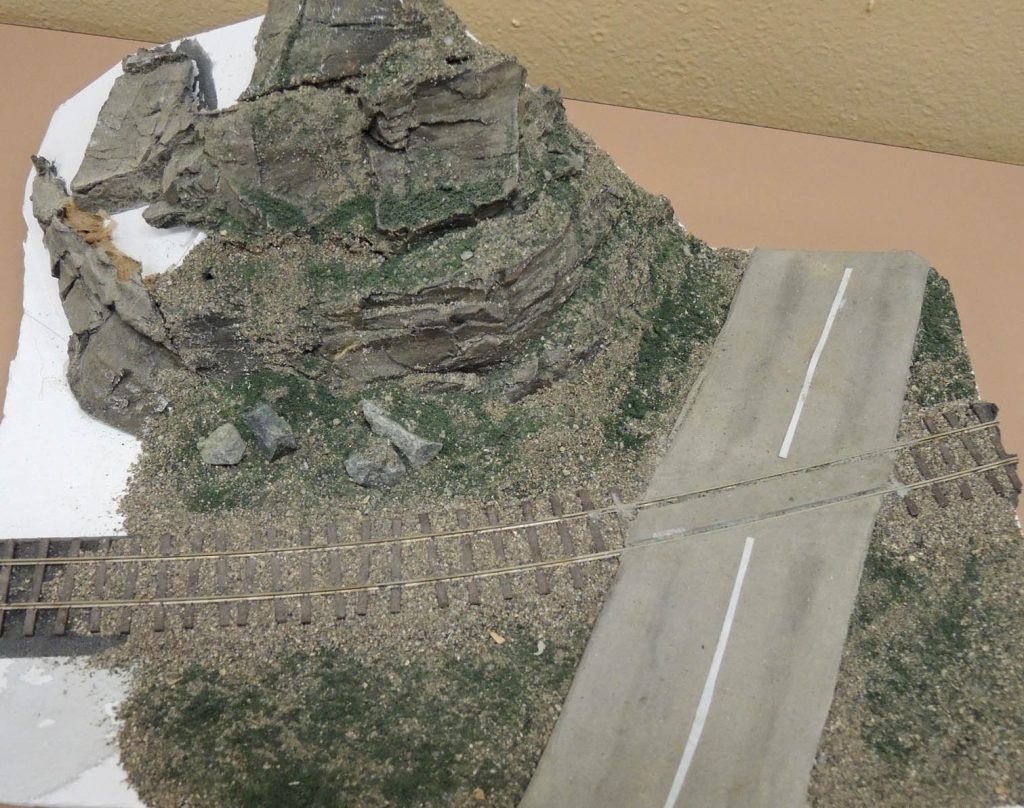
Fig 6 A Sample Showing both Rocks and Road Using Cliff’s Methods
Fig 6 shows a small display piece with both a concrete patch road and some rock outcroppings made with concrete crack seal as above. The crack seal rock pieces can be trimmed with tin snips to fit neatly onto hillsides or into cuts and are glued into place with hot glue (high heat type). Crack seal doesn’t stain the way plaster does: you must paint it. Cliff uses acrylic craft paints diluted 1 part paint to 4 water applied with a squirt bottle. He does black first and allows it to settle into the cracks and dry completely.
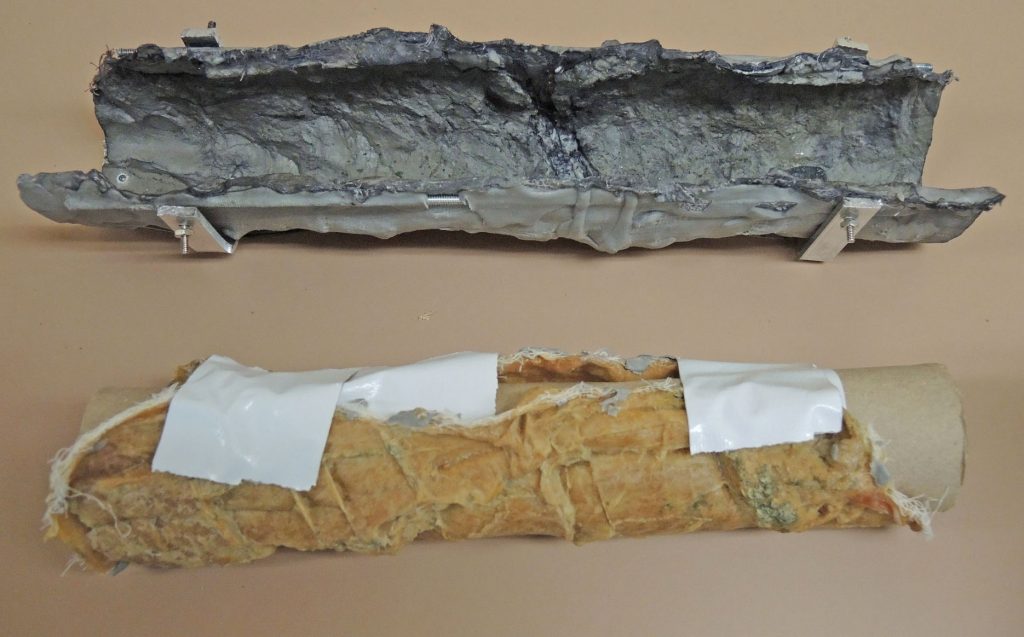
Fig 7 A Tunnel Lining for an On18 Ore Track
Cliff discovered other uses for the Quickcrete material. One example is shown in Fig 7: a tunnel lining for one of Cliff’s On30 modules. The module contains a small length of On18 ore track with ore cars shuttling back and forth using an automated reversing circuit. Train Show attendees would peer into the tunnel, Cliff said, and remark that it had no walls or ceiling. Easily fixed by using the crack seal to create a lining. The “mold” for the lining is at the bottom in Fig 7 and the lining produced at the top.
Fig 8 Cliff Making His Own Mold
Speaking of molds, Cliff makes his own (Fig 8). He uses Castin’Craft Mold Builder liquid latex rubber sold at Michael’s and similar craft stores.
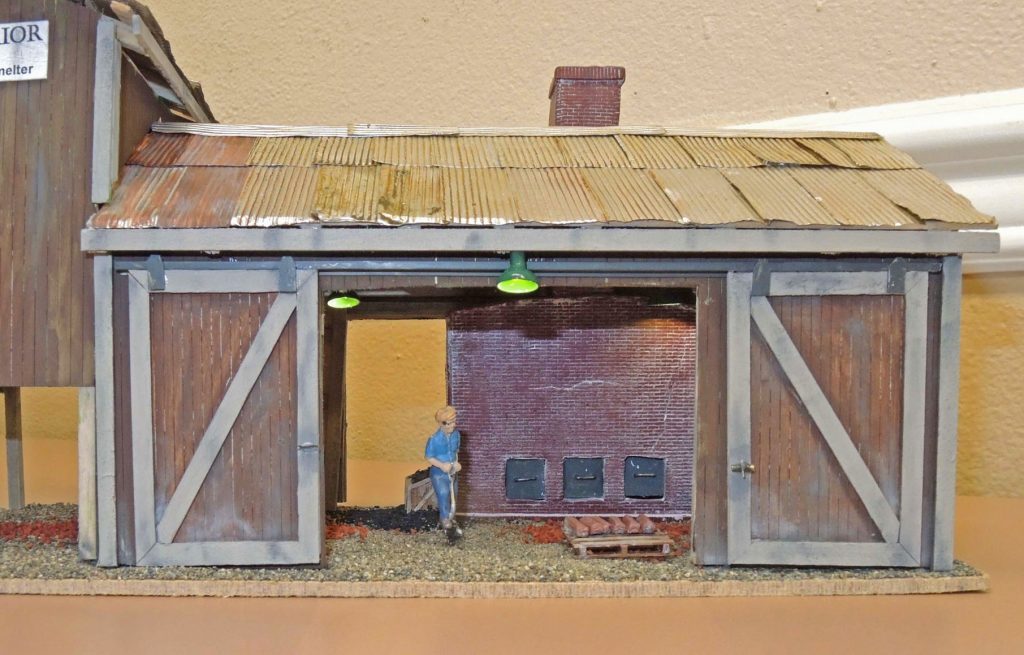
Fig 9 Cliff’s On30 Copper Smelter–See Text
Cliff has also used Quickcrete Concrete Crack Seal for creation of structural details. In Fig 9, a portion of a larger O-scale model of a copper smelter, Cliff used it to produce the furnace and chimney: beautifully done. The material accepts common acrylic craft paint—Cliff used Black Cherry to create the brick tones here. He earned a well-deserved NMRA Achievement Award for his copper smelter.
We will have some limited snacks and coffee available but it will probably go fast so plan ahead.
Entrance is through the rear doors (southwest side) not the main entrance on the street. Parking available next to the building and along adjacent streets.
Some local options available but our lunch break is only an hour. Highly recommend brown bag lunch for all participants.
Read on for more details on our clinics this year.
Ted Becker – Introduction to
Arduino
– What is Arduino? What can it do for me as a model
railroader? How does it work? How do I get started? How do I
learn more? There will be several projects on display and working.
Some of these projects you can do with off-the-shelf components and canned
software. Many model railroad functions can be done with more flexibility
and less cost with Arduino compared to other products. Bring your
questions. Bring a thumb drive so you can take home a lot of (hopefully)
useful information.
Jon Bentz – Updated L Girder Benchwork Construction – A different take on classic L girder design.
This will consist of Planning and layout of benchwork, photos of benchwork
constructed to date on my home layout, and full size samples of benchwork to
share with the group.
Didrik Voss – Create Your Own Virtual Railroad with Trainz – This clinic will explain
how to get started creating your own virtual railroad in Trainz. Didrik will show how he
downloaded the topographic maps for the Everett & Monte Cristo Ry, laid the track and
is currently creating buildings and structures based on photographs and Sanborn
maps.
Roger Johnson – Decoder
Installations & General Soldering – Roger Johnson will demonstrate decoder installations for
pre-screened projects. Prerequisite: If you would like to have a decoder installed in one of your
locomotives, email details to Roger at skagitrailbird@gmail.com no later than March 15th. Please include locomotive
(scale, maker, model, approximate year made) and decoder (make & model #,
if already purchased). Note: Depending upon time and the complexity of the project walk
up requests may (or may not) be accepted.
As time allows he will also demonstrate general soldering
of such things as LEDs and resistors, track and power bus, control panels,
multiple and other components and brass stock for framing signs.
Al Carter – Weathering With Pan
Pastels – How to use Pan Pastels to apply
weathering finishes and touches to both rolling stock and structures. We
will also look at how Pan Pastels can be used instead of paint to color
structures. You will have an opportunity to try your hand with this
technique, and if you want, bring a car to weather – Prequisite: Please first
spray your car with Dullcoat or a similar flat finish. This is approximately a half hour clinic,
followed by:
Al Carter – Improving The Appearance
Of Flex Track – How
to take that shiny plastic flex track and improve its appearance by applying a
base coat of acrylic paint (thanks, Martha Stewart!), then weathering the ties
with water based oil paints, then the rails, and finally the ballast.
Sample track will be provided so you can try your hand at this technique. This clinic is also approximately a half hour
long.
Russ Segner – Layout Planning – My clinic will focus on
some basic ideas helpful in planning a home layout. I will use several
layouts as examples with photos and track plans. It will be a Power Point
presentation with handouts. Questions will be welcomed. My home layout, The Coal Creek Lumber
Company, is point to point Sn3 lumber and mining and is built around the
perimeter of a 19 foot by 16 foot bonus room.
Rich Blake – Handlaid Turnouts and Soldering Basics – This clinic we will explore track soldering jigs (i.e. Fasttracks) and how to properly solder track and other electrical doo dads. Soldering is a craft that when done properly will last for many years, when done improperly will cause many headaches. This clinic will show you some best practices when using soldering equipment for model railroading. PREREQUISITES: If you want some real solder practice please bring a 40Watt or lower soldering iron and iron holder/stand if you have it. We will have solder/flux and other materials available for practice.
Don Jones – Passenger Car and
Caboose Lighting Options, using
LEDs, super capacitors, pickups and light boards – Included will be
“cheapo home made” wire and tube pickups for Athearn passenger
cars with modified Rapido light boards using LED’s and super capacitors.
Also to be
shown will be Streamline Back Shop pickups and light boards for Rivarossi
passenger cars and clones. Included will be examples of Voltscooter Electronics
light boards.
I will
bring examples of the Voltscooter and Streamline Back Shop boards installed in
Rapido and Walthers passenger cars. For the Walthers passenger cars I
will bring and example which uses the Owl Mountain pickup lug kit used to
improve the passage of current from the car trucks to the light board.
I will show
examples of the space saving KSQ2 miniature board which eliminates the need for
a separate resistor and diode rectifier when lighting DCC passenger cars.
Caboose
lighting with marker lights will be demonstrated using the Light It board from
NCE.
Consultation
services will be available for hard to light cars.
The Skagit Valley and Whidbey’s first 2019 clinic was an excellent event presented by Susan Gonzales.
SV&W’s Make and Take Clinician Susan Gonzales showing her coiled steel rolling tool.
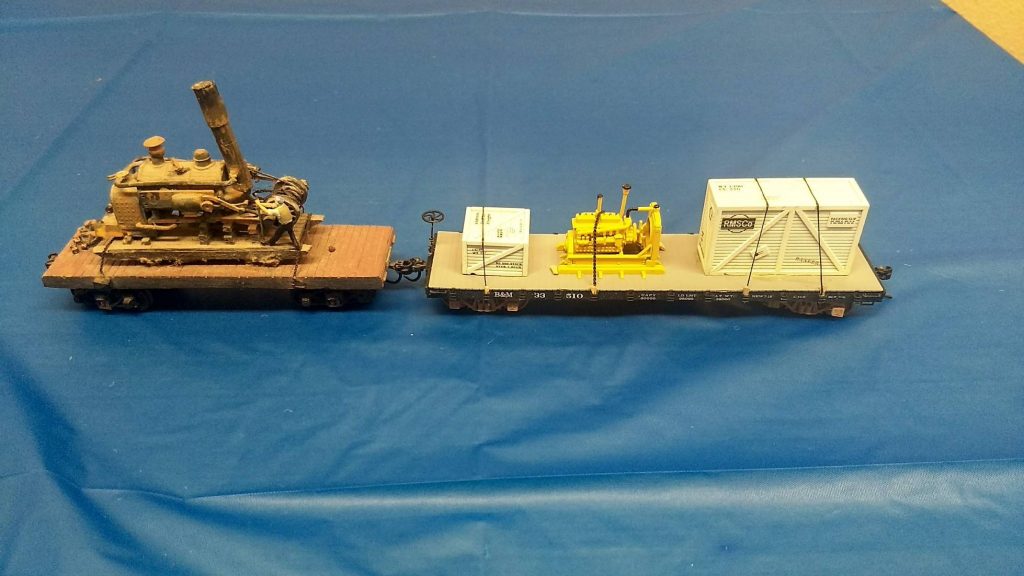
Our objective was to show various types of open car loads and explore different techniques for making loads using common materials found at box stores. We started out the clinic with a display of various clinic members cars and loads and some show and tell on each.
Mike Garcia brought two HO flat cars with a nicely detailed logging donkey and the other with diesel engine loads. All loads were tied down properly.
Curt Johnson had two HO cars for work train support. One car contained sets of ties all blocked and staked together and the other with sets of rail segments with blocking in between.
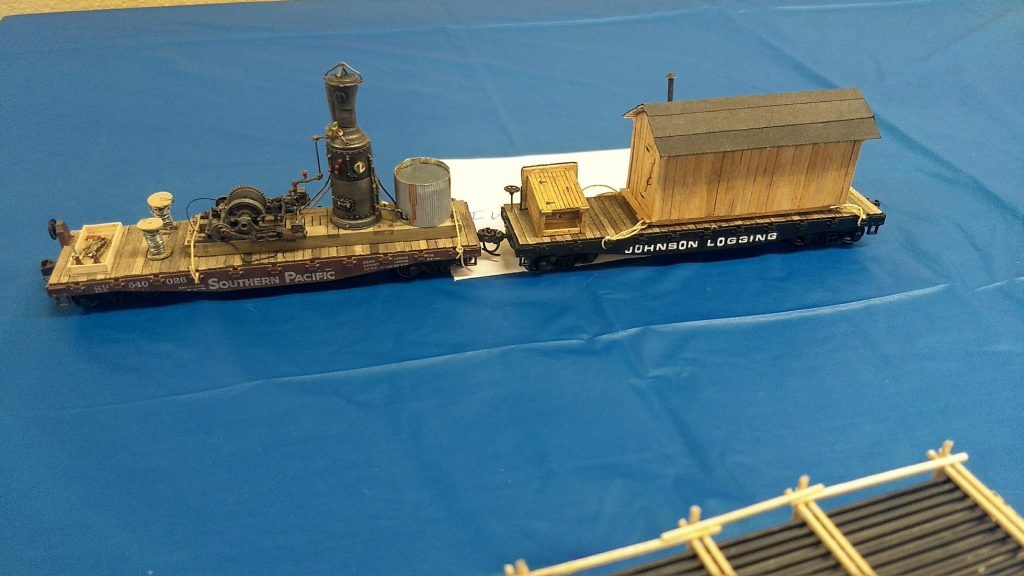
Curt’s dad Iver brought a couple HO logging support cars with a steam donkey load and a camp cabin load complete with outhouse.
Clinic Chair Rich Blake welcomed a jovial crowd of
32 to our annual holiday Wassail at the Summerhill facility in Oak Harbor. The large room there (pirated last month by
another group) was rightfully ours once again and definitely needed to accommodate
the dozens of groaning platters of snacks and sweets: It was not a Weight
Watchers meeting! Rich also welcomed
newcomer Mike Bernethy and we hope he
becomes another regular.
The evening’s diversion,
while attendees dug into the goodies on their paper plates, was a slideshow by
your reporter titled “No Problem, Sahib” presenting photographic
excerpts from his four trips to India between 1982 and 2005. “No problem, Sahib” was something the
traveler didn’t want to hear from the train’s conductor, the hired car driver,
or the hotel clerk. Because that
reassurance actually meant: you had a really big problem! Your train would be hours late or terminated
short of its destination; the road ahead was closed and the detour was 140
miles; or despite your reservation, you really had no room at the hotel and it
was full. Rail travel seemed
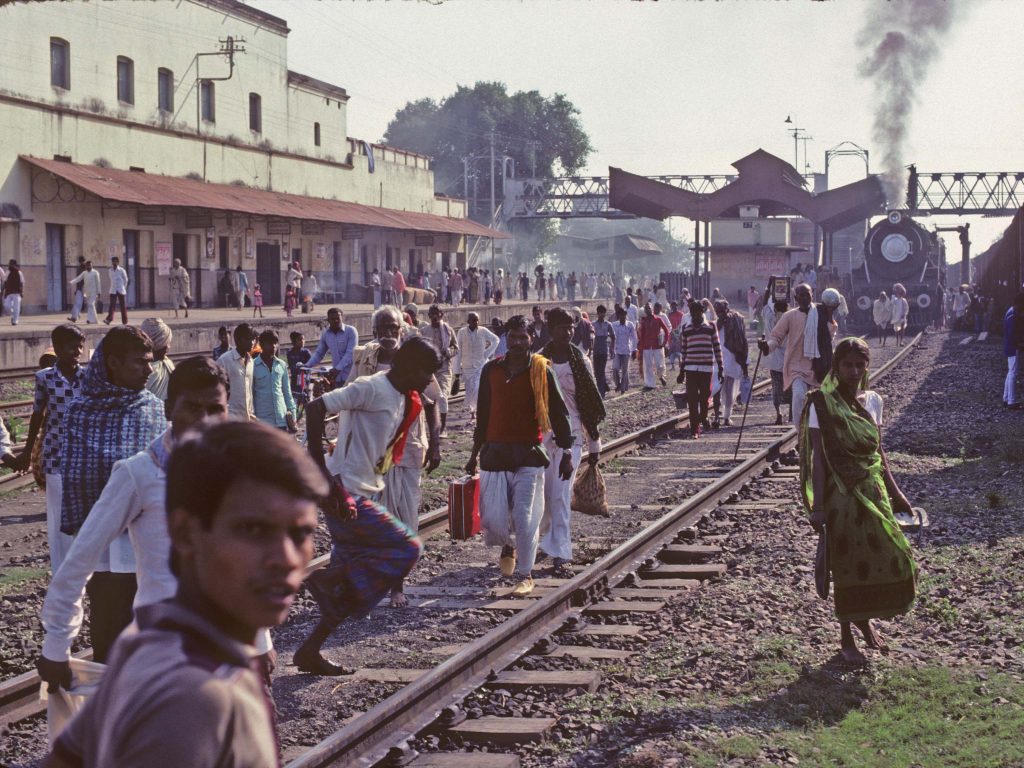
chaotic—because it was. Stations were
overflowing, as were the trains; even the tracks at busy junctions and stations
were used as footpaths home.
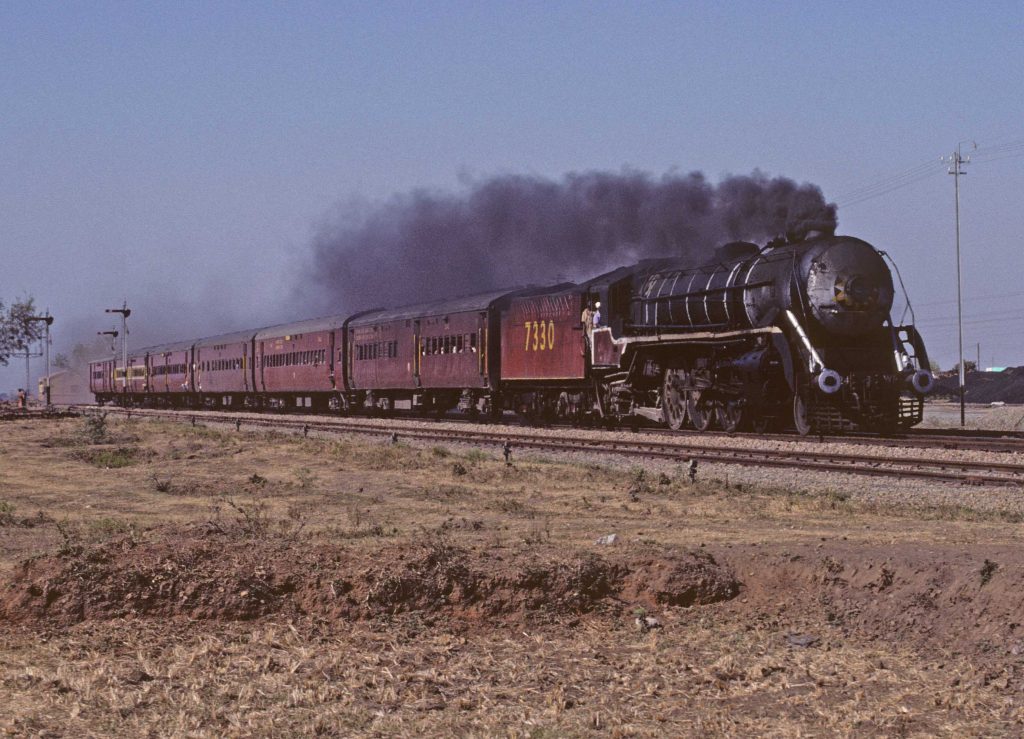
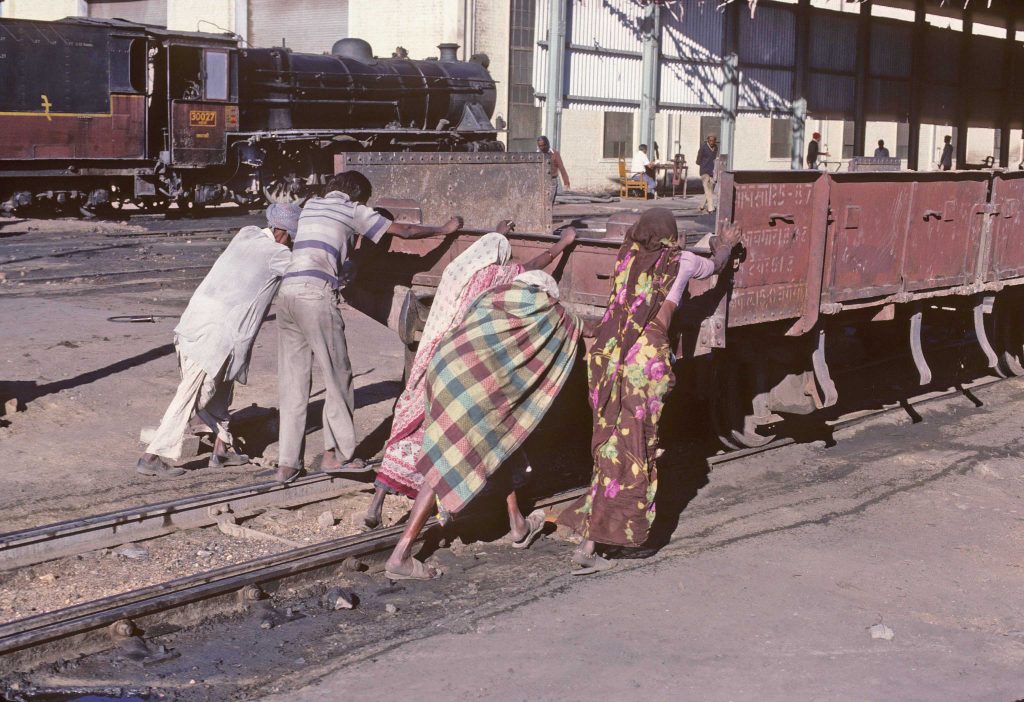
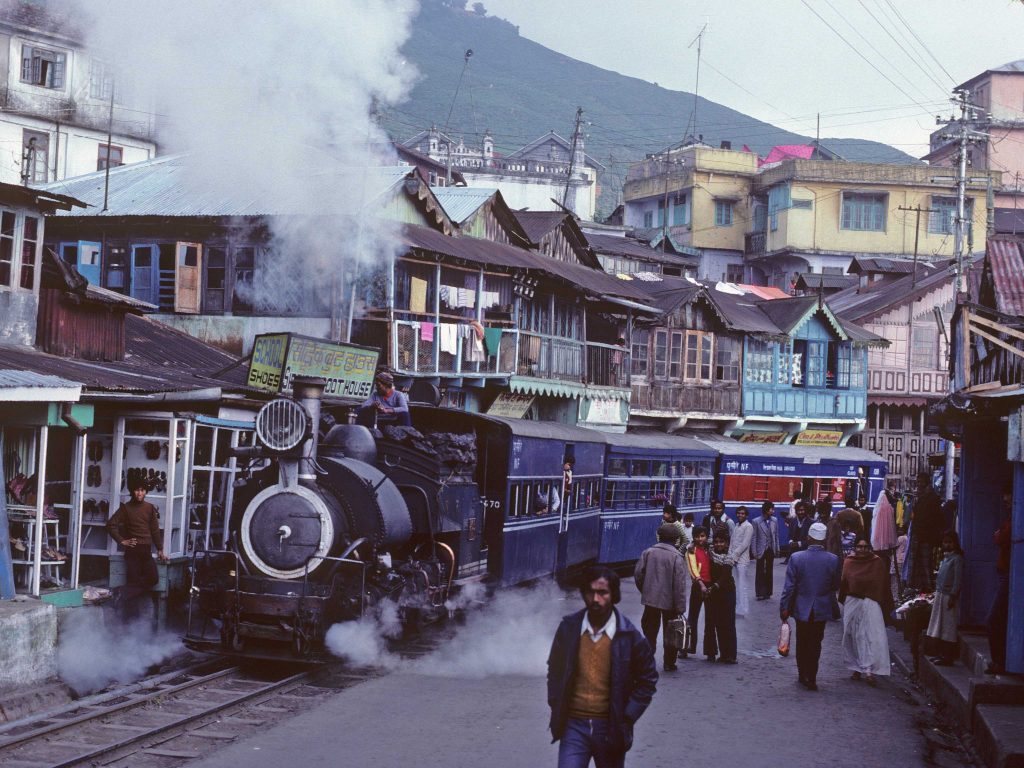
In the early 80’s steam still dominated, although dieselization and electrification had made inroads,and the remaining steam on India’s broad (5’6”) and meter gauges comprised mostly standard post-war classes. But itwas still possible to cross the subcontinent entirely behind steam, as your presenter did. The narrow gauge was another draw: hundreds of miles of mostly 2’6” gauge still remained 100-percent steam. Perhaps the most interesting of all was the world-renowned Darjeeling Himalayan Railway, the 2-foot gauge mountain-climbing gem in India’s far northeast, now a UNESCO World Heritage Site.
Maybe more than anything,
the rail enthusiast in India was simply overwhelmed by the crush of humanity;
the cities and even small villages which seemed to burst with people; the
poverty; the incessant toil of the country’s citizens. A handful of photos from the program may give
a flavor of Indian train travel during the years your writer traveled there.
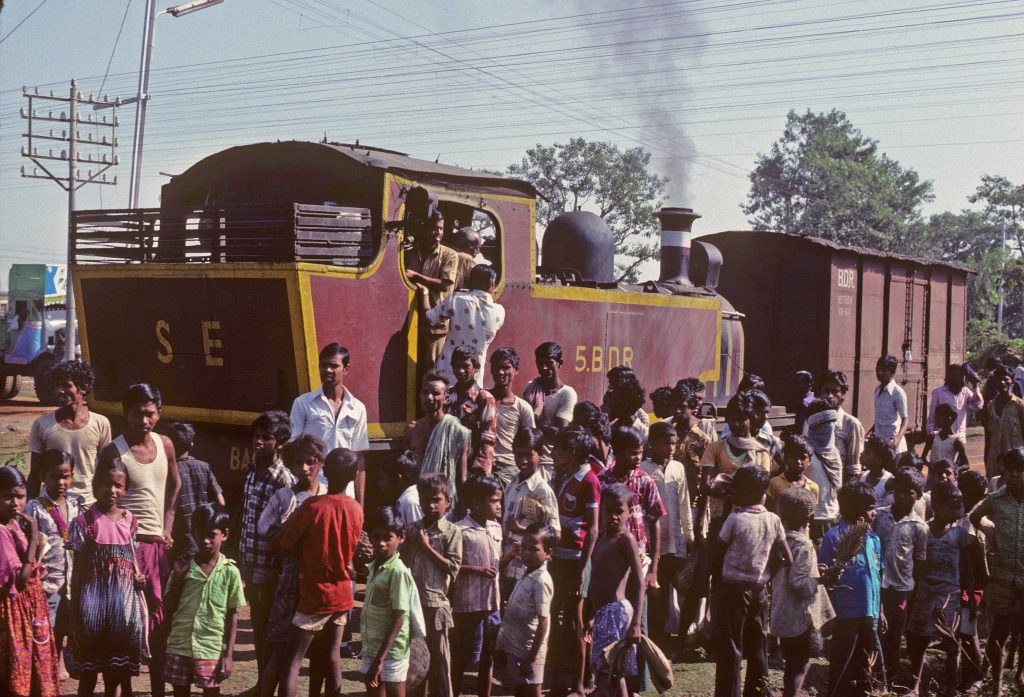
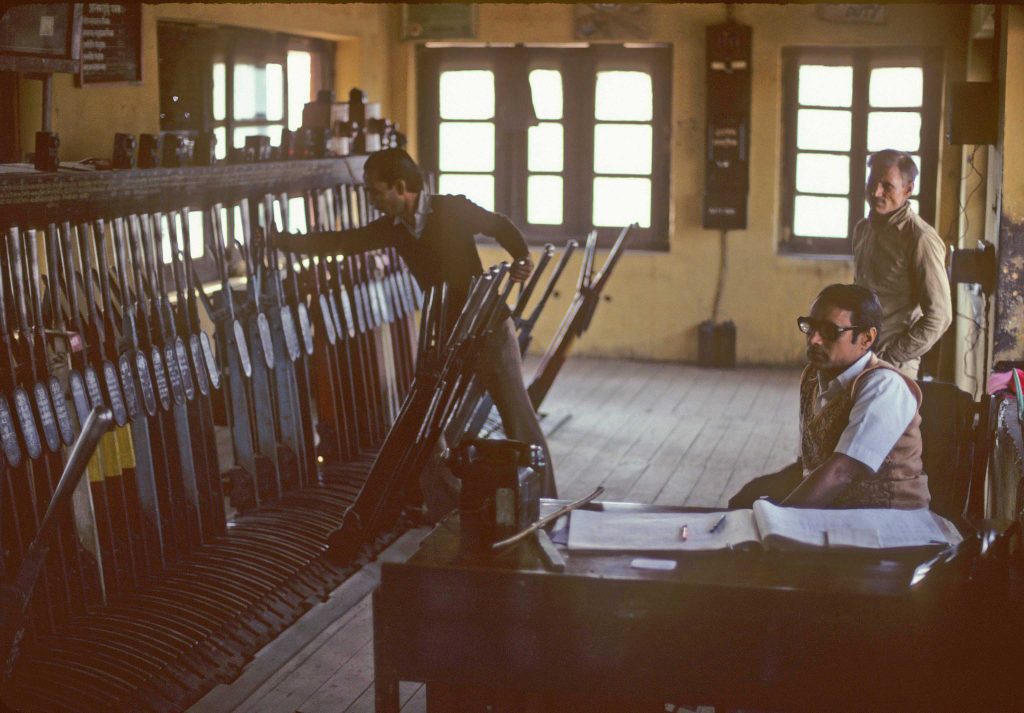
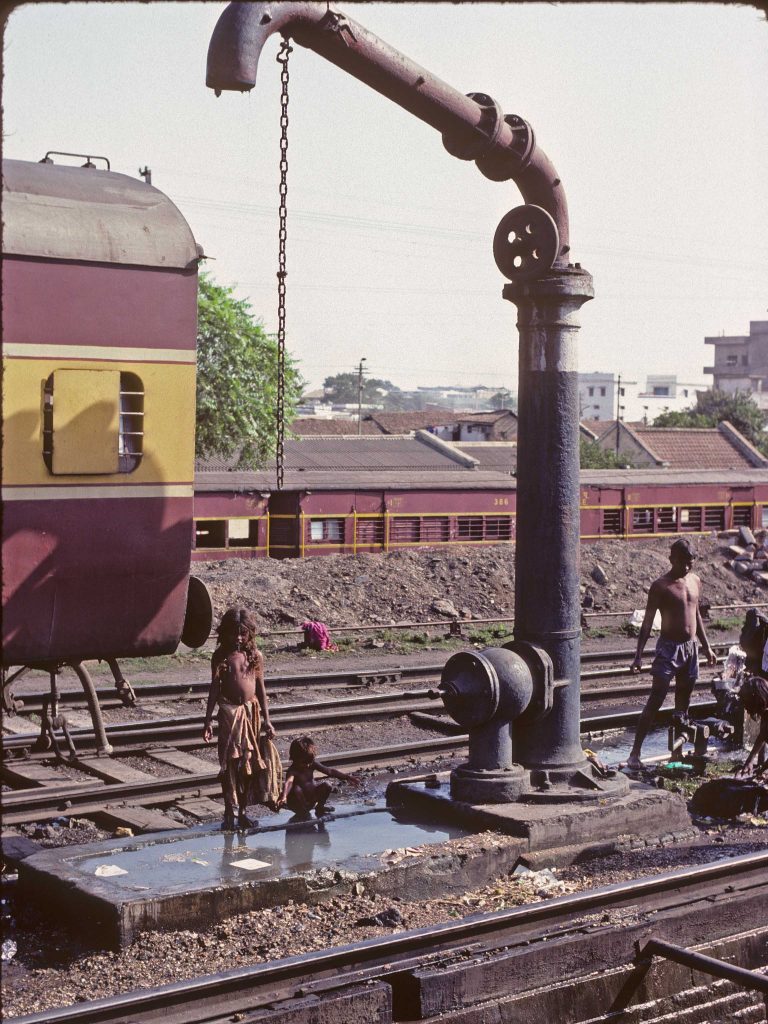
Fig 1 – A broad gauge station in 1982Fig 2 – Frustrations of Railfanning in India—Try to Get the Shot!Fig 3 – Typical Long-Distance Express in 1982 with a Broad-Gauge WP Pacific in ChargeFig 4 – Agra Fort Station, 1986; British to the Core, a Fully-Mechanical Lever FrameFig 5 – Convenient, and Clean Enough: Washing Up at the Water PlugFig 6 – An 0-10-0 Switching in Secunderabad; Count the Safety Violations!Fig 7 – Darjeeling Himalayan Rwy; the Classic Shot of the Train Climbing Through Kurseong Bazaar
Editor: This was a fascinating presentation by Rich and Linda Thom that provided a colorful glimpse into the widely (and dare I say “narrowly”) variable types of railroad subjects in India, a country still very much dependent on railroads for travel, commuting and commerce. All had a great time and again thanks to the Thoms for sharing their travel adventures.
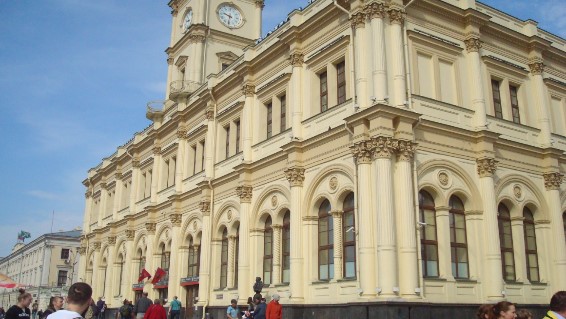
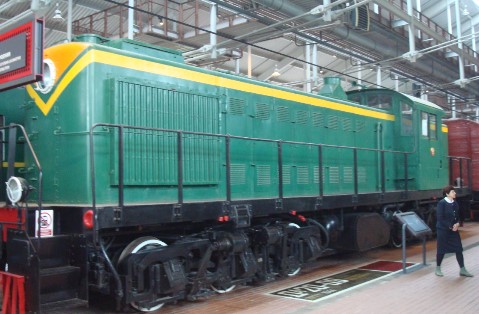
Our November meeting opened by finding ourselves rudderless—Chair Rich Blake was out-of-state on business—and room-less as well. Due to an overbooking our usual large meeting room at the Summerhill facility in Oak Harbor was well-filled by another group, who—possession being nine-tenths of the law–were not inclined to share. Some quick footwork by Susan Gonzales and others got us relocated into two smaller rooms, where a (covered) pool table in one soon found use as swap and snack table, and chairs moved into the second got us set up for the evening’s program. Cliff Aaker had brought the A/V equipment so were ready to go with Mark Malmkar giving an interesting and entertaining talk on the Railways of Russia. Mark had given this talk the week before at the Mt. Vernon Clinic to rave reviews, so we were pleased he was able to repeat it for our group.
An example of classic Russian architecture.
Mark and his family had a great opportunity to visit Russia for two weeks in May of this year, which included a railroad-themed tour of several stations, museums, subways and other facilities in both Moscow and St. Petersburg, as well as an overnight journey by train between those two cities. He showed over a hundred photos and we can’t reproduce them or the whole story that went with them here, but a handful are included below to give readers an idea.
Russian Alco RSD-1 C-C coupled loco provided under wartime lease agreement during WWII from the USA.
The Russian rail system of today, although contracted somewhat from its Soviet-era size, is 53,100 miles in length, most of which is built to the curious gauge of 5 feet. (For purists, it’s actually 1.520 meters or 4 ft 11 and 27/32 inches!) This wider than standard gauge was useful during both world wars by making it more difficult for Germany and its allies to run its trains into the Soviet Union, but it actually originated way back in 1841 with the construction of the Moscow-St. Petersburg route. Mark’s photos clearly showed the pride that the Russians have in both their current railway and its history. Stations are immaculate, with Moscow’s subway system being particularly famous for the ornateness of and artwork in its stations. Mark’s photos showed immense escalators in some of the stations; the longest is 413 feet long accessing a station 275 feet below ground. High speed trains have entered service on the mainline network as well.
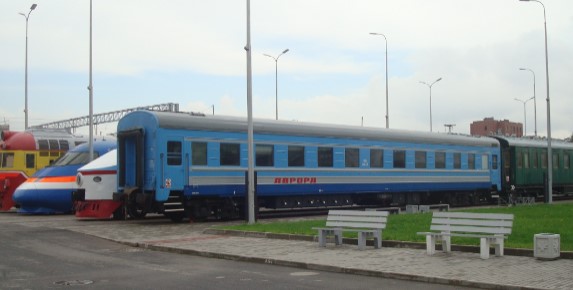
Russian Passenger train display.
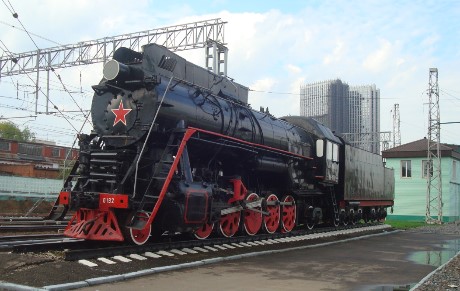
Rail history is well preserved in several museums. One relatively new one, dating from only 2009, in St. Petersburg would take a full day or more to see properly, Mark said. Interpretation is presented in several languages so foreign visitors can read about the full history and use of displayed locomotives and rolling stock. Mark was surprised to find some remaining steam locomotives in apparent ordinary use, although most, as elsewhere, are found on excursions. Russian steam was famous not only for its variety but the large numbers (by European standards) of locomotives built of single wheel arrangements. Ten-coupled locos, 0-10-0’s, 2-10-0’s, and 2-10-2’s predominated; a staggering 17,400 2-10-0’s were built in several classes (this total included over 2,000 decapods from Alco and Baldwin, the Amerikanskiis).
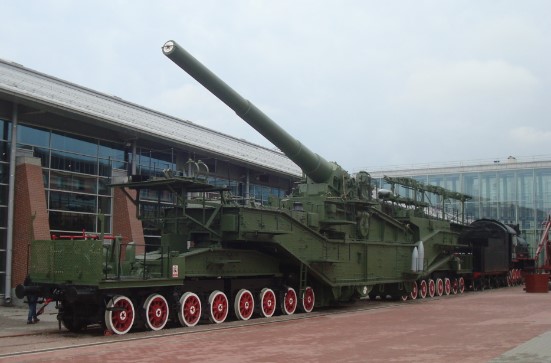
Big 2-10-2 Russian Decapod
Mark’s visit happened to coincide with a May 6th military parade, which he and his family were able to view comfortably from their hotel room window—a seemingly endless procession of rocket launchers and other hardware, including remotely-piloted tanks and helicopters enlarging on the drone concept. Many thanks to Mark for a fine program about the railways of Russia, a place that not many of us may get to.