Rich Thom, photos by Rich Thom
Clinic Chair Rich Blake welcomed 28 other folks to the Skagit Valley & Whidbey Clinic’s April meeting at the Summer Hill facility in Oak Harbor. Attendance this season continues to be strong, so planning next season’s program was up front and center, with Program Chair Susan Gonzales requesting further ideas. She and Rich have already fleshed out some of the program, with Russ Segner presenting in September, the ever-popular Mini-Clinics in October (five or six 15-minute clinics by our own talented members), and a reprise of the Model Contest in February. The theme for next season’s contest will be flatcars with loads, any scale as usual. Jack Tingstad, volunteering as contest shepherd, said that the contest rules will be presented at the September meeting, but broadly either a flat car must be scratch built, or a load (or both). There will be a humor award as well as others. Get a-building now!
Without further ado, Rich introduced well-known model building artisan Al Carter for the evening’s clinic on how to apply distinctive period signs to buildings, of brick, wood, stone, or any other material. Al uses three techniques: (1) dry transfer lettering; (2) thin paper method; and (3) decal method, often combining them on the same model.
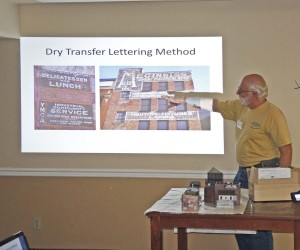
Fig 1 – Al Carter introduces the dry transfer method
The Dry Transfer Lettering Method uses self-adhesive letters available at stationery or craft stores. The letters are used as masks, rather than applying them to a wall and leaving them in place. Start by painting the wall:
- Choose your base structure color
- Spray on primer (rattle can or air brush)
- Add mortar
- Add weathering (optional at this point)
After the wall is prepared, select the location for lettering and:
- Mask wall so area of lettering is exposed (all other areas covered)
- Paint with desired color of letters, usually white; use a spray-on primer for this step, not a craft paint, for better adherence
- Add individual lettering (note the letters can be any color you can find since they are removed later)
- Paint over letters, usually black; craft paint can be used for this step
- Carefully remove letters
- Remove masking
- (Optional) Lightly sand or scrape sign to reveal wall material—brick or wood—to simulate a well weathered sign
The end result is white lettering on a black background. See the excellent example in Figure 2. (You can also create black lettering on white, or use other colors, but white on black was most common.)
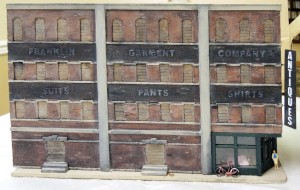
Fig 2 – Signage on Al’s Franklin Garment Co. building
The Thin Paper Method makes use of color reproductions of signs that can be found in multiple sources including magazines and on-line. The trick is to print them on very thin paper so that the signs, when glued to the structure, conform – or “snuggle on” – to the texture of the building wall.
- Select sign graphic—from magazines, internet, books, your own artwork
- Copy on thin paper
- Carefully cut ou
- Apply 50/50 white glue/water to backside
- Place sign
- Carefully press into place with damp sponge
- Weather to suit
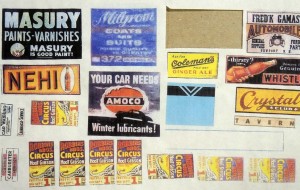
Fig 3 – Some of Al’s signs printed on thin paper
Several kinds of thin paper are suitable, but it may take some experimenting. Al uses “flimsy” paper he obtained many years ago, but others will work, too. Ted Becker said that he has had good results with the tissue used with gift wrapping. Other options are “onionskin,” tracing paper, and airmail paper. Whatever you try, the next challenge is: will the thin piece of paper run through your printer without jamming? The only way to find out is to try. If it doesn’t, Al suggested that you can tape the thin sheet to a carrier sheet – a piece of ordinary copy paper – and run it through your printer that way. Another hint: whenever Al obtains a new kit or sheet of signs, he always makes a copy on his home copier of the signs so he has a backup in case of errors made with the original. A terrific example using the thin paper method is shown in Figure 4.
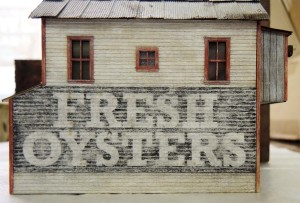
Fig 4 – One of Al’s buildings with sign created by the thin paper method
The Decal Method is essentially the same technique that modelers use to letter rolling stock except that the decals are just substantially larger.
- Select sign decal
- Apply decal
- Use setting solution; on hydrocal buildings, use lighter fluid (extinguish cigars before performing this step)
- Carefully press into place with damp tissue or sponge
- Seal with Dullcoat (or alternatives—see below)
- Weather to suit
Some sources for sign decals include Art Griffin Decals (www.artgriffindecals.com), T2 Decals, and Largemouthlodge Decals. The latter two suppliers do not have websites, but both sell on Ebay under those seller names. Do an Ebay search (in model railroading) on Ghost Signs.
Al has also experimented with various dulling finishes, and has found that an even flatter finish than the popular Testors Dullcoat is another Testors product named Modelmaster Lustreless Flat.
Two of Al’s buildings with signs applied using decals are shown in Figures 5 and 6.
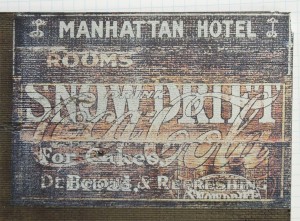
Fig 5 – The Manhattan Hotel overlaid signs, a decal by Art Griffin Decals
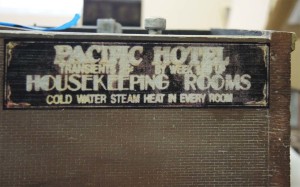
Fig 6 – Another sign created using an Art Griffin decal
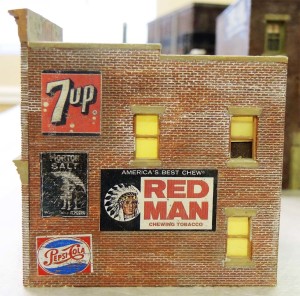
Fig 7 – Side of one of Al’s buildings with signs made by a number of methods
Al concluded by noting that these methods can be used in combination, such as in Figure 7. The Pepsi sign is a Woodland Scenics dry transfer; the Morton Salt sign a decal; and the Seven Up sign a thin paper example. The Red Man sign is a paper sign that was slightly sanded on the back (but not as thin as a thin paper sign) so it doesn’t conform to the bricks as well,
Never one to leave the stage without an encore, Al showed pictures from his and his wife’s recent cruise to Brazil. No flash pix of Rio or Carnival here, just photos of cluttered and well-weathered rooftops on wharf side buildings for modeling inspiration. Al really knows how to enjoy his vacations!
